QuietStove.com

Showing posts with label bushbuddy. Show all posts

Friday, March 9, 2012

BushBuddy vs Ti-Tri Cone

Recently, I reviewed the Ti-Tri Cone and the BushBuddy Ultra.  Today, I thought I'd do a quick comparison of the two.

A Ti Tri Cone (Sidewinder type), left, and a BushBuddy Ultra, right. 
First, let me say right up front, that these are two really good quality wood burning stoves.  They're both well designed, well constructed, and a pleasure to use.  If you're in the market for a wood burning backpacking stove, I have no problem commending either one to you.  However, as with all stoves, one or the other will work better for a given individual, depending on that individual's situation and style.  So, let's compare!

Quality of Workmanship
Both have excellent build quality, but the BushBuddy Ultra is a tour de force in craftsmanship.  It is just really well put together by someone who clearly is a master fabricator.    I used this photo in my review, but it's so illustrative that it bears repeating.
The wonderful craftsmanship of a BushBuddy Ultra
Just look at the regularity of the spot welds.  My information is that those are all done by hand (!).  Now, that's craftsmanship.  Of course we're here to burn wood not put something up on the mantle as an art piece, but still, one can't help but admire the workmanship of the BushBuddy Ultra.

Note that the BushBuddy's craftsmanship in no wise puts the Ti-Tri Cone in a bad light.  The Ti-Tri Cone is a well made product.

Packability
The Ti-Tri Cone has a clear edge here.  The main cone, inferno option inner cone, and floor roll up into a little package.  Now, that's pretty sweet.
The main cone, inner cone ("Inferno Option"), and the floor.
The fire grate fits on the floor of the pot; the two tent stakes fit inside the rolled up cone; the wire support for the grate rolls up and stores next to the rolled up cone; and there's still room inside for more.  I can toss in a lighter, measuring cup, alcohol stove, spoon, a couple of ESBIT cubes, etc.
A packed up Ti-Tri Cone (left).  A packed up BushBuddy (right).
By contrast, a BushBuddy in the pot means you generally won't get too much else in the pot.  Now, don't get me wrong.  The BushBuddy's trick of simply rotating the pot supports 180 degrees and storing them within the body of the BushBuddy is brilliant, but the BushBuddy just isn't as compact as a Tri-Ti Cone.
The BushBuddy's pot supports rotate 180 degrees and store inside.
You can fit an alcohol stove or some ESBIT inside, but the BushBuddy isn't quite as space efficient as a Sidewinder Ti-Tri Cone.

Ease of Set Up
The BushBuddy is a snap.  Pull out the pot supports, rotate 180 degrees so that the pot supports point up, and set the pot supports in the grove that runs along the top of the BushBuddy.  You're done.  It might take all of about 30 seconds, if that.  On the other hand, the Ti-Tri Cone has an outer cone to assemble, the floor to emplace, the wire roll to position, the grate to set atop the wire roll, the inner cone must be connected, and the two tent stakes must be slid through their respective holes,  Clearly the BushBuddy is the winner here.

However, we're talking about a wood fire here.  Compared to gathering wood, building a fire lay, and getting a fire started, I don't think either set up is particularly bad.  In the context of the amount of work that a wood fire requires, the set up on either one is not a big deal.

Ease of Take Down
As you might expect, it's more work to pack up a Ti-Tri Cone with the Inferno Option.  I don't think it's a huge hassle, especially after you've done it a couple of times, but it is more work.  The one thing I do notice is that my hands get dirtier when taking down a Ti-Tri Cone after wood burning.  I guess one just needs to be prepared for that and pack some baby wipes.

Ease of Cooking
The real difference here is capacity.  Even though the Ti-Tri Cone packs smaller, it sets up larger.  The larger capacity means you load once for a boil.
The Ti-Tri Cone (left) has a much larger fire box than the BushBuddy (right).
The smaller BushBuddy needed to be fed repeatedly while in use in order to get a boil.  If you're wanting to do cooking that requires coals for even heating, the Ti-Tri Cone holds more coals and provides more sustained, even heat.  I've been able to prepare things like a four egg omelet, which is pretty thick when cooked in a small backpacking type pan, without any problems on a wood-fired Ti-Tri Cone.
An omelet prepared on a wood-fired Sidewinder Ti-Tri Cone
Non-Wood Use
OK, here's where the Ti-Tri Cone just plain beats the BushBuddy.  Yes, you can kludge up a way to run an alcohol or ESBIT stove with a BushBuddy, but it really doesn't work that well, particularly in wind.
An alcohol stove in use with a BushBuddy.  It works.  Kind of.
On the other hand, the Ti-Tri Cone is an alcohol stove set up of the first order.  The Ti-Tri Cone is also an excellent ESBIT set up.  Really it is excellence in non-wood mode that sets the Ti-Tri Cone apart.  The BushBuddy is great if you're going to be able to burn wood a high percentage of the time and only occasionally have to burn alcohol or ESBIT.  If however you're going to do any significant portion of a trip with non-wood fuels, the Ti-Tri Cone wins hands down.

Wind Resistance
The Ti-Tri Cone system uses the highly effective Caldera Cone as its pot support and windscreen.  Except for the handle cut out, the pot has no gap between itself and the upper edge of the windcreen.
The tight fitting Caldera Cone windsreen.  
On the other hand, the BushBuddy has a 360 degree gap that allows wind to sweep through.
There is a gap that wind can blow through between the pot and the stove with a BushBuddy Ultra.
With wood, efficiency is a little less critical since if the wind blows away your heat you can presumably just add some more wood to make up the difference.  In higher winds, a stove without good wind resistance can be a problem.

If one is using alcohol or ESBIT, then wind resistance is quite a bit more critical.  The Ti-Tri Cone is the clear winner in the wind resistance category.

Weight
Just below, I've put down the weights corresponding to the various modes that one could run a Ti-Tri Cone in.  These weights are measured on my kitchen gram scale.  Note that I'm using a Ti-Tri Cone sized for a 1300ml Evernew pot which does not need stakes when used with alcohol.  Smaller pots will require the use of stakes.  Each stake weighs 7g.

Ti-Tri Cone   Grams  Ounces
Full Wood Mode (Inferno Option) 126 4.44
Minimum Wood Mode (with floor) 77 2.72
Non-LNT Wood Mode (no floor) 59 2.08
Alcohol Mode (no stakes) 60 2.12
ESBIT Mode (with stakes) 57 2.01

By contrast, the BushBuddy weighs 139g/4.9 ounces on my scale.  No matter what configuration in which the Ti-Tri Cone is used, the Ti-Tri Cone is lighter.

Keep in mind also that you'll need a windscreen for the BushBuddy if you use alcohol or ESBIT.  The weight of a windscreen will add weight to the above listed weight.

Pot Stability
Both stoves provide good pot stability.  I'd say the edge goes to the Ti-Tri Cone, particularly in sloping or uneven terrain.
Two Evernew 1300ml pots on (left) a Sidewinder Ti-Tri Cone and (right) a BushBuddy Ultra.  The Ti-Tri Cone is more stable in varied terrain.
Price
The Bushbuddy Ultra is $120.00 Canadian Dollars including shipping to addresses within Canada and $128.00 Canadian Dollars including shipping to the United States including Alaska and Hawaii.  No pot is included.

The price of a Sidewinder Ti-Tri Cone will vary with the options you select.  For the full wood burning set up listed below, the price is $130.00 US dollars which does not include shipping.  No pot is included, but a 20% discount is offered if you buy a pot along with the Ti-Tri Cone.  Shipping to my location is $6.37 for the below listed components.  Shipping to your location may vary.  California residents must pay sales tax which I believe is 7.6% in the county where Trail Designs is located.

The BushBuddy is slightly less and includes shipping but the Ti-Tri Cone set up includes more, and Trail Designs offers a 20% discount if you buy a pot for your set. Take your pick.

Sidewinder Ti-Tri Cone Component List
a)  Sidewinder Ti-Tri Cone (outer cone)
b)  Two titanium tent stakes
c)  12-10 alcohol stove
d)  "Gram Cracker" ESBIT stove with drip plate
e)  Inferno insert (inner cone)
f)  Fire grate and wire support
g)  Floor
h)  Tyvek sacks to house the various components.
i)  Fuel bottle (for alcohol)
j)  Small measuring cup (for measuring alcohol)

LNT Considerations
I have experienced some scorching of the ground after using the Ti-Tri Cone for an extended period of time (long periods of testing with multiple items cooked in a row) despite using the floor.  I have not experienced scorching with normal use.
Superficial scorch mark left on the ground by a Ti-Tri Cone
The scorch marks are very shallow and easily removed, but one should clear the ground before use and inspect the ground after use.

I have experienced no scorch marks when using a BushBuddy Ultra.  Indeed, the bottom of a BushBuddy doesn't even get hot while in use.

It's also worth mentioning that with either stove, fuel consumption is far less than with an open fire.  Using less fuel means that there is less impact on the environment.

Flexibility
Here, the BushBuddy wins, no question about it.  With the BushBuddy, you can use pretty much any pot, kettle, or pan.
A BushBuddy Ultra with a 1300ml Evernew pot
The same BushBuddy with a 1000ml Snow Peak pot
Note however that if you want to pack the BushBuddy in your pot that you'll need a relatively tall pot.  A BushBuddy will not fit in a shorter pot.  The BushBuddy Ultra is sized to fit well in a Snow Peak Trek 900 pot.
A BushBuddy Ultra will not fit in, for example, an Evernew 1300ml pot.  A taller pot is needed.
With a Ti-Tri Cone, you are generally restricted to whatever pot the Cone was built for.  Each Ti-Tri Cone is sized for a particular pot.  The Ti-Tri Cone seen here is sized for a 1300ml Evernew pot.  However, I have been able to balance a pan on top of the edges of the cone.  In other words, I actually have a few more options than just the pot the Ti-Tri Cone was made for.
Cooking scrambled eggs in a pan placed on top of a Ti-Tri Cone
Note:  I would not try cooking with a pan placed on top of an aluminum Caldera Cone.

Conclusion
Overall, I prefer the Ti-Tri Cone because of it's lighter weight, greater capacity, better packability, wind resistance, better stability, and ability to run equally well on wood and non-wood fuels.  Particularly where I live where wood fire bans are a fact of life, the ability to run equally well on wood and non-wood fuels is key.

Moreover, I would think that for anyone who camps both above and below tree line that the Ti-Tri Cone would be the wood burning stove of choice.

So, there you have it, a quick look at the BushBuddy Ultra and the Ti-Tri Cone in terms of how they compare to one another.

I thank you for joining me on another Adventure In Stoving.

HJ

Acknowledgments
The two stoves featured in this comparison were provided by BPL members Christian D. and Randy N.  Thank you to Christian and Randy!

Other wood fired backpacking stove posts:

Posts on the Caldera Cone:

Saturday, February 11, 2012

The BushBuddy Ultra

Well, Saturday.  Time to get out on the trail!  :)  I'm looking forward to testing a new wood stove.

Heading up the trail
Arriving at the creek, I see some recent blow down.  The fuel depot is open.  :)

Plenty of fuel
It only takes a minute to gather enough wood for a wood stove, a distinct advantage to just using a pot over an open fire.

Fuel for today's tests
And today's stove?  The BushBuddy Ultra.

The BushBuddy Ultra
The first thing to note is that a BushBuddy Ultra is a tall stove.  You'll need a pot with some height in order to be able to put the stove in the pot.

Here, I'm using a Snow Peak 1000ml pot which has a frying pan type lid.  Without this lid, I couldn't store a BushBuddy Ultra inside a pot with these proportions.

A 1000ml Snow Peak pot with a frying pan type lid will hold a BushBuddy Ultra
 A BushBuddy Ultra pretty much needs to be stored upright.  It won't even begin to fit in my pot sideways.

A BushBuddy Ultra will not fit sideways in a 1000ml Snow Peak pot
A wide, short pot without a frying pay lid may have trouble accommodating a BushBuddy Ultra.  For example, an Evernew 1.3L pot cannot hold a BushBuddy Ultra.  You really need a taller pot.

A BushBuddy Ultra will not fit upright in a wide, short pot like this 1.3L Evernew pot
Neither can you lay the stove on its side.

A BushBuddy Ultra will not fit on its side in a 1.3L Evernew pot
Well, let's pull that BushBuddy out of the pot and have a look.  The pot support cleverly fits upside down inside the body of the stove.

A BushBuddy Ultra with the pot support upside down stored inside the body of the stove.  
Note the grill in the above photo.  This is important.  The grill keeps the wood off the floor of the stove, allowing air to flow up from underneath during a burn.

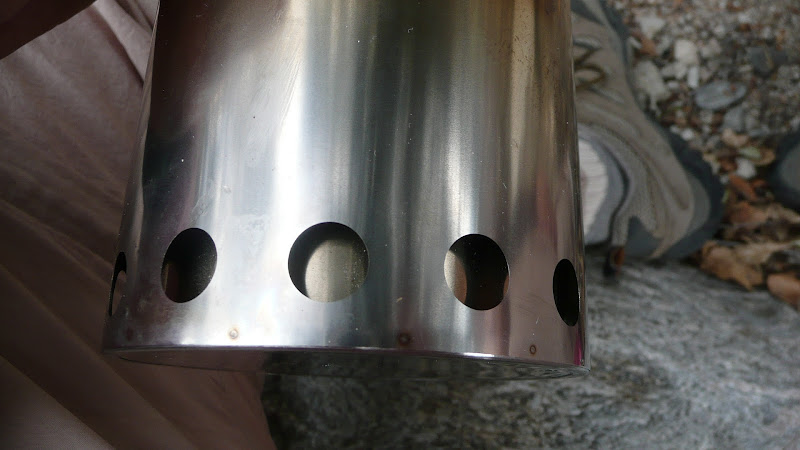
Pulling the pot support out, I notice a row of vent holes just below the rim of the stove.

Note ventilation ports just below the rim of the stove
There are more vents on the outside at the base of the stove.

On the exterior, there are additional ventilation ports at the base of the stove.
Basically, the BushBuddy Ultra is a chimney type stove.  Cooler air enters from outside at the base, is heated between the inner and outer walls of the stove, and as the air is heated, it expands and accelerates out the ventilation ports just below the rim of the stove in the interior, causing a strong inflow of oxygen rich air.  It's a pretty good design.  Someone obviously knew what they were doing.

The pot support rests on the rim of the body of the stove.

The pot support emplaced on a BushBuddy Ultra
The pot support has a gap in it that can be seen at the left in this photo.  Additional wood can be inserted through the gap during use.

Looking down from above on a BushBuddy Ultra.  Note gap in pot support at upper left.
Taking a step back from the details, the first thing I notice is the craftsmanship.  Everything is really well made and well put together.  Just look at how regular the pattern of the spot welds is on the bottom of the stove.

The base of a BushBuddy Ultra
This stove is not something that someone just slap dashed together.  This is a well thought out stove with truly excellent build quality.  A lot of labor clearly goes into the manufacture of these stoves.

Well, let's fire her up!

A BushBuddy Ultra starting a burn
Today, I'll be testing with a 1.3L Evernew pot with 500ml of cold creek water.

A 1.3L Evernew pot on a BushBuddy
A 1.3L pot like the Evernew is a little bit wide for the BushBuddy, but I found the BushBuddy to be reasonably stable.  I was careful to pick fairly level ground.

One thing I notice with a BushBuddy Ultra is that it's a little hard to predict where the flames will come out.  This make it a little tricky to keep the pot handles out of the flame.  I found that by simply watching the burn and periodically repositioning the pot as needed kept the pot handles reasonably cool.

Flames can arise from any point around the perimeter of a BushBuddy Ultra
The other thing I found during testing was that one load of wood wasn't enough to boil 500ml of cold creek water.  I had to reload the stove.  It's possible to insert some wood through the gap in the pot support.

Inserting additional wood through the gap in the pot support
However, to really get even loading, I found it easier to remove the pot.  If one is inserting wood through the gap in the pot support, it's important to watch the ends of the sticks you insert.  Burning bits can fall of the ends of the sticks.

Burning ends of sticks can fall out if wood is inserted through the gap in the pot support
When additional wood is inserted, the excellent ventilation of the BushBuddy Ultra quickly causes the additional wood to become part of the fire.

The excellent drafting qualities of the BushBuddy Ultra quickly cause inserted wood to ignite.
I didn't time it, but I was quickly able to get a good boil using the BushBuddy Ultra.

Boiling water on a BushBuddy Ultra
Now, here's one of the nice things about a wood stove:  There are more heat settings than just "boil."  I let the wood burn down to just coals.

Coals in a BushBuddy Ultra
Then I add my noodles. 

Preparing noodles over coals
I add a few dried vegetables.

Adding vegetables to the mix
And a few minutes later, everything has re-hydrated nicely.

Nicely hydrated noodles and vegetables
And the best part?  No scorching, and no burning.  It's wonderful to have multiple heat settings on a stove.

And after the burn?  Nice, complete combustion.


The white ash of thorough combustion.
In short, the BushBuddy Ultra is a really nice wood burner.  It has a fairly small combustion chamber, so you do have to add wood while a boil is in progress, but no big deal.

Of course, there are times when you can't burn wood every meal.   For example, sometimes fuel is scarce (or wet) or perhaps you're at too high of an altitude or perhaps you're in such a popular area that wood fires are restricted.  Whatever the reason, there are times when wood fires just aren't going to work out.  With the BushBuddy Ultra, do you have a plan "B?"

To find out, I thought I'd try a quick experiment with an alcohol stove. 

An alcohol stove resting on the grill of a BushBuddy Ultra
Using a Trail Designs 12-10 alcohol stove and 0.75 fl. oz. of SLX denatured alcohol, I thought I'd try to boil 500ml of cold creek water. 


An alcohol stove burning inside a BushBuddy Ultra
Normally, I'd expect 0.75 fl. oz. of SLX denatured alcohol to bring 500ml of cold creek water to a boil.  It didn't. 

I added an additional 0.75 fl. oz. of SLX denatured alcohol and re-lit the alcohol stove.  This time, toward the end of the burn, I got a boil.  Not a strong boil, but the water did boil.

A weak boil was achieved with 1.5 fl. oz. of SLX denatured alcohol
In other words, it took 1.5 fl. oz. of SLX denatured alcohol just to get a rather uninspired boil.  So, do you have a plan "B" with a BushBuddy Ultra?  Well, yes, but the BushBuddy Ultra really isn't an alcohol set up.  The BushBuddy's strength is wood burning.  While the BushBuddy Ultra can be run on alcohol, it doesn't work all that well.  The BushBuddy Ultra is a wood burning stove and is best used for that purpose.

I didn't get a chance to test with hexamine (e.g. ESBIT), but I believe the results will be similar to running with alcohol.  The best use for a BushBuddy Ultra would seem to be for trips where you can almost always burn wood and then go to a secondary fuel only if you really have to.

Are there other ways to use the BushBuddy with non-wood fuels than what I've shown?  Of course, and I think they're worth exploring.  However, a simple substitution (as done above) of an alternative fuel did not produce good results.  Got a better way?  Lay it on me.  :)

CONCLUDING REMARKS
Cooking with a wood fire using a stove is so much easier than using an open fire.  There's also much less chance of starting a wildfire given the contained nature of a wood stove and the complete nature of the combustion, and there's very little trace left when you're done.  Having tested a couple of wood stoves now, I really wouldn't consider going back to an open fire for cooking except in an emergency.

I have to say that it was a real pleasure to be able to use a BushBuddy Ultra.  Special thanks to Christian D. for the loan of his BushBuddy Ultra for this testing. 

Thanks for joining me for another Adventure in Stoving.

HJ

Other wood fired backpacking stove posts:


Appendix
BushBuddy Ultra,
Weight ..... 139g/4.9oz
MSRP  ..... $120.00 CAD including shipping within Canada.  $128.00 CAD for shipping to the US including Alaska and Hawaii*

Per the bushbuddy website:  All stainless steel construction, with an outer shell of .004" fully hardened 304 stainless steel,  firebox walls of .010" annealed 304 stainless steel, and a hand made grate of nichrome wire for long life with minimum weight.

*Note that prices are in Canadian Dollars not US Dollars.