Investigations into and adventures with backpacking stoves including solid fuel (e.g. ESBIT), alcohol, gas, "white" gas (Coleman type fuel), wood, and kerosene.
The Optimus Nova is a great stove -- if you get the right version (see my Optimus Nova Review for how to tell).
But the Nova is a liquid fuel only stove. Wouldn't it be nice if it could run on gas? Well, hold on here. I mean why not? What's stopping us?
But how to do it? Well, let's take a look at an Optimus Nova
An Optimus Nova stove in its case
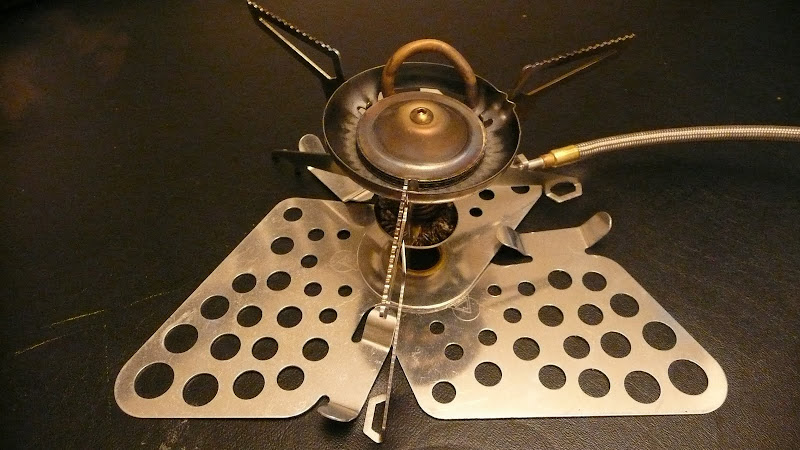
An Optimus Nova stove
Yep, that's the stove all right. :) No obvious clues there, so let's dig a little deeper. Let's look at the fuel line.
An Optimus Nova with the fuel line showing
First let's look at the distal end of the fuel line.
The distal end of an Optimus Nova
On the distal end of the fuel line, we can see the excellent and proven CEJN connector. The CEJN connector is perhaps the best connector on any stove in the world. The connector plugs into the Nova's pump (liquid fuel only). The connector will not mate with a canister of gas, and there's no adapter available. So, no help on the distal end of the fuel line.
What about the proximal end?
The proximal end of a Nova's fuel line
Well, now isn't that interesting? There's a nut there. A nut as in the type that you can unscrew. But what to attach it to? Hmm. Now, interestingly enough the fuel line on a Primus Omnifuel is already set up to run on gas, and the fuel line of a Primus Omnifuel also ends in a nut, a nut that is very similar to the Nova's
Optimus Nova stove (top). Fuel line from a Primus Omnifuel (bottom).
Notice the similarity between the nut on the Nova's fuel line and the nut on the Omnifuel's fuel line? Could it be? Rats. Nope. Not the same. But they're so close!
Hmm. What if we could get a small adapter? Enter our friends at Bluewater Stove Restoration. Yes, Bluewater Stove Restoration is famous for making silent caps both for classic stoves like the Primus 96 and the Svea 123 as well as for modern stoves like the Dragonfly and the Omnifuel, but Bluewater does a whole lot more. Indeed, they've come up with an adapter to connect an Optimus Nova to the fuel hose of a Primus Omnifuel so that a Nova can be run on gas.
An adapter from Bluewater Stove Restoration. This adapter will mate the fuel line from a Primus Omnifuel to an Optimus Nova stove.
A word on safety: Any time you modify any stove, you take your life in your hands. Be aware that you could have a fire, and that there are serious risks involved including severe burns and possibly even death. If you "try this at home," be really careful. In the case of using an adapter like the one shown in this post, take care not to cross thread, and make sure the fittings are tightened securely. Always test with a low volume of fuel first before you open the valve fully. In, the specific case of the Optimus Nova, close the valve at the burner, open the valve at the canister, and listen. There should be no sound of escaping gas. If you hear gas, something is wrong, and you need to STOP and correct the problem before you light the burner. Fair warning.
OK, enough safety talk. Let's give it a whirl! First, let's take the Nova's fuel line off.
Disconnecting the fuel line from an Optimus Nova stove
And let's try out that adapter!
The Bluewater Stove Restoration adapter installed on an Optimus Nova stove
Fits great. Now for the fuel line from the Omnifuel.
A fuel line from a Primus Omnifuel mated to an Optimus Nova stove via an adapter
The fuel line also fits great. Now we're ready to start cooking with gas!
A fuel line from a Primus Omnifuel mated to an Optimus Nova stove via an adapter.
So, let's hook it up.
An Optimus Nova stove attached to a canister of gas
And let's fire it up!
An Optimus Nova stove running on canister gas.
It's a little hard to see the flames, but the adapter works great, and the Nova runs well on gas. One could probably get slightly better heat output if one had a jet optimized for gas, but the factory installed Nova jet (optimized for liquid fuel) works just fine on canister gas. I've noticed as I've tested various stoves that in general using a jet designed for a less volatile fuel (like white gasoline) will work reasonably well with a more volatile fuel (like gas).
I noticed that the stove went out a couple of times when I tried to get a really low simmering flame when just adjusting the at-the-canister valve. It was broad daylight, and the flame was hard to see, so I don't think the stove going out was any reflection on the adapter or any indication that a Nova doesn't run well on gas. However, I thought I'd try something different: Running with the canister inverted.
An Optimus Nova stove running on gas with the canister inverted (liquid feed mode)
Running a stove with the canister inverted causes liquefied gas to flow out the bottom of the canister. Liquefied gas is very similar to the Nova's intended (liquid) fuels. When I ran the Nova on liquefied gas and used the at-the-burner valve to regulate the flame, I found that the stove was able to get a really nice "barely there" simmer.
An Optimus Nova stove with a low simmering type flame running on gas with the canister inverted (liquid feed mode)
I did find the control valve on the Primus Omnifuel's fuel line to be a bit of a pain with the canister inverted.
Inverted canister (liquid feed mode).
So, I just lifted the canister with one hand and adjusted the valve with the other. An inconvenience, but no big deal.
As for keeping the canister in position, adding a couple of rocks kept the canister inverted, no problem. I've seen people use small plastic tubs, like the kind that margarine or yogurt come in, to hold a canister inverted. That might be a bit more convenient, but my stack of rocks did just fine.
By the way, when running on gas, you've got no less power than when running on liquid fuel. I found that I could quickly bring water to a vigorous roiling boil.
Passing the "tea test". You've got oodles of power when running on gas.
Well, there you have it, an Optimus Nova stove running on canister gas. A big thank you to Gary at Bluewater Stove Restoration for making these tests possible.
HJ
Note: I was approached by Bluewater Stove Restoration and asked if I might like to evaluate the adapter featured in this review. As a part of the review process, I received an adapter from Bluewater Stove Restoration. Other than the adapter itself, I received no remuneration for my review. The receipt of the adapter was not contingent on the nature of my review (in other words I didn't have to promise to do a positive review in return for the adapter). Further, I receive no part of the proceeds from the sale of any Bluewater Stove Restoration products. All comments regarding the adapter shown on this page are strictly my own and do not necessarily reflect the views of Bluewater Stove Restoration.
In this post, I thought I'd show the Clikstand with Trangia burner in a little more detail, and I thought I'd show you my typical day hike configuration. My overnight hike configuration is the same, only I'd carry more fuel.
First, a pot of about 1000ml in capacity with "traditional" proportions (wide not narrow, short not tall) works well with the Clikstand. Smaller pots don't fit well with the span of the Clikstand. I tried a 780ml Snow Peak pot and an 850ml MSR Titan kettle on the Clikstand, and neither was very stable. See the Clikstand compatibility information at the bottom of this post for more details.The other big advantage of a pot of about 1000ml size is that all of the of the components will nest inside the pot (Clikstand, burner, small fuel bottle, lighter, spoon,windscreen, and fuel measuring cup).
A 1000ml Snow Peak pot containing all the components necessary to operate a Clikstand/Trangia combination.
The same set up as above with the pot lid removed so that you can see the contents.
The Clikstand is quite compact in terms of stowage. To better appreciate just how complete the set is, let's take a look at all the components spread out.
All of the components of my Clikstand/Trangia set up on display
Now, let's take a little closer look at the central components. Note the roughly triangluar piece with the circular cut out. This will form a "deck" and hold the burner. The burner can be seen just above the upper point of the triangular shaped "deck".
The central components of my Clikstand/Trangia set up.
Top row, L to R: fuel bottle, Trangia burner, lighter
Middle Row, L to R: fuel measuring cup, Clikstand "deck", telescoping spoon
Bottom row: the Clikstand's "walls"
Let's take a closer look at the Clikstand's "walls." Note the tab on the left side of each piece, the slot on the right side, the "hooks" to the right of the slot, and the projection on the top of each piece. The slot and tab connect the walls. The hooks hold the windscreen. The projection supports the cook pot.
The three identical stamped pieces of stainless steel that form the walls of the Clikstand burner stand/pot support
The Clikstand is first formed from the three identical pieces of stamped stainless steel (there is a titanium version as well; see below). The tab from one piece is fitted to the slot in the next until all three pieces are connected, forming a triangle.
A fourth piece, the "deck" that you saw in earlier photos (roughly triangular in shape, with a cut out for the burner) is then fitted within the triangle. The deck "clicks" into place when inserted properly, hence the name "Clikstand."
The three identical pieces form the "walls" and the fourth piece is emplaced as a "deck" within the walls.
The Trangia burner is then placed into the cutout in the center of the deck. A windscreen is then placed onto the "hooks" that extend from the slotted end of each of the wall pieces. Note: The windscreen shown is not a Clikstand windscreen. The windscreen is a BPL titanium windscreen. The Clikstand I bought was used and did not include a windscreen, so I included one of my own.
Clikstand with Trangia burner and windscreen in place.
A pot is then of course placed on the assembled burner and stand.
A Clikstand with a 1000ml Snow Peak pot in place.
The regular stainless steel Clikstand with brass Trangia burner isn't the lightest set up out there (see my thoughts on the titanium Clikstand below). Indeed, many will argue that a small upright gas stove will be as light or lighter, even when you factor in the weight of the steel canister that a gas stove requires. True, but the Clikstand has a several advantages over a gas stove:
1. Windproofness. Upright gas stoves are typically quite vulnerable to wind. The Clikstand functions very well in wind (although its fuel consumption will typically go up)
2. Foolproofness. The Clikstand has almost nothing to go wrong on it. There is no delicate thread that you might cross thread. There are no "O" rings or gaskets to crack or dry out (well except for the one in lid of the Trangia burner, but that gasket does not affect the operation of the stove). There is no tiny, single jet to clog. There is no Lindal valve to get stuck open (It happens! Ask me how I know!).
3. Fuel availability. To get a gas canister, you generally have to go to a specialty shop. Alcohol, at least in the US, is far more available. Stove appropriate alcohol is available at gas stations, hardware stores, cleaning supply stores, paint stores, and even some grocery stores and pharmacies. Availability is particularly important when traveling by air and you don't want to burn a day gathering supplies. Who wants to drive around looking for a specialty store when you could just grab some alcohol from the first hardware store you pass? For information on what alcohols are appropriate for stove use, see my post on Alcohol as a Stove Fuel.
4. Alternative fuels. Not only is alcohol fuel widely available, the Clikstand can run on alternative fuels.
One alternate fuel is hexamine, which is commonly sold under the brand name ESBIT. Hexamine is a little smelly and leaves a residue on the bottom of your pot, but it is very light and convenient. You'd have to rig something up in the cut out of the deck of the Clikstand, but that shouldn't be too hard.
Another alternate fuel is wood. Yes, you heard me right, wood. The Clikstand is either stainless steel or titanium, both of which will withstand heat quite well. You can pile small sticks and such in the body of the Clikstand and burn them. You will of course blacken the pot, stand, and windscreen in the process, but there are times where having an alternative fuel source like wood (which is often available where there are no stores or points of resupply!) could come in really handy. Note: As of this writing, I have not tried my Clikstand on wood.
5. Silent operation. Don't underestimate the value of silence. I love to be able to hear the natural world that surrounds me when I'm out in the wilderness. Experience the Zen of an alcohol stove!
COMPARING THE COST AND WEIGHT OF TITANIUM vs. STAINLESS STEEL (All prices in USD)
Steel (g)
Ti (g)
Weight Savings
(g)
Conversion Factor
Savings (ounces)
Steel Price
Ti Price
Price Difference
Cost per gram
saved
Cost per ounce
saved
Stand
94
57
37
0.035
1.3
$29.95
$59.95
$30.00
$0.81
$22.99
Screen
37
20
17
0.035
0.6
$14.95
$19.95
$5.00
$0.29
$8.34
Subtotal
131
77
54
0.035
1.9
$44.90
$79.90
$35.00
$0.65
$18.37
Burner
111
34
77
0.035
2.7
$15.95
$45.95
$30.00
$0.39
$11.05
Total
242
111
131
0.035
4.6
$60.85
$125.85
$65.00
$0.50
$14.07
MY THOUGHTS ON THE TITANIUM VERSION OF THE CLIKSTAND
The difference in weight between a Ti Clikstand and windscreen and a stainless steel (SS) Clikstand and windscreen is 54g (about 2oz), for which you will pay an additional $35.00. $35.00 is a bit much to pay for two ounces in weight savings, although it may be worth it for some.
The argument for going with the titanium version is more compelling if you get everything Ti (stand, screen, and Evernew burner). If you get everything Ti, you would save 131g (4.6 oz) -- which is over a quarter of a pound. But, to do this, you must pay an additional $65.00 over the price of the standard SS and brass components. In other words, the price more than doubles if one gets all Ti components. For $125.85 I can get a very nice petroleum based liquid fuel or gas stove. $125.85 is simply too much for an alcohol stove. One would really have to be an alcohol stove aficionado in order to pay that kind of money. Note: One could save some money if one were to by the components as a set. Still, even as a set, the titanium components cost significantly more than the conventional SS and brass components.
Add to that the fact that there is no lid or simmer ring on the Ti version of the burner, both of which are very nice features of the Trangia burner. Moreover, the Evernew Ti burner is generally less efficient (but faster) than the Trangia burner according to the tests that I've seen. A less efficient burner means that you will have to carry additional fuel, thus eroding at least some of the weight savings that you just paid so dearly for.
I'd love to try a Ti set up, but for those prices? I can't quite justify it just yet.
VIDEO COMPARISON TITANIUM vs. STAINLESS STEEL
The following video was made by Hendrik who is from Finland. The video compares a titanium Clikstand set up (including the Evernew titanium burner) with a stainless steel Clikstand set up with a conventional brass Trangia burner. You can view Hendrik's interesting and informative hiking and lightweight backpacking blog, Hiking In Finland. The blog is in English and includes a lot more than just information pertaining to Finland.
There you have it, a very brief introduction to the Clikstand.
HJ
Appendix
CLIKSTAND COMPATIBILITY INFORMATION (Copied from Clikstand.com)
Pot Compatibility:
Minimum pot size 4.2” (106 mm) diameter or larger. Maximum recommended pot size 8.0” (203 mm) diameter. For pots, cups or kettles smaller than 4.2” (106 mm) diameter click here(Note this link leaves my blog and goes to the Clikstand site).
Windscreen Compatibility:
Maximum pot size 5.9” (150 mm) diameter.
Burner Compatibility:
Maximum burner diameter 2.75” (70 mm), maximum burner height 2.5” (64 mm).
Pot Size Required for Storage:
Minimum pot size required to store Clikstand, windscreen, and burner inside 5.2” (132mm) diameter, 2.8” (71mm) height.
Disclaimer: I am in no way affiliated with Clikstand.com nor do I have any financial interest in any product displayed on this page. I am merely a satisfied customer sharing his experience.
Gas stoves are super convenient. Why would anyone want to use a liquid fueled stove? I mean aren't liquid fueled stoves dinosaurs? Isn't it just weird old-timers who still use them?
Well, hardly. Petroleum based liquid fueled stoves still rule the day when it's seriously cold. There are gas stoves that will work in really cold weather (particularly if you do things to warm the canister), but in general 0F/-18C is sort of my dividing line between appropriate use of a winter capable gas stove vs. a liquid fueled stove. Note that I said "winter capable." By that I mean a remote canister stove capable of inverted canister operation. Don't try to take an ordinary upright canister stove down to 0F/-18C!
OK, so extreme cold is when you need a liquid fueled stove, but are there other reasons to go with liquid fuel? Sure there are. Here are just a few:
Motor touring. Liquid fuel is pretty popular with long distance motorcyclists for example. They can just pull a little unleaded out of their motorcycle's tanks and run their stove.
International travel. Kerosene is the international stove fuel and is generally available world wide. Gas canisters aren't as widely available, and the canisters available in a given area may not be the canisters your stove uses. Other liquid fuels like "Av gas" (aviation gasoline) and unleaded automotive gasoline are also available in many areas
"Sustainability." Canisters take a lot to manufacture and are single use. Even if you recycle them, there's still a much greater impact than buying a liquid fuel bottle that will last a lifetime (or more)
KISS (keep it simple, sweetheart). If don't want to have "gear proliferation" and want one stove for all four seasons, liquid fuel is the way to go.
High volume use. Liquid fuel is still the cheapest fuel. For people that use their stoves a lot, it's a good option. A four ounce canister of gas costs about $5.00. The equivalent amount of white gasoline? About $0.30.
Nostalgia. Seriously! I've still got my uncle's 1962 Primus 71 stove. It's all brass, and it's highly cool. I'm not going to stop using that or my ultra-cool Svea 123 just because gas is a bit more convenient! Get real!
No matter what stove you use, remember to enjoy yourself and be safe.
As previously announced and reported here on Adventures in Stoving, MSR is coming out with a new version of their Whisperlite stove, the Whisperlite Universal.
An MSR Whisperlite Universal running on canister gas in liquid feed mode
I've written a review of the new Whisperlite Universal, and that review is now available at Seattle Backpackers Magazine. This blog post will answer questions that may not have been addressed in the review and also serve as a place to display additional photos not used in the review.
Update, 19 January 2012: The MSR Whisperlite Universal has been awarded the Backpacking Magazine Editor's Choice award.
QUESTION: Can the gas adapter from the Whisperlite Universal be used on a Simmerlite? ANSWER: The end of the Whisperlite Universal's fuel line is threaded, and it is onto these threads that the gas and liquid fuel adapters attach. The end of the Simmerlite's fuel line is smooth. So, no, unfortunately, the gas adapter from the Whisperlite Universal can not be used on a Simmerlite.
The end of a Whisperlite Universal fuel line
QUESTION: What tools are needed to assemble/disassemble the Whisperlite Universal? ANSWER: Generally, the only tool you will need is the wrench/tool that comes with the stove. However, a safety pin or needle can be really handy for replacing "O" rings. For heavier duty maintenance, you may need additional tools. For example, the burner head now requires a hex tool (Allen wrench) for disassembly. However, this type of maintenance is almost never needed in the field, and you should be fine when out on the trail with just the MSR wrench/tool.
The wrench/tool that comes with the Whisperlite Universal
QUESTION: What is the retail price of the Whisperlite Universal? ANSWER: MSRP is $139.95. Update 11 Nov 2011:MEC, the Canadian Outdoors retailer, has the MSR Whisperlite Universal listed for $131.00 (CAD -- about $128 USD). Let's hope that MSR has relented a little bit on the price. $140 is a bit much for a Whisperlite, even a wonderfully improved Whisperlite like the Whisperlite Universal
DETAILED PHOTOS NOT USED IN THE REVIEW:
The UC jet is seen here in the mixing chamber. Note how the height of the jet restricts the air supply to the mixing chamber.
The legs have "stops" that precisely control the positioning of the legs/pot supports. Gone are the notches that each leg slipped in to.
A photo of the underside of the MSR Whisperlite Universal's burner. A spring clip holds the legs in place.
The canister adapter of the MSR Whisperlite Universal, opposite side. Note the pictograph of a canister gas jet and the letters UC which correspond to the letters on the actual jet.
The baffles of the Whisperlite Universal's burner. There are fewer baffles than earlier versions.
MSR Whisperlite Universal (top) with liquid fuel adapter on the end of the fuel line. MSR Whisperlite "Classic" (bottom).
MSR Whisperlite Universal (top) with liquid fuel adapter on the end of the fuel line. MSR Whisperlite "Classic" (bottom).
The MSR Whisperlite Universal rigged for canister gas
Flame shot, running on white gasoline (Coleman fuel). Note how hot it gets under the generator (pre heat loop). This apparent heat entrapment allows the stove to simmer far better than current Whisperlite stoves.
Flame shot, running on white gasoline -- MAXIMUM POWER.
Running on canister gas in liquid feed mode -- MAXIMUM POWER. That is a really big flame for a Whisperlite.
Running on canister gas in liquid feed mode -- MAXIMUM POWER.
Running on kerosene
Soot build up after running on kerosene
MSR Whisperlite Universal (left) and MSR Windpro (right).
MSR Whisperlite Universal (left) and MSR Windpro (right).
The fuel line of the Whisperlite Universal is fairly stiff. Here, you can see that the fuel line never touches the table top. The line is stiff enough to support its own weight without drooping.
A Whisperlite Classic snapped into a Trillium base.
The legs of a Whisperlite Universal do not fit onto the tabs of a Trillium base
The Whisperlite Universal canNOT plug into older versions of the standard pump. The aluminum block is too wide. Note how the red plastic of the pump has been chipped by the aluminum block.
The aluminum block of the Whisperlite Internationale fits right in to an older MSR standard pump.
The aluminum blocks of the Whisperlite Universal (bottom) and the Whisperlite Internationale (top). Note that the aluminum block is asymmetric on the Internationale. This asymmetry allows the block to fit into older versions of the standard MSR pump.
The Whisperlite Internationale has four "baffle" rings.
The Whisperlite Universal has only three "baffle" rings
MSR Whisperlite Universal (left) and MSR Whisperlite Internationale (right).
A Primus Omnifuel
An MSR Whisperlite Universal connected to a Primus Omnifuel pump using the Whisperlite Universal's gas adapter
An MSR Whisperlite Universal connected to a Primus Omnifuel pump using the Whisperlite Universal's gas adapter
Running an MSR Whisperlite Universal with a Primus Omnifuel pump
Running an MSR Whisperlite Universal with a Primus Omnifuel pump
Passing the "tea test"
Breakfast is served. :)
Stove testing at First Water on the Mount Wilson Trail
Simmer test on kerosene. Note that the burner is NOT glowing red. I was able to get a nice low flame.