QuietStove.com

Saturday, December 31, 2011

The MBD Nion 3 Simmering Alcohol Stove

Here's a really interesting little stove, the Nion 3 from Mini Bull Designs.  I'm showing it here next to a Trangia burner so you can get an idea of just how small the Nion 3 really is.  The Nion 3 is made from 5.5 fl. oz./162ml aluminum beverage cans
A standard Trangia burner (left) and a MBD Nion 3 (right).  Note the primer pan under the Nion 3.
Showing a Nion 3 next to a Trangia burner is actually quite appropriate:  Both are excellent simmering stoves.  Today's stove, the Nion 3, is capable of holding water at a low boil for extended periods of time without having the water go into a full roiling boil.

The Nion 3 is a closed jet (pressurized) type burner.  To fuel it, we remove the center screw as shown.  Note that there is a priming pan under the stove.  The stove must be primed in order for it to operate properly.  The priming pan shown is the cut off top of a Fosters sized aluminum beverage can which is very light weight.
A Nion 3 stove with the center screw removed for fueling
Alcohol is added via the open port.
Fueling a Nion 3 stove
After fueling, replace the thumbscrew.  To fire up the stove, put a small amount of alcohol into the priming pan and ignite.  The little Nion roars like a blowtorch in the priming phase!
A Nion 3 in the priming phase of its burn.
If you put a lot of alcohol in the priming pan, you can have a real fireworks display!
A Nion 3 primed with a lot of alcohol.
After priming runs its course, the stove settles down with a nice steady little blue flame. 
A Nion 3 in normal operation
Or, really two flames. 
The two distinct flames of a Nion 3
Recall in the first photo that we saw that there were not one but three screws in the top of the Nion.  The center screw is just the opening to the fuel port.  The two screws on either side have jets at their base.  The flames come out of these jets.  The two screws are rotated to increase or decrease the amount of heat that the stove produces.  One drawback to the design of the Nion is that the control screws are not easily adjusted while the stove is running.  Typically, one sets the control screws before the burn and then lights the stove.  The stove is then essentially non-adjustable until the burn is finished.  Because the flame is a fairly low flame, the flame can be blown out.  It is essential to use a good windscreen.  Since the flame can be blown out, it is easy to extinguish the stove.

The Nion 3 has a high setting and a low setting, but even its high setting would take a while if you wanted to bring water to the boil.  Basically, the Nion 3 is a simmering only stove.  The best use for the Nion 3 is as a back up stove.  If your primary stove doesn't simmer, then you could use the Nion 3 for simmering once your primary stove had brought the water to a boil.  A little inconvenient, yes, but a lot lighter than bringing something heavy like the brass Trangia burner shown above.  Aluminum beverage can stoves are so light, it really doesn't hurt that much to bring a second little burner.  The weight penalty is less than one ounce (see exact weights in the Technical Appendix, below).  Alternatively, one could bring a Trangia burner which is good for both boiling and simmering, but the weight penalty for carrying a Trangia is far greater than carrying two aluminum beverage can type burners.

HJ

Technical Appendix:  Weights
Nion 3 stove:  19g/0.67oz
Priming Pan:    6g/0.21oz
Total Nion 3:  25g/0.88oz

Trangia Burner:              67g/2.4oz
Trangia Burner Lid:          21g/0.7oz
Trangia Burner Simmer Ring:  23g/0.8oz
Total Trangia Burner:       111g/4.0oz


All weights were measured in grams and then converted to ounces after the fact.  Weights in ounces may not add up correctly due to rounding error.

Friday, December 30, 2011

The MSR MicroRocket -- Packability Report #1

This is an installment in my series on the new MicroRocket stove from MSR.  Other installments in the series include:

If you're interested in traveling light, there's more to it than just the weight of a stove. You have to consider your cooking set up as a whole. And of course, it's really sweet when everything nests together inside a small lightweight mug-type pot. So, for the new MicroRocket, the inevitable question is: Just how small is it? And will it fit in my particular set up?

Well, obviously I can't test the MicroRocket with every pot and mug known to man, but I thought I'd test it with a few hopefully representative mugs/small pots.  Hopefully my tests will give you an idea if the new MicroRocket will fit in your set up.

Well, let's meet today's "contestants:" A BPL Firelite 550 mug/pot (550ml), a Snow Peak 780ml pot, and an MSR Titan kettle (850ml).  We'll be seeing how a MicroRocket does or does not fit and how the older PocketRocket compares.  So, fasten your seat belts, and let's head out on another Adventure in Stoving.
Front:  MSR PocketRocket (left), MSR MicroRocket (right). 
Rear (left to right):  BPL Firelite 550 mug pot (550ml), Snow Peak 780ml pot, MSR Titan kettle 850ml
Well, let's start with the Firelite 550 mug pot.  We'll try the PocketRocket first and see how that flies.
A PocketRocket in a BPL Firelite 550 mug pot
Uh, well, the word "FAIL" comes to mind.  Twist and turn, try as I might, I could not fit a PocketRocket into a BPL Firelite 550 mug pot.

But what about the MicroRocket?
A MicroRocket inside a BPL Firelite 550 mug pot
Whoa!  How cool is that?  Not only does it fit, it lays down flat.  Nice.  And, yes, that's the same pot as in the prior photo.  The MicroRocket really is that much smaller.  Sweet!

Well, shoot, if we've got that much room, why don't we pop in a canister of gas?
A BPL Firelite 550 mug pot with a MicroRocket and a 110g gas canister inside
Well, it sort of fits, but not exactly.  Even if I take the cap off of the canister, I can't quite get the mug's lid on.
A BPL Firelite 550 mug pot with a MicroRocket and a 110g gas canister inside
A tad disappointing, but still that's pretty darned good that I can fit all that into a little 550ml mug.  And, if you use your favorite ultralight stuff sack, maybe it will work for you.
A "stuff sack" for the BPL Firelite 550 mug pot.  Inside are a canister of gas and a MicroRocket stove.
OK, next, let's look at the Snow Peak 780ml pot.
A PocketRocket inside a Snow Peak 780ml pot
This time, the PocketRocket does fit, but try to fit in a gas canister, and you've got a bit of a problem.
A PocketRocket and a 110g gas canister inside a Snow Peak 780ml pot
I tried differing combinations, but to no avail.  A PocketRocket and a gas canister just cannot be made to fit in this small of a pot.
A PocketRocket and a 110g gas canister inside a Snow Peak 780ml pot
But with a MicroRocket, now, that's a different matter.  They both fit without too much trouble.
A MicroRocket and a 110g gas canister both fit inside a Snow Peak 780ml pot
A Snow Peak 780ml pot without the MicroRocket will fit a larger 220g canister, but with precious little room for anything else.
A Snow Peak 780ml pot with a 220g gas canister
OK, so there's our look at a Snow Peak 780ml pot.  Now, how about the MSR Titan kettle which is 850ml?
An MSR Titan kettle with a PocketRocket and a 110g gas canister inside.  You can't close the lid.
Well, with a Titan kettle, you can get both a PocketRocket and a 110g canister of gas inside.  Kind of.  But you can't close the lid.

On the other hand, with a MicroRocket, you've got oodles of room.  Go ahead, throw in a lighter, a little washcloth, or what have you.
An MSR Titan kettle with a MicroRocket and a 110g gas canister inside.  Plenty of room.
With the MicroRocket and a 110g canister, I can fully seal the lid.  Nice.
An MSR Titan kettle with a MicroRocket and a 110g gas canister inside.  The lid seals fully.
A 220g canister however doesn't quite work even with a MicroRocket.
A 220g canister doesn't quite fit into a Titan kettle with a MicroRocket.
Just for fun, I thought I'd try another gas stove with a reputation for being compact, the Optimus Crux, in the same configuration.
An Optimus Crux inside an MSR Titan kettle
There was no material difference between the fit with an Optimus Crux and the fit with a MicroRocket.
The fit with an Optimus Crux is not materially different than that of a MicroRocket
In fact, I tried the Optimus Crux with all of the above pots.  The Crux is a bit more compact than the MicroRocket, but it made no material difference with any of the pot and canister combinations.  I do find that the new MicroRocket's pot supports are a little less fiddly than the supports on a Crux, but more on that in a future post.

Well, this isn't one of our original three contestants, but I was curious.  If a 220g gas canister won't fit in any of the above, what will it fit in?  Let's try a 1000ml Snow Peak pot.  I wouldn't exactly call a 1000ml pot small, but let's try it.
A 1000ml Snow Peak pot with a 220g gas canister and an MSR MicroRocket inside.
Fits reasonably well, and the lid closes fully.  Do note that my pot has a "fry pan" type lid with some depth.  I wouldn't say that a 220g canister and a MicroRocket will fit in all 1000ml pots, but it's worth checking.
A 1000ml Snow Peak pot with a 220g gas canister and an MSR MicroRocket inside. The lid closes fully.
Well, there you have it, a look at the fit of the MSR MicroRocket in three small, ultralight backpacking type pots -- with a special guest appearance by our friend the 1000ml Snow Peak pot.  I hope this gives you a sense of the size of the MSR MicroRocket and whether or not it might work with your particular set up.

Thanks for joining me on another Adventure in Stoving,

HJ

P.S.  A preview of coming attractions:
An MSR MicroRocket
I fired up the stove using the piezoelectric lighter.  It's actually very effortless and slick.  I found it easier than using a conventional lighter.  Now, is it worth it to carry the extra 13g and to have to keep track of yet another piece of gear?  I mean, I am going to have to carry a regular lighter anyway, so is it worth it to carry the little piezoelectric lighter?  Dunno, but now that I've used it and seen how well it works, I'm not quite so dead set against it.  It's actually pretty nice.  I now think that some people will elect to carry it.  One nice thing about it is that unlike a Bic, the piezoelectric ignition will not run out of gas.

It also looks like MSR has taken some steps to reduce the carbon monoxide output of the MicroRocket.  More on that in a future post.  Stay tuned.  :)

Thursday, December 29, 2011

The PackaFeather Cap

Here's another "make your life easier" stove gear tip:  The PackaFeather Cap from PackaFeather.com, an ultralight gear provider.

Basically, it's just a flip top spout for a bottle of alcohol, but it has a very nice little enhancement:  a nice, long plastic tube is well seated in the spout.  The tube can be pulled out, but it doesn't come out on it's own and is air tight.
A PackaFeather Cap. Note the long plastic tube.
The plastic tube is bent at the point it exits the spout such that it lies flat against your alcohol bottle when the spout is closed.
A PackaFeather cap in the closed position.
In the open position, the tube is basically perpendicular to your alcohol bottle.
A PackaFeather cap in the open position.
It comes with an "O" ring to seal the cap against the bottle, but honestly I don't think you need it.
The "O" ring of a PackaFeather cap.
OK, so why do I say this is a "make your life easier" piece of gear?
  • Fueling.  Got an alcohol stove with a tiny, little fuel opening?  No sweat.  Insert that little straw straight into the fuel port.  See photo below.
  • Measuring out alcohol.  When I dispense alcohol into my little medicine measuring cup, this straw allows me to squeeze it in really smoothly without a lot of turbulence.  It's easy to see exactly where the meniscus lies against the measurements on the cups.  I also have very precise control.
  • Oops!  Did I squeeze out too much alcohol?  No problem.  Squeeze the bottle a little bit, dip the straw into the alcohol, and use the straw to suck up the excess alcohol.  Sweet.
  •  Priming.  That straw is great for getting alcohol into hard to reach old stoves that you'd like to prime with alcohol.

Tricky fueling that little alcohol stove?  Problem solved.  Fueling the little MBD Nion 3 simmering alcohol stove.
Now, could you DIY something similar? Sure.  If your flip top pour spout has a round cross section, piece of cake.  But PackaFeather has already done a really good job and produces a quality product.  Someone passed this tip along to me (thanks, Nick!!), and now I pass it on to you.

The PackaFeather cap.  It just makes life easier.

HJ

Note:  I have no relationship with PackaFeather, financial or otherwise.  I am merely a satisfied customer sharing his experience.

The Soto Pocket Torch

This isn't exactly a post on stoves.  This is however stove related.  I've got a "make your life easier" gear tip for you.  Today's featured gear?  The Soto Pocket Torch.
A Soto Pocket Torch
Um, gosh, Jim, isn't that just, um, a lighter?

Well, I guess, but it's pretty darned nice lighter.  Let me tell you what I like about it.

First, it's got a piezoelectric ignition.  A good one.  One that works pretty reliably.  It usually takes two clicks, but it very consistently lights on the second click.

Second, it's a torch.  In other words, that flame comes out of the nozzle with some force.  It's not like a candle flame that can be blown out easily.  It's got decent wind resistance, and I can turn it different directions including sideways and straight down which is pretty nice for lighting certain stoves.


What's that you say?  Hand held lighters with piezoelectric ignitions don't work very well at altitude?  Well, you're absolutely right about that.  I've had lighters with piezo ignitions fail as low as 8,000 feet/2400m and succeed as high as 10,000 feet/3000m.  Somewhere in there, most piezoelectric ignitions on hand held lighters are going to fail.  But that's really not a problem with the Soto Pocket Torch.  Just pull the head off, and underneath the covers is an everyday Scripto lighter.
A normal Scripto lighter resides inside the body of a Soto Pocket Torch
That Scripto lighter has an ordinary flint and steel type striker which is not affected by altitude.
The flint and steel wheel type ignition on a Scripto lighter.
Another nice thing about that Scripto lighter:  If you want to know how much fuel you've got, just hold it up to the light.
Checking the fuel level on a Scripto Lighter
Update 14 Feb 2012:  I went to the local shop to get a new Scripto lighter.  They were out.  On a whim I tried a Calico brand lighter in the Soto Pocket Torch.  It worked just fine.  And of course it should.  I just checked their website and Scripto is owned by the same company.  Just a tip then:  If you can't find Scripto brand, try Calico.

So, there you have it, Hikin' Jim's recommendation for a lighter.  It's not exactly ultra light, but it is ultra convenient.

Hope that's a helpful gear tip,

HJ

100% Propane for Backpacking? YES!

What's the "holy grail" of canister gas for cold weather backpacking?  100% propane.  Propane is the best.  Plain butane won't vaporize below 31F/-0.5C.  Even isobutane just sits there and looks at you below 11F/-12C.  But propane?  Propane vaporizes all the way down to -44F/-42C.  Sweet!

What's that you say?  Propane is only available in those big heavy steel cylinders that are 16.4oz/465g net weight?  And the total weight is even more than that?  And you're not about to carry that on your back?

Hey, I'm with you.  Don't blame you a bit.  Those big green steel cylinders are just impractical for backpacking.  Too bulky, too heavy, and the stoves that go with them aren't any better.  But what if there were a better way?

Introducing the Bernzomatic Power Cell.
A Bernzomatic Power Cell
Take a close look at that label
A Bernzomatic Power Cell is 100% propane
That's propane baby!

But will it work with backpacking stoves?  Let's have a look.
The connector on a Bernzomatic Power Cell is a standard 7/16 UNEF threaded connector
That's a standard 7/16 UNEF threaded connector, the same one used by backpacking stoves.  Let's try it out.
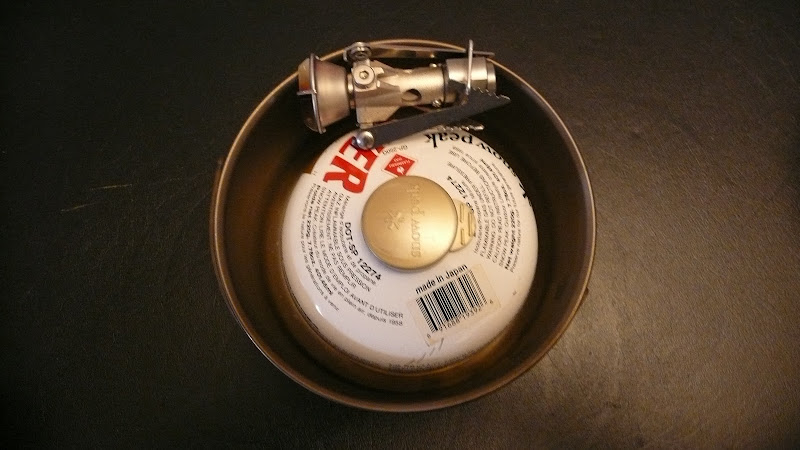
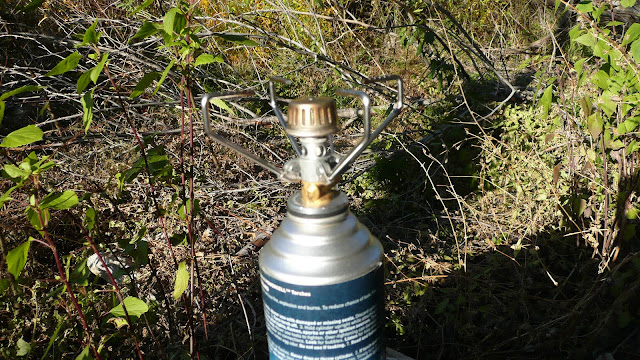
A Snow Peak GS-100 stove on a Bernzomatic Power Cell
Well, I'll be danged.  Sure enough, it works.  But now you've got an upright type canister stove mounted on a long, slender bottle.  No way is that going to be stable.  We're back to impractical again. What to do?

Well, what if you could separate the burner from the bottle?  You can -- if you have something like a Brunton Stove Stand.
A GS-100 stove connected to a Bernzomatic Power Cell via a Brunton Stove Stand
Well, that's an improvement, but that canister is still a little on the tippy side.  Can't we just lay it down?
A Bernzomatic Power Cell laying on its side.
As a matter of fact, we can.  And, in case you can't see it in the above photo, that stove is on and in use.
 

Warning:  When you lay this canister on its side or turn the canister upside down, you are feeding liquid propane into your stove.  Burning liquid propane can be extremely dangerous.
To play it safe, you should follow the manufacturer's recommendations.  The manufacturer recommends that the canister always be used in the upright position.  See the full warning at the bottom of this post before you try laying the canister on its side or turning the canister upside down.
A close up of the flame of a GS-100 stove running on 100% propane from a Bernzomatic Power Cell
Now, I started with a completely full canister, so by putting the canister on its side, I should be getting liquid feed, the kind of feed you'd want to use in cold weather.  But, just to be sure, I leaned the canister up against the hillside.
A Bernzomatic Power Cell, completely inverted
And how does it work when completely inverted?  Just fine thanks.
A GS-100 stove running on liquid propane from a Bernzomatic Power Cell
The really interesting thing about these tests I ran with 100% propane is that I made absolutely no modifications to the stove or stove stand in any way, shape, or form.  In other words, I was able to run the stove on liquid propane (which is what you get when you invert the canister) without adding any pre-heating device.  I ran my tests in weather that was about 50F/10C air temperature.  In colder weather, a device to conduct heat from the flame to vaporize the fuel before it reaches the burner head may be needed.  At the temperatures I was operating in, the normal properties of propane were sufficient to vaporize the fuel.  I experienced no flaring.  I did allow the stove to warm up before inverting the canister.

There you have it, ladies and gentlemen, practical  propane for backpacking, the holy grail of cold weather canister stoves.  You saw it here first, on Adventures in Stoving.

OK, but now the bad news.  These are hard to find.  They are out there, and they do exist, but they aren't widely available.  But they're very worthwhile if you can find some.  It appears that Bernzomatic may no longer be making these, so once the existing supply is gone, that may be it.  Grab 'em while you can!
UPDATE 12 Jan 2012:  A thoughtful reader wrote Bernzomatic.  Bernzomatic has indeed discontinued the PowerCell (PC8).  The only such canisters available are the ones currently on shelves.  Once those are gone, no more will be available.

WARNINGAny use of a fuel or a stove in a manner not recommended by the manufacturer may be dangerous or even deadly.  You may also void any warranty and/or nullify any legal protections you might otherwise have.  The preceding blog post shows techniques that are inherently dangerous.   Inverting the canister is against the manufacturer's recommendation.  Burning liquid propane can be extremely dangerous.  If you invert (turn upside down) the canister or lay the canister on its side, you will get liquid propane. Screw up here, and you may be cooking a lot more than your dinner, get it?
The author mentions these techniques solely because he believes that they might be of interest, but the author does not warrant in any way that these techniques are safe.  Indeed, these techniques are not safe and are by their very nature dangerous.  Use of these techniques may lead to property damage, great bodily harm, or even death.  The author does not recommend the techniques shown in this blog post.  If you decide to use the dangerous techniques shown in this blog, that is your decision, and you must accept that you have deliberately chosen to engage in a dangerous activity. 

HJ

Technical Appendix
Net weight:      226g/8oz of liquefied propane.
Gross weight:    365g/12.87oz (about 3/4lbs in other words)
Empty weight:    139g/4.90oz
Connector type:  Standard 7/16 UNEF threaded with a female Lindal type valve.
Manfucturer:     Bernzomatic
Stove stand:     142g/5.00oz

Wednesday, December 28, 2011

The New MSR MicroRocket -- First Look

I'm in the process of writing another review for Seattle Backpackers Magazine, this time of the new MSR MicroRocket.  I've got a ways to go yet on the review, but I thought I'd at least let people have a preliminary look at the stove.  Look for the full review in about a month's time.

    UPDATE 29 Dec 2011
    Just got a note from MSR:  The official release date is January 3, 2012. We already have them in stock and are shipping to retailers.

    OK, first impressions.  Guys, this sucker is compact.  Woo who!  Oh, yes.  Tiny, baby.  What a nice little stove.  Talk about saving some room in the ol' pack.  Sweet!
    A new MSR MicroRocket (left) and a PocketRocket (right).
    The new MicroRocket comes with a separate piezoelectric ignition.
    MSR MicroRocket stove (top) and its separate piezoelectric ignition.
    Now, I haven't fired it up yet (I just took it out of the box this evening), but my first impression of the separate  piezoelectric lighter is:  Why?  Sorry, MSR, but wouldn't I be better off just carrying a regular lighter?  What's the advantage of carrying a separate piezoelectric lighter?  A piezoelectric lighter is only going to be able to ignite gas whereas a regular lighter will ignite pretty much anything.  Wouldn't I be better served by a more versatile conventional lighter?  What's the point?

    Now, to be fair, I haven't tried it yet.  Maybe I'll really love it.  These are just my first impressions upon taking the stove out of the box.  I will test it out.

    Now, back to the stove.
    The new (for 2012) MSR MicroRocket
    Did I mention it's compact?  Man!  They really mapped this one out.  Everything folds together just so.  It literally fits in the palm of my hand, and I don't have particularly big hands (ring size 9.5).

    I'm liking the way the valve control handle folds around the base of the stove.  Compact, baby, yeah!
    The valve control handle folds compactly around the base of the stove.
    Not too much looks new in terms of the burner head although the wind deflector is a bit more compact.  Like I say, though, I haven't fired it up yet.  Soon!
    MSR PocketRocket (left),  MSR MicroRocket (right)
    Now, take a look at the below photo.  One of my pet peeves about the older PocketRocket is that the point where the pot supports join the body of the stove is prone to bending.  Don't ask me how I know this.  I've read it elsewhere, so I know it's not just me.  The attach points on the new MicroRocket are way beefier.  When I unfolded everything into "working mode," the supports felt very solid.
    MSR PocketRocket (left),  MSR MicroRocket (right)
    Now, since this stove is super compact, you probably have to give up on the "surface area" that the pot supports cover, right?  Nope.  There's no sacrifice here.  The span is about the same.
    MSR MicroRocket (right), MSR PocketRocket (left).  Note the smaller wind deflector on the MicroRocket
    MSR MicroRocket (left), MSR PocketRocket (right).
    Overall first impression:  It's like the top stove designers at MSR did nothing but play with a Pocket Rocket for six months straight, looking for anything they could improve.  And they seem to have succeeded in just that.  They've really improved and beefed up the stove.

    Um, Jim, beefed up?  Don't you mean they've turned a perfectly good stove into a fragile little ultralight toy -- a little toy that's useless to the average hiker?

    NO!  Counter-intuitive as it may seem, they've managed to beef up the stove while dropping the weight and size.  Sweet!

    OK, so that's all for now in this very brief first look.  Watch for more to follow soon.

    HJ

    Technical Appendix:  Weights
    PocketRocket        MicroRocket
    Case   25g/0.88oz    36g/1.27oz
    Stove  86g/3.03oz    73g/2.57oz
    Total 111g/3.92oz   109g/3.84oz
     
    I didn't include the weight of the piezoelectric lighter because I wanted a 1:1 comparison.  The MicroRocket's piezo electric ignition weighs a mere 13g/0.46oz.

    The above weights were all determined using my Kitchen Chef gram scale.  These weights may differ slightly from the weights listed by the manufacturer.   All weights have been double checked. All weight were measured in grams and then later converted to ounces.  Weights in ounces will not necessarily add up properly due to rounding error.

    Interestingly, if the case is included, there is essentially no weight difference between the MicroRocket and the PocketRocket.  I did a double take when I weighed the new case.  I've checked it multiple times.  The new case really does weigh 36g.  I realize that a lot of people leave the case at home, storing the stove in their cookpot, but I still found it odd that MSR would go to so much trouble to lighten the stove and then turn right around and wipe out all the weight savings with a heavier case.  Hunh?