QuietStove.com

Showing posts with label liquid feed. Show all posts

Tuesday, January 24, 2012

The Kovea Camp 5 Remote Canister Stove

Introduction
If it's cold out and your remote canister stove has a generator (a pre-heat mechanism), then you can invert (turn upside down) the canister.  Inverting the canister means that you're sucking liquid off the bottom of the canister instead of sucking vapor off the top.  Now, liquid fuel goes to the burner where the heat of the flame vaporizes fuel.

If the heat of the flame is doing the vaporization, you're far less dependent on the weather.  In fact, all you need from the weather is just enough warmth to keep a little pressure in the canister, just enough pressure to get some liquefied gas to the burner where the heat of the flame will take care of the rest.

And that pressure should be pretty easy to come by.  Unlike upright operation, the propane content of your canister does not burn off faster.  With inverted operation (liquid feed gas), your gas mix -- and thus your canister pressure for a given outside temperature -- stays fairly constant.  As a practical matter, you can run your stove inverted in weather that's about 20F/10C colder than if your ran your stove upright.

Wow, gas in colder weather? All the simmering, none of the priming, how sweet is that?  Um, but what's the catch?

Well, the "catch" is that remote canister stoves that can handle inverted operation usually weigh two or three times what an upright stove weighs.  But we're making progress. Today, we feature a guest post by Geoff R from Australia.  Geoff reviews the Kovea Camp 5 (KB-1006).  The Camp 5 weighs 142g/5.5oz.  Which, while not as light as an upright stove, is a step in the right direction, particularly when you compare the Camp 5 to other remote canister stoves like the MSR WindPro (227g/8oz) and the Primus Express Spider (198g/7oz).

The selection of lightweight remote stoves in the US is pretty limited, so I am particularly happy to welcome Geoff's contribution to Adventures In Stoving.  So, without further ado, I turn things over to Geoff...


Since I acquired my MSR Dragonfly in 1998, I have been a firm believer in liquid-fuelled stoves.  Partly that was because of the underwhelming performance of gas stoves I had used before that – such as the Bleuet 206, especially in the wind.  Gas stoves have however advanced a lot in the intervening 14 years.  Hence I decided to investigate getting a gas stove again to enjoy benefits such as lower weight and simplicity of use again.

My criteria were to find a second stove which would be useful when two stoves are required to cook a meal, for taking with on day walks when I just want a quick cuppa, or as a more lightweight solution for longer overnight walks.  After some research I decided to take the plunge and order the Kovea Camp 5.
The Camp 5 comes in a nifty-looking plastic container
  
The Camp 5, which weighs in at 156g/5.5oz, comes with a separate piezo-igniter and is packaged in a nifty-looking brown plastic container.  I initially struggled to pack the stove back into its container.  With practise, I have now worked out how to fit everything back together properly.  The separate igniter weighs in at 14g/0.49oz and the container weighs another 60g/2.12oz, bringing the total package to 230g/8.11oz.  While not the lightest stove on the market, it is still probably one of the lightest remote canister stoves, and is a featherweight compared a packed weight of 502g/17.71oz for my Dragonfly.
The Camp 5 comes with a separate piezo-igniter.  Editor's note:  The AA sized battery is shown for scale only.  The stove does not run on batteries!

While some may take issue with the separate igniter, I prefer not to have the igniter continually being cooked all the time while the stove is on.  Also, if it breaks, I won’t have a piece of ballast attached to the stove.  In addition to the stove itself, I also purchased an adaptor from Kovea to permit the use of cheap long butane cans with the stove, as a fuel source in warm weather.  (This kind of adaptor has already been reviewed in Butane Adapter WARNING.)  Editor's note:  One must be very careful with this type of adapter.  If the canister rolls, the stove can go into liquid feed mode unexpectedly.  However, since the Camp 5 has a generator/pre-heat mechanism, use of such an adapter should be fairly safe with this stove if reasonable care is exercised.  

Initial impressions
On unpacking the stove, the overall impression is that it feels quite solid for something that weighs only 156g/5.5oz.  The legs feel quite sturdy.  My only concern was with the pot supports, which look quite flimsy, and which rotate loosely on the ends of the arms coming out of the stove body.  I don’t think the pot supports would stand up to rough handling or very heavy cookware.
The pot supports rotate loosely on the ends of arms coming from the stove body
The stove legs and the arms which run up to the pot supports feel quite securely attached to the stove body, and are articulated together by sets of teeth which ensure that the legs and stove supports lock securely in position when the stove is unfolded.
The legs and stove support arms are articulated together by sets of teeth

Another feature, which was a major in my decision to choose the Camp 5, is the fact that it has a small generator tube.  Based on my initial research on the stove it is capable of running in liquid feed mode, with an inverted gas canister.  More on this later.  The canister hose itself feels very flexible, and it rotates freely at the point where it is attached to the stove.

The burner, visually appears to be the same as that on the Kovea Flame Tornado, which is widely believed to be the same stove as the MSR MicroRocket, bar some cosmetic changes.  (One of those cosmetic changes between the MicroRocket and Flame Tornado is the burner itself.)

In Action
The first impression on firing up the stove is that it seems more like a flame-thrower than a stove.  The flame is very concentrated.  This does raise some questions about its ability to cook omelettes!
The first impression on firing the stove up is more flame-thrower than stove
After getting the stove running, one of the first tests I performed, with both a butane can and a propane-butane-isobutane mix was to invert the canister.  All the documentation I received with the stove was in Korean, so I have no idea whether inverted canister operation is officially sanctioned by Kovea.  Try this yourself at your own risk.


It is definitely advisable to turn the stove right down before inverting the canister.  The rate of fuel delivery does increase considerably on inverting the canister, especially with a propane/butane mix.  Apart from the fact that you need to be cautious of the much higher flame output, I had no issues with inverted canister operation.  I was not able to turn the valve open all the way, since the stove quickly got to a point where it could no longer suck in enough air for the amount of gas being delivered.
Inverted canister operation was no problem apart from the much higher output
Kovea seems to have erred on the conservative side when stating that the time taken to boil 1l of water is 30m30s.  During my tests, I was able to achieve a good deal less than this using a full 230g canister of propane/butane/isobutane mix from Primus.  I used the Dragonfly as a control to compare with a relatively well-known stove.

Stove
Fuel
Feed
Boil time
Fuel used
Camp 5
Butane
Vapour
4:36
16g
Camp 5
Butane
Liquid
3:47
16g
Camp 5
Propane/Butane
Vapour
3:19
14g
Camp 5
Propane/Butane
Liquid
3:18
18g
Dragonfly
Shellite
n/a
3:54
22g

Editor's note:  "Shellite" is a brand of white gas available in Australia.  Shellite is similar to Coleman Fuel.

It would appear that with a propane/butane mix, in liquid feed mode, the stove is no longer operating efficiently.  Turning the stove down a little would probably help on the efficiency front.  While I did not perform enough tests to build a statistically relevant sample, it appears that butane may be a little less efficient than a propane/butane mix.  The time quoted for the Dragonfly only includes the time from the point when the stove had reached full output and the billy of water was put on it, until the time when the water boiled.  The fuel used by the Dragonfly includes the fuel used for priming.  This test once again verifies the fact that gas stoves use less fuel than liquid-fuelled stoves.


The tests were performed at an ambient temperature of 22°C/72°F and 24°C/75°F at an altitude of approximately 7m/23ft above sea level.

Getting Out
Unfortunately I haven’t managed to get out on the trail with the Camp 5 yet, so a few tests on the gravel path in the back yard would have to do.  The small feet of the stove do have a tendency to bury themselves in a loose or soft surface.   That is however a problem I would expect any stove with small feet to have.  I didn’t have the expectation for this stove to have the same level of stability as the Dragonfly anyhow.
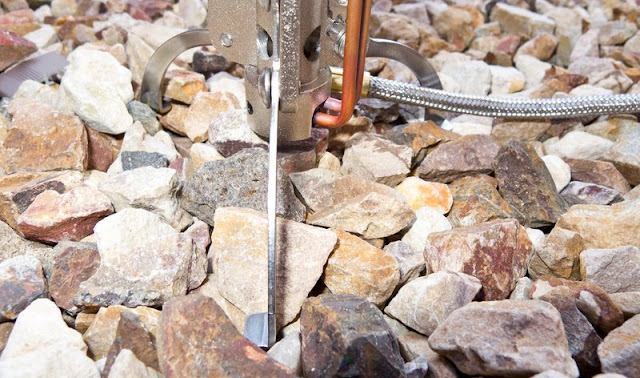
The feet of the Camp 5 have a tendency to bury themselves in loose gravel
While I was outside there was a nice sea breeze blowing.  The breeze was “nice” enough to blow over a potted yellowwood tree, which I have in the most sheltered corner of my back yard.  A windshield was definitely advisable under these conditions.  With the windshield, cut from a piece of aluminium flashing, in place I was still able to turn the gas right down to a low simmer.  As I turned the gas down, however, the circle of bubbles on the base of the billy became smaller and smaller – an indication that this stove may not be good at evenly cooking your simmering bolognaise.

Conclusion
I’m looking forward to getting out into the bush with this little stove.  I would hardly say it is perfect, but so far it is pretty much living up to my expectations.  I believe that every stove is a compromise of some sort.  For my purposes, I think the Camp 5 will be the right one.  It still isn’t without its disadvantages though.  In summary, here is a short list of the  Camp 5’s pros and cons from my point of view:

Pros:
·      Light weight (for a remote canister stove)
·      Ability to use cheap butane cans with an adapter
·      High power output
·      Ability to turn output down to a light simmer
·      Overall build quality feels solid
·      Generator tube makes it possible to operate the stove in liquid feed mode (I am not sure if this is officially sanctioned by Kovea.)

Cons:
·      Flimsy-looking pot supports
·      Very concentrated flame – possibly not great for simmering
·      Difficult to get the stove back into its container
·      Small feet bury themselves in loose or soft substrates

Note: I do not have any affiliation to Kovea.  All images in this post are © GM Rehmet 2012 and have been licensed to Adventures in Stoving.  No images may be reproduced without permission.  For licensing details, please refer to http://www.rehmet.alt.za/copyright/


A big thank you to Geoff for his contribution to Adventures In Stoving!

HJ


Other Kovea Related Posts
Kovea MoonWalker vs. MSR WindPro II -- Packability

Thursday, December 29, 2011

100% Propane for Backpacking? YES!

What's the "holy grail" of canister gas for cold weather backpacking?  100% propane.  Propane is the best.  Plain butane won't vaporize below 31F/-0.5C.  Even isobutane just sits there and looks at you below 11F/-12C.  But propane?  Propane vaporizes all the way down to -44F/-42C.  Sweet!

What's that you say?  Propane is only available in those big heavy steel cylinders that are 16.4oz/465g net weight?  And the total weight is even more than that?  And you're not about to carry that on your back?

Hey, I'm with you.  Don't blame you a bit.  Those big green steel cylinders are just impractical for backpacking.  Too bulky, too heavy, and the stoves that go with them aren't any better.  But what if there were a better way?

Introducing the Bernzomatic Power Cell.
A Bernzomatic Power Cell
Take a close look at that label
A Bernzomatic Power Cell is 100% propane
That's propane baby!

But will it work with backpacking stoves?  Let's have a look.
The connector on a Bernzomatic Power Cell is a standard 7/16 UNEF threaded connector
That's a standard 7/16 UNEF threaded connector, the same one used by backpacking stoves.  Let's try it out.
A Snow Peak GS-100 stove on a Bernzomatic Power Cell
Well, I'll be danged.  Sure enough, it works.  But now you've got an upright type canister stove mounted on a long, slender bottle.  No way is that going to be stable.  We're back to impractical again. What to do?

Well, what if you could separate the burner from the bottle?  You can -- if you have something like a Brunton Stove Stand.
A GS-100 stove connected to a Bernzomatic Power Cell via a Brunton Stove Stand
Well, that's an improvement, but that canister is still a little on the tippy side.  Can't we just lay it down?
A Bernzomatic Power Cell laying on its side.
As a matter of fact, we can.  And, in case you can't see it in the above photo, that stove is on and in use.
 

Warning:  When you lay this canister on its side or turn the canister upside down, you are feeding liquid propane into your stove.  Burning liquid propane can be extremely dangerous.
To play it safe, you should follow the manufacturer's recommendations.  The manufacturer recommends that the canister always be used in the upright position.  See the full warning at the bottom of this post before you try laying the canister on its side or turning the canister upside down.
A close up of the flame of a GS-100 stove running on 100% propane from a Bernzomatic Power Cell
Now, I started with a completely full canister, so by putting the canister on its side, I should be getting liquid feed, the kind of feed you'd want to use in cold weather.  But, just to be sure, I leaned the canister up against the hillside.
A Bernzomatic Power Cell, completely inverted
And how does it work when completely inverted?  Just fine thanks.
A GS-100 stove running on liquid propane from a Bernzomatic Power Cell
The really interesting thing about these tests I ran with 100% propane is that I made absolutely no modifications to the stove or stove stand in any way, shape, or form.  In other words, I was able to run the stove on liquid propane (which is what you get when you invert the canister) without adding any pre-heating device.  I ran my tests in weather that was about 50F/10C air temperature.  In colder weather, a device to conduct heat from the flame to vaporize the fuel before it reaches the burner head may be needed.  At the temperatures I was operating in, the normal properties of propane were sufficient to vaporize the fuel.  I experienced no flaring.  I did allow the stove to warm up before inverting the canister.

There you have it, ladies and gentlemen, practical  propane for backpacking, the holy grail of cold weather canister stoves.  You saw it here first, on Adventures in Stoving.

OK, but now the bad news.  These are hard to find.  They are out there, and they do exist, but they aren't widely available.  But they're very worthwhile if you can find some.  It appears that Bernzomatic may no longer be making these, so once the existing supply is gone, that may be it.  Grab 'em while you can!
UPDATE 12 Jan 2012:  A thoughtful reader wrote Bernzomatic.  Bernzomatic has indeed discontinued the PowerCell (PC8).  The only such canisters available are the ones currently on shelves.  Once those are gone, no more will be available.

WARNINGAny use of a fuel or a stove in a manner not recommended by the manufacturer may be dangerous or even deadly.  You may also void any warranty and/or nullify any legal protections you might otherwise have.  The preceding blog post shows techniques that are inherently dangerous.   Inverting the canister is against the manufacturer's recommendation.  Burning liquid propane can be extremely dangerous.  If you invert (turn upside down) the canister or lay the canister on its side, you will get liquid propane. Screw up here, and you may be cooking a lot more than your dinner, get it?
The author mentions these techniques solely because he believes that they might be of interest, but the author does not warrant in any way that these techniques are safe.  Indeed, these techniques are not safe and are by their very nature dangerous.  Use of these techniques may lead to property damage, great bodily harm, or even death.  The author does not recommend the techniques shown in this blog post.  If you decide to use the dangerous techniques shown in this blog, that is your decision, and you must accept that you have deliberately chosen to engage in a dangerous activity. 

HJ

Technical Appendix
Net weight:      226g/8oz of liquefied propane.
Gross weight:    365g/12.87oz (about 3/4lbs in other words)
Empty weight:    139g/4.90oz
Connector type:  Standard 7/16 UNEF threaded with a female Lindal type valve.
Manfucturer:     Bernzomatic
Stove stand:     142g/5.00oz

Thursday, November 24, 2011

Gas Blends and Cold Weather Performance (Why not just use propane?)

I got a good question recently:
Hikin Jim, I see you refill [your backpacking canisters] with butane. What is the advantage over straight propane if propane works in lower temps? For that matter, why are these cartridges blended at all? I have wondered about this for a while.

An excellent (and important) question. It has to do with vapor pressures. Take a look at the following boiling points table.
 Boiling point
n-butane    -0.5C    31F
isobutane    -12C    11F
propane      -42C   -44F
 
As you can see, propane will vaporize (boil) at extremely low temperatures whereas n-butane ("regular" butane) has a vaporization point some seventy five Fahrenheit degrees higher. Quite a difference!

Let's say you have liquid propane in a container and the ambient temperature is a nice, comfortable 75F (24C). 75F is some one hundred nineteen degrees (Fahrenheit) above the boiling point of propane. Propane at that temperature desperately wants to boil and exerts tremendous vapor pressure against the walls of the tank, vapor pressure so strong that you need a fairly heavy steel container to hold it safely, such as those found on the big green 16.4oz (~460g) propane canisters from Coleman. The little lightweight canisters that backpackers carry could literally turn into a hand grenade at those pressures.

On the other hand, n-butane is relatively benign at those temperatures. Take a look at a clear plastic lighter some time. That clear liquid inside is n-butane. Yep, all that's needed to contain n-butane is some flimsy plastic. Contrast that with a 16.2 ounce Coleman canister! Of course the problem with n-butane is that if the fuel temperature falls below about 40F/5C, the vaporization isn't strong enough to run a typical gas stove.

Well, if propane is great but would catastrophically burst a backpacking canister and n-butane is easily contained but useless in cold weather, what to do? Well, you blend the two. The liquid blend takes on properties that lie somewhere between low pressure n-butane and high pressure propane. Better still, you get a chemist to rearrange the internal structure of the n-butane molecules a little and create isobutane. Isobutane is what is known as an isomer of butane. It's the same stuff, but the internal components have been put into a different arrangement, an arrangement that in this case works in our favor in that the boiling point drops by twenty degrees Fahrenheit! Nice, eh? It's like re-packing the trunk of your car. It's the same stuff, but in a different order. In the case of your car's trunk, things fit better. In the case of butane, the properties change a bit, and we've got a better cold weather fuel. The best cold weather blend for upright canister stoves is therefore isobutane mixed with propane. Note that I stressed the word "upright." More on that in a minute (see the second of the two below links).

The problem with this blending arrangement is that the higher pressure propane tends to boil off a bit faster than than the n-butane or isobutane. Toward the end of the life of the canister, all you have left is the "lesser" (in terms of cold weather performance) of your fuels. This is one reason why in cold weather you can get the dreaded "canister fade" where your flame slowly fades out toward the end of the life of your canister, and you can't operate your stove even though, when you shake the canister, you can still hear fuel sloshing around in there.

There are two things you can do to get good performance and avoid canister fade in cold weather.  One, you can take action to warm the canister or two you can switch to a liquid feed gas stove.

With respect to liquid feed gas stoves:  If gas is kept under sufficient pressure, it liquefies, i.e. the form of the fuel changes from a vapor into a liquid.  If you feed the fuel in liquid form to your stove, you no longer have to worry about which fuel in your blend has a tendency to boil off faster into a gas.  With liquid feed, the blend you start with is the blend your finish with.  Since the blend doesn't change with liquid feed, it's not quite so critical that the non-propane component of your fuel be isobutane.  Again, since the blend doesn't change, the cold weather performance of your fuel is just as good at the end of your canister as it was at the beginning, and you don't get such pronounced "canister fade" toward the end of the canister.

There are a lot of advantages to using a stove in liquid feed mode in cold weather, but be aware that not all gas stoves can be used in liquid feed mode.   Be sure to read the above linked article to find out what type of stove may be used safely.  You also need to buy the right brand of gas in order to get good cold weather performance.  Not all brands are equal.  For more information, please see my post on What's the Best Brand of Gas for Cold Weather?

As for refilling backpacking canisters, butane is cheap, readily available, and of lower pressure than the original contents (and therefore reasonably safe). Although reasonably safe, the one problem with refilling backpacking canisters with 100% butane is that they're no good if the fuel temperature gets much below about 50°F/10°C.  So, I just use my refilled canisters on fair weather trips.  I tend to prefer fair weather trips anyway, so refilling backpacking canisters works very well for me.  YMMV.  :)  I wish I had a source of cheap isobutane, but alas I do not. Refilling with 100% isobutane would also be reasonably safe if the canister originally contained a propane-isobutane blend. Refilling a backpacking canister with 100% propane could be a very deadly enterprise and should be avoided. But this post is really about why we blend gas and why we don't use 100% propane in backpacking canisters.  At some future point, I'll dedicate an entire post to the subject of refilling canisters.

Hope that clears things up a bit.

HJ


Related articles and posts:

Saturday, September 3, 2011

MSR Whisperlite Universal -- First Videos, Detailed Photos

I'm in the process of writing a review of the new MSR Whisperlite Universal stove.


UPDATED 10/4/2011I have written a review of the MSR Whisperlite Universal.

See also this related post which contains additional info on the new (for 2012) stoves from MSR.

The new MSR Whisperlite Universal

I'm still working on the review, but I've posted some rough videos. Don't be expecting slick production values, but if you're interested in the stove, these videos should be pretty informative.

MSR Whisperlite Universal -- First Look


Field trial: MSR Whisperlite Universal, running on canister gas.


Another video of running the MSR Whisperlite Universal on canister gas.


The MSR Whisperlite Universal -- changing from liquid fuel to canister gas:


MSR Whisperlite Universal -- Flip Stop:


I've also posted some detailed photos -- and commentary:


I'll have more to say after I get the stove out in the field, but I thought I'd give you some preliminary thoughts now.

HJ

Thursday, August 25, 2011

Stove of the Week: Hank Roberts Mini Stove, Mark III

I happen to like my old Hank Roberts stove, a stove that dates back to the 1960's. It's in very nice condition. I have the Mark III version.

So compact! And inside, the original accoutrements that came with the package.

Unfortunately, it's been some years since either the stove or its proprietary fuel canisters have been produced (see The Hank Roberts Stove -- With a Proper Canister for information on and photos of the original canister type).  Therefore, to the original contents, I add a few "essentials," all of which are easily contained within the outer shell of the stove.
Now, you probably recognize the Bic type lighter, but what of the other items?

Well, let's take a look.

The silver colored cylinder is an adapter made by Henrik from Denmark who I met on an internet forum.  Unfortunately, I've lost touch with Henrik.  :(

The hose is a spare gas hose to a Chinese made stove that I bought on eBay. The hose screws into the threaded end of the adapter, like so:

Now, let's take a look at the stove itself. That little discus you saw earlier? Here's what it looks like assembled. Pure genius.

Here's the valve assembly.
Do you see that brass "needle" to the right? That needle fits into a "rosebud" on a proprietary canister. Such canisters are alas no longer made.

Here's where Henrik's adapter comes in.
 The adapter slips over the needle.

And voila! here we are ready to cook.

Did someone say "cook?" Now, where would we be without some flame shots?

A very nice, efficient blue flame.

The Hank Roberts Mini Stove (Mark III) really has a good strong flame.

The original proprietary canisters contained a wick. The wick conducted liquefied gas into the burner. Liquid did you say? Why then we ought to be able to invert the canister and be able to run the stove in liquid feed mode. Indeed, we can do just that.

Be sure to let the stove warm up before inverting the canister. If you don't let the stove warm up a bit first, the stove will flare.  Running a gas stove in liquid feed mode allows one to operate a gas stove in much colder temperatures than in conventional upright (vapor feed) mode.

As they say, "the proof of the pudding is in the eating," so it's time for the "tea test."  Handily passed.

And if tea test, then tea.
Delicious, I assure you.

I thank you all for joining me on another Adventure In Stoving,

HJ

The Hank Roberts Mini Stove (Mark III version)
What's good about it?
Compact
Capable of operation in colder weather than conventional (upright) gas stoves
Highly adjustable flame
Good, strong flame
Stable because of nice wide base
Good pot stability because of well designed windscreen/pot support
Some wind protection from windscreen (it really needs a separate windscreen in a stronger wind)

What's bad about it?
Canisters are no longer available (but can be operated with an adapter, if you can get one)
A little heavy (about 8 oz) by modern gas stove standards
No longer available in stores (but available on eBay and such)

Hank Roberts Mini Stove:  Highly Recommended (considering its era).


Hank Roberts Stove -- Related Blog Posts

Tuesday, March 15, 2011

Stove of the Week: MSR Rapidfire

OK, so this week's stove is a bit of a "sleeper" in the sense that it's not a stove that you would expect a lot from -- unless you knew better.  But you'll have to read on to find out what's so interesting about this week's stove, the MSR Rapidfire.

First, let's go through our usual run down of the stove, and then we'll get into some of it's unusual qualities.  So, what's with this thing called a Rapidfire?  Isn't it just a Whisperlite?  I mean seriously, just look at it.  It's a freakin' Whisperlite for crying out loud.

Or is it?  Take a look at the bottom of the burner column.  Hmm.  No priming cup.  OK, so what the Dickens is this thing?  Well, it is a close relative of the Whisperlite all right, but made to run on canister gas.
The Rapidfire was MSR's first entry into the gas stove market.  Prior to the Rapidfire, MSR was a liquid fuel only stove manufacturer.  When MSR saw how gas stoves were really catching on, they needed an entrant into the market.  How better to get there than to simply modify their existing "workhorse" stove, the Whisperlite?  Enter the Rapidfire.  Apparently, MSR was pretty paranoid about the volatility of gas as compared to liquid fuel; they really lengthened the fuel line which is odd when you consider that now the majority of MSR gas stoves mount directly on to the canister.

The stove itself is identical to the Whisperltie except for the aforementioned lack of a priming cup.
Instead of a priming cup, there's a threaded, knurled ring that holds the fuel line and legs in place.
At the end of the fuel line, there's a gas connector and valve rather than the open ended tube with aluminum block and catch-arm of the Whisperlite.
Now take a careful look at that connector.
Note the central pin.  It is this pin that depresses the Lindal valve inside the canister of gas.  I've seen these pins go missing.  No pin, and essentially you've got no gas.  Second, note the black rubber "O" ring.  This "O" ring must be in place for you to operate the stove safely.  Without the "O" ring, gas may leak which could be quite dangerous.

Speaking of gas, it's worth mentioning here that the MSR Rapidfire stove can use any standard threaded backpacking gas canister.  Originally, the Rapidfire used a cylindrical gas canister, but that canister had the same 7/16" UNEF standard thread as used on today's dome shaped canisters, so there's no problem with respect to finding fuel even though the Rapidfire is an older stove.  MSR discontinued production, to the best of my ability to discern, in 2001.

OK, so MSR needed a gas stove, so they pressed a modified Whisperlite into service, so what?  I mean does this Rapidfire have any redeeming features or is it just some kludgey attempt to not let all the other stove manufacturers run away with the gas stove part of the stove market?  Actually, the Rapidfire has several features that distinguish it from typical gas stoves, one of which actually makes the Rapidfire potentially pretty worth owning.  I'll get to that in a moment.
First, the Rapidfire, like its progenitor the Whisperlite, is a remote fueled stove.  In other words, the fuel is not directly attached to the burner but rather fuel is brought in via a fuel line from a remote source.  This does several things for us:  1) since there's no fuel tank under the burner, the burner is lower which brings us out of the wind.  2)  Also since the burner is lower, the stove is more stable.  3) Lastly and most importantly, since the fuel isn't local to the burner, we do not have to worry about heat radiating from the burner and overheating the fuel -- which means we can use a windscreen with complete impunity.  Use a windscreen the wrong way on a typical canister stove, and you could turn your stove from a domestic servant into a domestic terrorist.  Overheated canisters can and do explode.

Speaking of windscreens, here's a Rapidfire all set up with a heat reflector and windscreen, a very efficient cooking set up.

Now, I keep blathering about something special about the Rapidfire.  Let's take a closer look at the burner itself shall we?
Do you see that loop in the burner?  That's the fuel line.  That loop is referred to as a pre-heat loop (or generator).  The loop is exposed directly to the flame when the stove is in operation.  Fuel flows into that loop before it enters the burner, which greatly heats the fuel.  In a liquid fueled stove, that heat is what turns the liquid into a vapor so that it can be burned.

Well, that's just great, Jim, but we're working with gas here, so who really cares?

Are you?  Really?  Pick up a full canister of gas and shake it.  Hear that sloshing sound?  That's a liquid in there.

OK, great, it's a liquid in the can but it's a gas when it comes out of the burner, so I still don't care about that pre-heat loop; can we just move on?

Well, not so fast there.  Yes, you're right, it is a gas when it comes out of the burner.  Usually.  But what about cold weather?  Gotcha.  That's the problem with gas stoves.  They lose power when the weather gets below freezing because the liquefied gas in the canister won't vaporize properly.  Remember that pre-heat loop?  There's our answer.  In cold weather, we let the liquefied gas stay liquid, and we let the pre-heat loop vaporize it for us.  In that way, we don't care if it's cold or not.  We don't use the air temperature to vaporize our gas, we use the heat of the flame.

Uh, great Jim, but the connector attaches to the top of the canister, and all it's going to draw is gas off the top.  If there's no gas, we've got no fuel.

This is not a problem.  Just turn the canister over.  Note:  Do not invert the canister on a gas stove that does not have a pre-heat loop.  A serious flare up might result. 
The top of the canister is now the bottom.  That portion of the fuel that is in vapor form now acts to pressurize the canister, pushing liquid down, out of the canister, and down the fuel line.  The fuel stays in liquid form until it hits the pre-heat loop where the high heat causes it to change from liquid to gas.  The resultant gas comes rushing out of the burner, and baby you've got flame.  Note that the stove is in operation in the above photo.  When gas is fed in liquid form to the burner, the stove is said to be in liquid feed mode.  Note that I said liquid feed not liquid fuel.  The fuel will still be a gas at room temperature and pressure.  We haven't changed fuel; we've merely changed the form that the fuel is fed in.
Using a gas stove in liquid feed mode is an important capability for a couple of reasons:
1.  Normal gas stoves operate in vapor feed mode, that is the fuel is fed in as a vapor, and you have to rely on the ambient temperature to vaporize your fuel.  In liquid feed mode, you rely not on the outside temperature but on the heat of the flame.  Stoves in liquid feed mode will operate in colder weather than normal gas stoves.
2.  In normal gas stoves, the fuel is typically a propane-butane or propane-isobutane blend.  Propane, the gas that works best in cold, has a higher vapor pressure and burns off faster leaving you, toward the end of the life of the tank, with a tank full of your worst performing cold weather fuel. In fact, you may wind up with a canister that is still 30% full that you can't coax any gas out of because all the good propane has burned off and nothing is left but the lesser performing fuels.  In liquid feed mode, all the fuels are burned at a constant rate.  The fuel towards the end of the life of the canister is the same mix as at the start of the canister.  In liquid feed mode, you don't get such horrible "canister fade" like you do in vapor feed mode.

I normally recommend a cut off of about 20F/-7C for normal gas stoves -- and that's with using "tricks," having to put up with less-than-stellar performance, and potentially having fuel that you can't get to vaporize.  With a gas stove in liquid feed mode, you can easily go down to 0F/-18C without having to use a lot of tricks, with full performance, and without having a portion of your fuel being unusable.

In other words, with a gas stove in liquid mode, you get all of the convenience of gas without all the low performance and hassles associated with gas in cold weather.  Uh, couldn't I just use a regular liquid fueled stove?  Sure.  If you're comfortable with liquid fuel, go for it.  But consider this:  If it's really snowing hard and you need to cook inside your tent do you really want to use liquid fuel?  What happens if your priming gets a little out of hand?  With a gas stove in liquid feed mode, you get liquid fuel performance but without the danger of priming.  And of course you get all of the usual convenience of a gas stove.  One of those conveniences is simmering.  It's pretty tough to get the typical Whisperlite to simmer like this:
And that's without monkeying around with only filling the fuel bottle half full and only pumping a few strokes.  Easy, just about automatic simmering in other words.

Now, in all fairness, other remote canister gas stoves have pre-heat loops. Other remote canister stoves can operate in liquid feed mode.  What makes the Rapidfire a "sleeper" -- a stove you wouldn't expect much from but turns out to be a pretty good stove?  Well, take a look at the price tags on some of those stoves out there that are remote canister stoves and have pre-heat loops.  They're expensive.  The Rapidfire is an older, discontinued stove, most people haven't heard of it, and you can pick one up for a much more reasonable price than you can some of the current production stoves.  All the performance at a fraction of the price.  You heard it here on Adventures in Stoving.  :)  Also, the Rapidfire's fuel line rotates easily at the connector which makes it easy to invert the canister to put the stove into liquid feed mode.  The Rapidfire's more modern cousin, the Windpro, does not rotate easily at the connector.

Yep, the Rapidfire is a "sleeper," but don't underestimate this stove.  It's a lot of stove for the money.

Well, looks like the kettle's boiling.  I'd best get to that cup of hot chocolate before it gets cold.

Thanks for joining me on another Adventure in Stoving.

HJ

The MSR Rapidfire
What's good about it?
Able to operate in liquid feed mode
Economical
Can use a full windscreen with impunity even though it's a gas stove
Simmers well
Connector rotates easily for liquid feed mode
Quiet
Fairly compact
Reasonably powerful
Reliable
Stable
Efficient

What's bad about it?
The wire pot supports are difficult to get back into "true" if they get bent.  (so don't bend them!)
The fuel line is a little stiff particularly when compared to newer stoves like the WindPro.
A tad heavy when compared to newer stoves like the WindPro.

Overall, recommended.

Friday, January 28, 2011

Stove of the Week: Coleman Xpedition

Well, here's something I'd like to try:  A "Stove of the Week" post.  I doubt I'll be able to post a stove every week (but I'll try), but I collect stoves, I've got quite a number of interesting stoves, and I'd love to share them with you.  I take them out quite frequently in the winter, but when the temperatures climb, less frequently so.


Related posts:
For starters, here is the Coleman Xpedition two burner backpacking stove.  Yes, you read that correctly, a two burner backpacking stove.  Not many of those out there!

The stove is shown here on the ruins of Echo Mountain House a hotel built in the late 1800's atop Echo Mountain (3207'/977m).

Now the stove has something of a story.  First it came to me by way of a friend in England.  Ian sent it to me simply because he knew of my affection for and interest in this type of stove.  He asked for nothing in return.  I thank you very much, Ian, and I apologize that it's taken me this long to get it fettled (repaired) and posted. 

In terms of fettling, the "X" stoves that Coleman produced do have an achilles heel:  their connector.  I own half a dozen of the three types of "X" stoves (the Xtreme, Xpert, and Xpedition).  I've seen multiple problems with their connector (the point at which the Powermax canister attaches to the stove).


Basically, the canister has a hex shaped protrusion on it.  The hex is placed into the connector pictured above and rotated 1/6th turn to the right.  As the hex rotates, it causes the inner cam in the photo above to rotate with it while the outer "finger plate" (Coleman's term for it) stays stationary.  The protrusions on the inner cam force the "fingers" on the finger plate to expand and a small ridge on each finger is forced into a grove on the inside rim of the canister's valve assembly.  The fingers when forced by the cam into the grove hold the canister in place such that the lindal valve is depressed, opening the valve and allowing the gas to flow.  If you look closely at this photo, you can see the grove on the inside rim of the canister's valve assembly.

In theory.  In practice, however, the inner cam just wasn't rotating.  Instead, the canister's hex was rotating within the cam, stripping the plastic of the cam.  If you look closely at the photo of the cam, two photos back, you can see some wear where I've stripped the cam.  

"Well," thought I in all my full brilliance,  "the fingers must be too tight, and they're not allowing the cam to rotate properly.  I'll loosen them up a bit."  Crack.  One of the fingers broke off.  Oh, great.  

Well, no problem, I'll just order one from Coleman.  Nope.  Coleman no longer carries either the cam or the fingerplate.  Stumped, I laid the stove aside for a while.

Some time later, I was tipped off that Campmor.com carries "trail maintenance kits" for the Coleman "X" stoves.  The best deal is the Xpedition trail maintenance kit:  it has more parts (and for a lower price) than the other kits.  All of the kits are interchangeable even though some of the kits are labeled for one of the three "X" stoves or another.  A bit expensive to buy an entire kit for just the finger plate, but having no other alternative, I bought a couple.

Here in this photo, you can see the difference between a nice, new cam and a worn cam.

But no dice.  The derned thing still won't turn.   I tried oil.  I tried swapping parts out for new parts.  I tried powdered graphite.  Nothing I tried worked.  The cam just wouldn't turn.  I admit that at this point I just about binned the danged thing.  

Now, fast forward some months.  New Year's day 2011 is fast approaching.  Now, we've something of a local tradition hereabouts, it's called the Rose Parade, which is a nationally televised event.  As part of that parade, the US Air Force usually does a relatively low altitude fly by over the parade route.  Lately, it's been the B-2 Stealth Bomber.  Fascinating!  There's a mountain that has a commanding view of the parade route.  The last several years, quite a crowd has gathered upon the mountain top so as to have quite the view of the B-2 as it flies by.  It's become an event in its own right, with people bringing stoves, cooking, and having quite the festive occasion.  Well, if one wants to cook for a crowd AND one has to carry the stove up a mountainside, what better stove than a two burner Coleman Xpedition stove?  It's relatively light, yet it has not one but two powerful burners.  I thought, what could it hurt to pull the Xpedition off the shelf and have one more go at fettling?  

Now, take one more look at that last photo.  Note that the protrusions on the cams have sharp, hard right angled edges on them.  What if I beveled them a bit?  I got out a file.  I don't know how well this will show in a photo, but here's a cam after I've beveled the leading edges of the protrusions.


Now, have I just wasted my time yet again?  
NO BY GOLLY I HAVE NOT!!!         

Phew!  That's the best looking flame I've seen in a long time.  The worst part of it of course is after months of time spent and untold frustration, it only took me a few minutes to bevel the edges and have the stove up and running.   It's a fairly simple fettle -- once it occurs to you to try it.  Don't become a stovie if you're not prepared to have a good laugh at yourself once in a while.      

Well, then fettle done, off we go early the next morning.  We've got to make it to the mountain top and be in position before 0800 when the fly by occurs.  I'm carrying about 30 pounds of gear (about 13.5 kg); this will be no fast trek.  My friend calls.  He's running late.   Ack!  Off we go in a bit of a race against time!

It's a fairly cold morning by California standards; there's frost on the ground, indicating that the over night low has been below 32 F (0 C).

The San Gabriel Valley of California, pre-dawn.


Here's another view of the greater Los Angeles area from further up the trail a bit later that morning.  If you look closely at the uppermost of the two blimps, you can see the rose colored light of dawn.  Downtown Los Angeles can be seen at the lower right.


Finally, we're in position, and it's nearly 0800.  We've made it in time.  And there it is!  The stealth bomber!


Unfortunately, I couldn't get him in frame when I maximized the zoom level (he was moving too fast), so that's not the best photo in the world, but I assure you it was quite exciting in person.

Here's my set up on the mountain top after the crowds have departed.  I made hot water for instant oatmeal and instant cocoa for folks.  The Xpedition did an admirable job of it.


The pots are 0.9 L and 1.5 L Primus LiTech kettles.  Very convenient to pour from.  By having two burners and two kettles, I could serve with one while heating more with the other, allowing me to provide hot water to a fair number of people.

The canteen seen at left is an orginal Swiss military one produced by Sigg.  Sigg recently issued a retro version made of steel with a screw top.  I saw one go recently for about $75.00 on eBay!    I bought the original version for $7.13 total, and mine is lighter aluminum.  I think I'll stick with my version although a cork stopper is not as secure as a screw top, and I worry I may get water spilled on my pack some day.  I carry it strictly for the cool factor.     

The windscreen you seen in the photo is the concatenation of one and a half Olicamp windscreens.  One and a half windscreens makes an almost perfect fit for the Xpedition.
 

Here's the view from the top.  The signs you see are historical interpretive signs explaining the various features of the site.  The blue you see on the far horizon is the mighty Pacific Ocean.


And now that the crowds have gone, it's my turn to enjoy a cuppa.


And if you look behind me, you can see why so many people have chosen to live in California:  It's January, but it's a beautiful day.  It's cold, there was frost still in the shady spots, but out in the sun a light down jacket like the one you see me wearing was all I needed.  Not too bad for January.

Well, I thank you for joining me on my New Year's Day trip up Echo Mountain.  I hope you've enjoyed the trip -- and the stove.

HJ