QuietStove.com

Sunday, December 18, 2011

Is Ethanol Worth It?

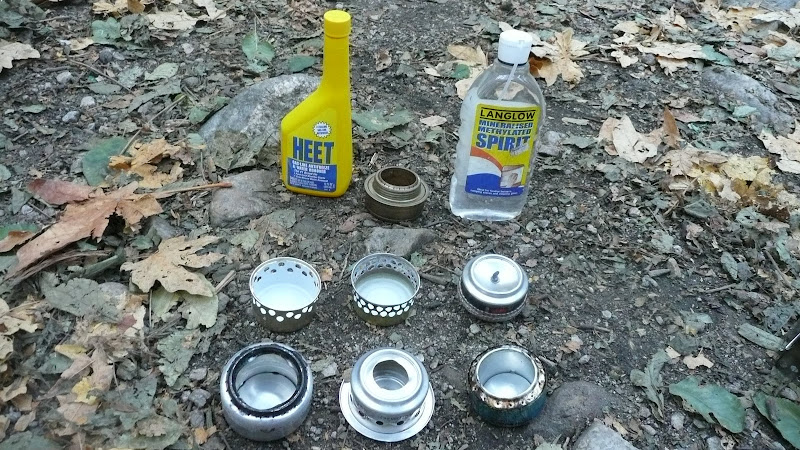
In the US, if you're an alcohol stove user, you probably know about HEET in the yellow bottle. "Yellow HEET" is basically methanol. It's cheap, widely available, and burns cleanly in alcohol stoves,  The downside to methanol is that it has relatively low heat content per gram compared to ethanol.  In other words, you have to carry more HEET to do the same amount of cooking that you could do with ethanol.
The yellow bottle on the left is HEET (methanol).

If you want an alcohol fuel with more heat per gram, you might use something like Klean Strip Green Denatured alcohol. Green denatured alcohol has a fairly high percentage of ethanol which, when burned, will produce more heat per gram than methanol. If you can produce more heat per gram, then you don't have to carry as many grams to do the same amount of cooking. In other words, you can shed some pack weight. The down side is that high ethanol content blends like Green denatured produce a little more soot, are a little harder to find (Home Depot carries it), and are a bit more expensive.
Klean Strip Green Denatured Alcohol, a high ethanol content alcohol blend
The question then is: Is ethanol worth it? Is it worth going to the trouble and expense to get an alcohol fuel with higher heat content?

Let's do the numbers.  Yesterday, I went and ran some tests with Green denatured and methanol.  See the appendix for details of testing conditions and parameters.
Running simultaneous tests to control testing errors.
I could consistently boil two cups of water with about 18ml of green denatured alcohol.  I could sometimes do it with 17ml, but 17ml wasn't consistent.  With 18ml, I never failed to get a boil.

With HEET (methanol), it took me 24ml of fuel to boil two cups of water.  I could sometimes get a boil with only 23ml of alcohol, but in order to guarantee a boil, I had to use 24 ml.  In other words, it took me about 6ml more fuel per two cup boil when I used methanol.
Conducting fuel quantity boil tests.
Six milliliters of alcohol weighs about 5grams.  In other words, we can save about 5 grams of weight each time we boil 2 cups of water if we use green denatured instead of HEET (methanol).  If on a trip I do a 2 cup boil in the morning and another in the evening, I'd save 10 grams (about 1/3 oz.) in weight per day.  If I take a week long trip, I'd save about 70 grams (2.5 ounces).  Of course if you boil more than 4 cups (approximately 1 liter) per day, you'd save more.  If you boil less, you'd save less.

There's the bottom line:  You'd save about 70g/2.5oz on a one week trip if you use green denatured alcohol instead of HEET (assuming you boil about 4 cups/1 liter per day).

So, is it worth it?  You tell me.  Each person needs to decide for him or herself what weight is worth cutting and what a lighter pack is worth.  Some people are "gram weenies" looking to cut every gram possible.  Some people are "ounce counters" looking to cut weight but perhaps not quite as zealously as the gram weenie crowd.  What's your style?  What amount of weight matters to you?  I can't tell you that, but at least now you can make an informed decision.

Hope that's helpful,

HJ

Appendix:  Test Conditions and Parameters
All tests discussed in this blog post were conducted at Henninger Flats near Los Angeles, CA, USA, at an elevation of about 2600 feet/790 meters.  Air pressure as measured by my Sunnto Altimeter watch was 928mBar/27.40 InHg.  Air temperature was approximately 50F/10C.  Air temperature did fluctuate during testing.  Winds were light and intermittent, but no more than about 5mph/8kph at any given time.  Water temperature was about 45F/7C.  Trail Designs 12-10 burners in a Caldera Cone windscreen/pot support (see photos above) were used for all tests.  All tests were conducted atop a wooden picnic table in an unsheltered location.  All tests were run multiple times to preclude testing errors. Stoves, pots, and windscreens were allowed to cool subsequent to each test and had returned to ambient temperature prior to further testing.

If you look closely at the photos above, you'll see that I used slightly different versions of the Caldera Cone set up for my tests.  Simultaneous tests were run one fuel at a time.  In other words, both burners were run on the same fuel as I ran my tests.  Interestingly, even though the pot sizes are different between the two versions of the Caldera Cone I used, the amount of fuel required was remarkably consistent, both with HEET and with green denatured alcohol.
The view from Henninger Flats on Satuday, 17 DEC 2011.  Can you see downtown Los Angeles?  The Pacific Ocean?
Click to enlarge

Related posts and articles:

Monday, December 12, 2011

DIY Alcohol Stoves -- Basic Design Principles

In a pinch, you can use just about anything to make an alcohol "stove" out of.  Really, there are only two criteria: Your stove has to be able to hold a liquid (the alcohol in other words), and your stove can't be made of a flammable material.

What's that? Oh, you want a good stove?  Yeah, well that's just a bit more complicated.  No worries.  Let's talk about a few basics of alcohol stove design.

There are many, many types of alcohol burners, but for the purposes of this post, I'm going to limit the discussion to open type burners made from aluminum cans.  Open burners are relatively easy to make, effective, and widely used, so it's not like we're limiting ourselves too much.
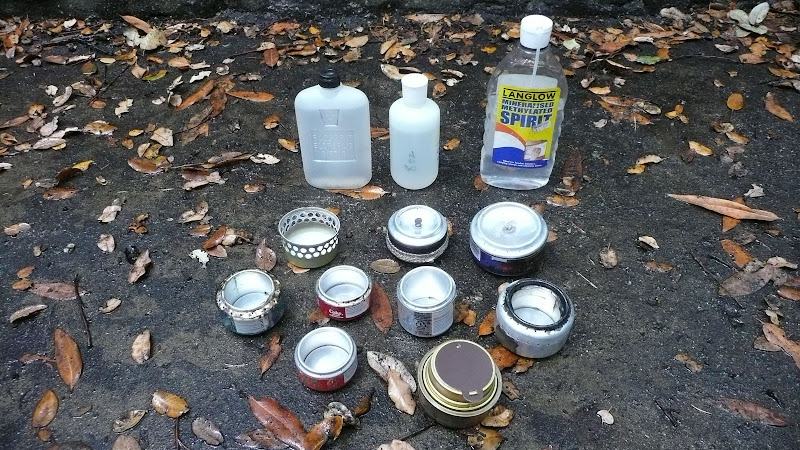
Various alcohol stoves prior to testing
OK, so what constitutes a good stove?  Everyone is going to look at this a little differently, but below are my critiera.  See also the Standards for DIY Alcohol Stoves in the appendix of this post.
1.  Lightweight.  Hey, I gotta carry this thing, right?  And if I'm going to give up the convenience of gas, then I better be getting something out of it -- like a lighter pack.
2.  Efficient.  So, what good is a light stove if it eats fuel like an old 450 V8 Chevrolet engine with a four barrel carburetor?  Who cares if the stove is light if I have to carry four times the fuel?!  The danged thing needs to save  me weight, remember?  I want a stove that will do the job with a minimum amount of fuel. 
3.  Effective.  Yeah, it has to be light.  Yeah, it has to be efficient.  But it has to do the job.  A stove that won't cook doesn't save me anything.  It's got to work. Not negotiable. 
4.  Minimum "fiddle factor."  If I need a degree in mechanical engineering and a Rube Goldberg mindset just to run the thing, then it's not the stove for me.

With me so far?  Sure, we can think of more criteria, but those are the basics.  Let's go with those and see what we can come up with.

Preparing to test another set of alcohol stoves
You can make an alcohol stove out of most anything, but aluminum drink cans are the most commonly used item for DIY alcohol stoves.  They're light, they're easy to get, and there's a free drink inside if you buy the can!  :)

Now here's where it gets tricky.  There are 10,000 ways to slice and dice an aluminum can to make a stove.  There are tons of sites out there on the net that list detailed templates.  I may post something like that at some point, but that's not my purpose today.  What I'd like to do is take a step back and look at a slightly bigger picture in terms of DIY alcohol stove design:  What are some of the basic principles involved?  
Testing various open type burners
OK, so any fool can lop the top off an aluminum can, splash in some alcohol, and light it on fire.  The chances of getting an efficient stove that way are pretty much zero.  For example, take a look at this photo:
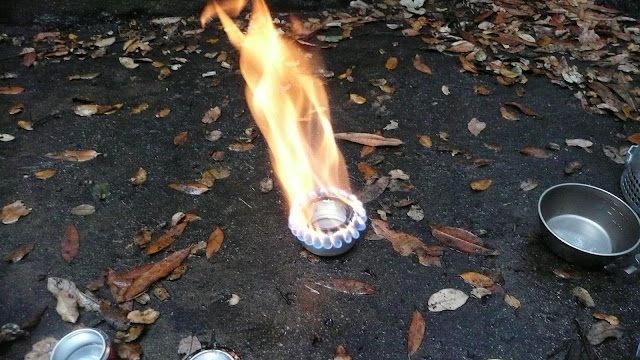
An alcohol stove made from 23.5 fluid ounce/695ml drink cans
See those towering, bright yellow flames?  This stove puts out a lot of heat, but it burns through a lot of alcohol quickly.  Can you say "inefficient?"  The first lesson of alcohol stove design is this:  fast stoves are fuel hogs.  The corollary to that is that slow stoves are more efficient.

So, what's the problem with the above stove?  Poor materials?  Poor execution?  Not really.  It's a design issue.  It just burns too darned fast.  So how can we slow it down and make it more efficient?

It's hard to tell in the photo above, but that's a bigger than average stove.  It's made out of 23.5fl oz/695 ml sized cans.  What if we downsized a little bit?  Take a look at this stove. It's made out of 7.5fl oz/222ml sized cans.
An alcohol stove made from 7.5 fluid ounce/222ml drink cans
Much better!  Much smaller flames and a lot less yellow.  So, lesson two:  The width of the burner matters.
So is that the answer?  Just use a small can?  Take a look at this photo:
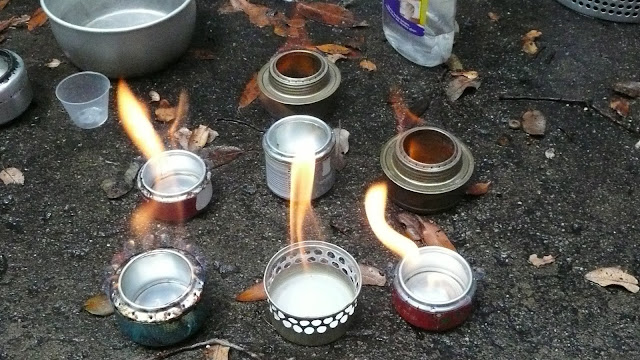
Various types of alcohol stoves being tested.
Notice that there are three stoves made from the smaller cans.  The two shorter small stoves have bright yellow flames (inefficient), but notice that the taller one in the center of the back row.  Its flames are a nice pale blue -- you can barely see them.  So, lesson three is that the height of the burner is important.

Now, did you notice the brass burner in the photo above?  That's no DIY burner; that's a Trangia burner.  Trangia has been making alcohol burners since at least 1951, and they're pretty darned good burners.  Can we learn anything by looking at a Trangia burner?  Let's compare a Trangia burner to the stove we called inefficient in the first photo above.
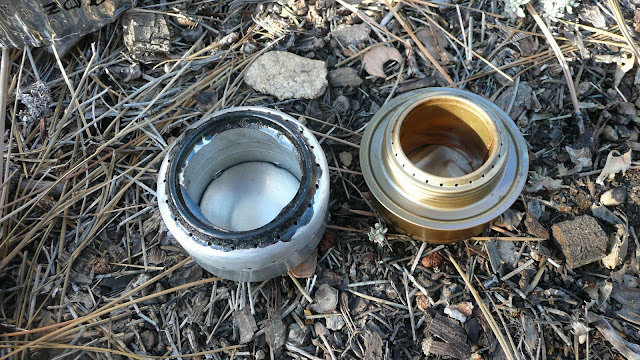
An alcohol stove made from 23.5fl oz/695 ml drink cans (left) and a Trangia burner (right)
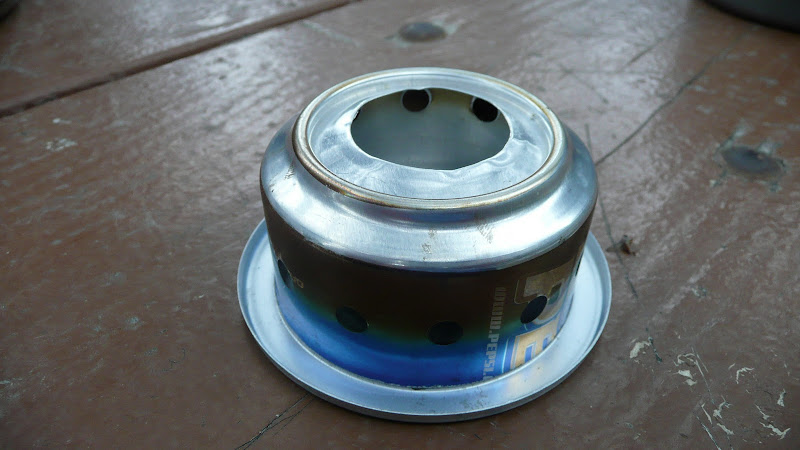
Well, now what the heck?  The two stoves have roughly the same width at the base, but the Trangia is pretty efficient, and the other stove, well, isn't.  What's the difference?  Take a look at the opening in the Trangia burner.  Notice that it's not full width.  The opening is smaller than that the width of the entire burner.  Lesson four:  Yes, width matters, but the width of the opening is even more important than the width of the entire burner.

OK, now take a look at this photo:
Alcohol stoves of varying designs.
The two stoves in the back row are the proven 12-10 stove from Trail Designs. Note how the opening is smaller than the width of the cans -- just like the Trangia. Hey, maybe we really are on to something here!

Now, take a look at the third stove from the left in the front row. Note how it too has an opening smaller than its width.  It's a little hard to tell from that photo, but that's a very tall stove.  Recall from lesson three that the height of the burner is important. So, let's fire that burner up and see how it works.
Testing a tall stove with a small opening.
Well, we've certainly gotten rid of those nasty yellow flames!  But this thing is a PITA to get started, and the flame is so small that it barely heats water.  It might be fine for simmering, but it won't boil water.  After 20 minutes, my water still hadn't boiled, so I cancelled the test.  This model just isn't practical.

Height makes for a more efficient stove, but too tall and your water never boils.  There is a relationship between height and opening size, so lesson five:  For a practical stove, the optimal ratio between height and opening size is approximately 1:1.

What would a stove with a 1:1 opening size to height ratio look like?  About like this:
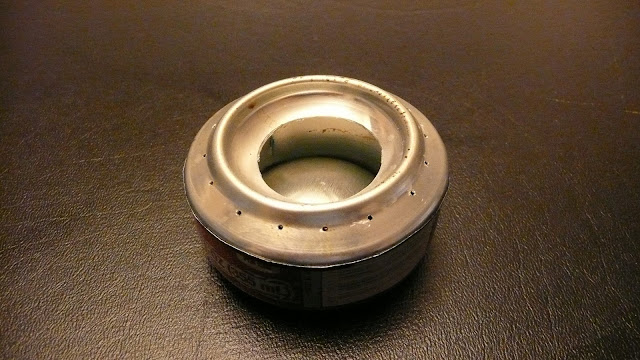
An alcohol stove where the opening size is approximately equal to the height of the stove
So, great theory, but does it work in practice?  As a matter of fact that ratio works pretty well.
A 1:1 ratio alcohol stove in use
Yeah, there's a little yellow in the flame, but that's not bad when you compare the size and amount of yellow to the stove in the first photo in this post.  And the flame is a nice middle of the road size.  It's not so small as to be useless, yet it's not so large as to be wasteful.  In my tests with 500ml of approximately 45F/7C water, I was able to bring the water to a boil with about 1/2 fluid ounce (approx. 15ml) of green denatured alcohol.  In terms of efficiency, that's pretty good. 

So review:
1.  Fast stoves are fuel hogs; slow stoves are more efficient.
2.  The width of the burner matters
3.  The height of the burner matters
4.  The width of the opening is even more important than the width of the burner
5.  For a practical stove, the ratio of the width of the opening to the height of the burner is about 1:1.

OK, there you have it, some basic design considerations for making a practical, efficient open type alcohol burner.  There's more to it, such as exactly which template you want to follow, but in the interests of keeping this post shorter than the Encyclopedia Britannica or the New York City phone directory, I'm going to end things here for today.

Thanks for joining me on another Adventure in Stoving,

HJ

Appendix:  Standards for DIY Alcohol Stoves
Below are some numbers for you to benchmark your stoves against.  These are some fairly high standards.  Do not be discouraged if your first couple of stoves don't hit all the numbers. Of course, these numbers are just my thoughts on the subject.  Ultimately, your DIY stove must please you.

Weight:  A lightweight burner should weigh one ounce (28g) or less.  For example, the 12-10 stove from Trail Designs weighs 0.6oz (16g).

Efficiency:  An efficient stove should be able to boil 500ml of 20C water using 15ml of alcohol or less in a plain pot (no heat exchanger in other words) with a lid at 1 Atmosphere (1013 mBar) of pressure.  Use of a windscreen is permitted (recommended actually).  You may vary the height of the pot above the burner as you see fit.  About 2cm to 3cm seems to work well in my experience.  YMMV.

With respect to to the above efficiency standard, atmospheric pressure is hard for most of us to control.  Cut yourself some slack on the atmospheric pressure, but if you live at high altitude on the Tibetan Plateau, just don't crow too much when your stove meets the rest of the criteria.

Effectiveness:   Your burner should consistently be able to bring the water to a boil in 10 minutes or less in a wide variety of conditions, e.g. differing air temperatures, wind velocities (within reason), altitudes, etc.  Stoves that only work on your work bench at home do not qualify.  Your stove should be able to work under typical, real world outdoor conditions.  Generally, alcohol stoves work better when the air temperature is at least 40F/5C (that's actually pretty chilly for most alcohol stoves).  If your stove continues to work well below 40F/5C, then you've got a real winner.

Minimum "fiddle factor:"  Your stove should not require priming and should be able to be fueled from a normal flip top squeeze type bottle in the field without a separate funnel or any other external device.  Your stove should light with a common match in one try, a normal Bic type lighter in about one or two tries, or a typical fire steel within about three tries.  The point being that it shouldn't be a major hassle to get your stove to light.

Related posts and articles:

Acknowledgments:  I am indebted to many people who shared with me ideas about alcohol stove design.  I'm sure I'll forget someone important, but when a debt of thanks is owed, better to remember to thank a few than to thank no one at all.  My thanks to:  James M, James N, Jon F, Kevin B, Tony B, Turkoker, and Zelph.  Particular thanks to Will L. who patiently did the majority of the actual fabrication of the stoves (hey, I'm a blogger not a stove manufacturer.  I'm really more of an "ideas" guy, see?).  :)

Friday, December 9, 2011

The Trail Designs 12-10 Alcohol Stove

Recently, I did a review of the Caldera Cone alcohol stove system, which is a wonderfully efficient, lightweight, wind resistant alcohol stove system, one of the best out there.
A Caldera Cone alcohol stove system in use with an MSR Titan kettle.
Today, I thought I'd take a quick look at the unique burner that comes with the Caldera Cone, the 12-10 burner.  As for why the Caldera Cone is such an efficient alcohol stove system, please see The "Magic" of the Caldera Cone.
A Caldera Cone's 12-10 burner, shown here in my hand.
The 12-10 burner has an interesting and unusual design.  While the 12-10 has holes in the side of the body of the burner, it is not a side jet stove, at least not in the conventional sense.
Some common alcohol stove designs:  Open cup side burner, closed top jet, open top jet (including the brass Trangia burner)
With a typical side jet burner, the flames burn out from the jets.
A typical side jet burner.
With a 12-10 burner, the flames from the "jets" basically burn in to the burner.  It's a little hard to see, but take a close look at the two photos below of a 12-10 burner.  If you look closely, you can see the jets burning within.
A 12-10 burner in use.  Can you see the jets within the burner?
Another photo of a 12-10 burner in use.  Can you see the interior jets any better in this photo?
The interior jets combine into one flame and exit the burner, burning as though the 12-10 burner were a simple open cup type burner.  It's anything but.  This is one sophisticated, well-tuned burner.  I can only imagine how many hours of design, building, and testing went into the 12-10!
The 12-10 burner almost looks as though it were a simple open cup type burner.  Note the burner is shown mounted in a Trangia 27 set up for ease of photography. The Trangia 27 is NOT a Caldera Cone or a Trail Designs product.
Now, take a look at that photo above.  That's a really tall flame.  On most stoves, if you get a tall flame like that, the stove is really inefficient and burns through its fuel quickly.  Not the 12-10.  In test after test, I've matched it up against various designs, and relatively few stoves beat the 12-10 in a duration test.
Various alcohol stoves being compared to 12-10 burners in a duration test.  Can you spot the 12-10 burners?  They're the two on the lower right hand side, front row.

One might also think that such a tall flame would waste a lot of heat.  Not so with a Caldera Cone
A Caldera Cone (left)
That cone controls the airflow around the pot and transfers heat to the pot very efficiently with a minimum of fuel use.
Water boiling on a Caldera Cone stove system.
The Caldera Cone alcohol stove system -- it's one well thought out system. 
My Caldera Cone alcohol stove system set up.

And at it's center?  The superb, lightweight 12-10 burner.  Highly recommended.

HJ

P.S. This blog post is part of my series on the Caldera Cone. In case you missed any of the series:

A Trail Designs 12-10 alcohol burner
Related posts and articles:


Monday, December 5, 2011

Gas in Extreme Cold: Yes or No?

OK, if you've read my previous blog posts, you know that remote canister gas stoves work pretty well down to 0°F/-18°C – if you run them with the canister upside down.  This assumes that you know and use good cold weather gas stove techniques.  And you'd better read up to understand just which gas stoves can be run with the canister upside down, because most of them can't.  See my article Stoves for Cold Weather II  (see also the list of related blog posts below).

What about below 0°F/-18°C?  Remember the three basic rules of gas stoves in cold weather:  choose good fuel, start with a warm canister, and keep the canister warm.  Those rules still apply, but in extreme cold, they become critical.  You must have a "warm" canister (generally about twenty degrees above the boiling point of your fuel) for your stove to work.  If things go seriously wrong on a backcountry trip and you can't warm that canister, you're in a world of hurt.

Hey, wait a minute.  So, why even bother with gas?  I mean if I can't warm up that canister, then I could die, right?

Yep, you could die.  That's not an exaggeration.  This is not something to take lightly.  But there are reasons to want to take gas in extreme cold. One reason is safety.  If you have to cook inside your shelter, gas is the safest option.  Yes, I know, stove manufacturers unanimously proclaim "never use a stove inside."  Let's see.  It's -5°F/-20°C.  It's blowing hard out there.  There's snow everywhere.  It's basically a white out.  You're going to go outside to cook? Really?  There comes a point in time where cooking inside is the lesser of two evils.  Cooking outside might mean certain death whereas cooking inside while risky is far safer.  Yes, you have to worry about fires.  Yes, you have to worry about Carbon Monoxide.  But you're a complete idiot if you try to cook outside in a howling gale when it's -5°F/-20°C out.

Back to my point about safety:  Gas stoves generally do not require priming.  If you know anything at all about priming a liquid fueled stove, you know flames can spring up several feet into the air.  Yes, with practice and care, you can keep the priming flames smaller.  In ideal conditions.  But if you come stumbling into your tent at night, half dead, half hypothermic, with hands about as nimble as a block of ice, just how controlled do you think that priming will be?  Priming inside a confined space with flammable items surrounding you is just not a good idea.  With gas, you just open the valve, light, and go.

Another issue is mechanical reliability.  Pumps on liquid fueled stoves can and do fail in extreme cold.  While the valve on a Gas canister can jam, jams are far less likely than on liquid fueled stoves, and the valve usually jams open.  In the case of a gas canister with the valve jammed open, just leave the stove attached to the canister.  Hardly ideal, but leaving the stove attached will allow you to use the stove's valve to hold back the gas – and you can still use the stove.

Now, even though I have called out liquid fuel pumps as having reliability problems in extreme cold, that is not to say that such pumps are unreliable per se.  In other words, most liquid fuel pumps will do fine, but failures do happen and they happen at a higher rate than with gas canisters.

Me personally?  I'd take both.  Yes, I am serious. I'd take a liquid fueled stove and a gas stove both if there were any way my team could reasonably manage it.  I'd take more than two stoves if the group were large enough to support it, even if I thought we could get by with less.  Gas will be safest if you have to cook inside, but if you get into a situation where you cannot warm the canister (a distinct possibility in extreme cold), you still have a liquid fueled stove. In extreme cold, it's time to quit counting grams and stay focused on coming back alive.

For your liquid fuel, use kerosene not white gasoline.  Kerosene is much  less likely to start a fire if there are any leaks or spills.  White gasoline is volatile stuff and really shouldn't be used inside unless you just don't have any other choice.  I'd also bring a spare fuel pump (or two) and expedition type maintenance kits and tools.  In extreme conditions, take extreme precautions.

In extreme cold, the real failure is the failure not to have everyone come back in one piece.

HJ

P.S.  OK, so maybe "bring both" is a little bit of a cop out.  If I absolutely had to choose only one stove for extreme cold weather, I'd probably go with kerosene.  But I really would seriously consider bringing both a liquid fueled and a liquid feed canister gas stove, especially for a group.  You just don't want to screw around when it gets that cold.


Related articles and posts:

Sunday, December 4, 2011

Fuel Price Guide (Dec. 2011)

Who's got the deals?  Who's ripping you off?  Take a look at the following fuel prices to see what's out there -- and compare it to what you're paying.  Exceptional deals are show in red colored type.

Note:  The following are fuel prices that I observed in person at the retailer listed on the date shown.  Be aware that sometimes I make mistakes and that sometimes retailers change prices.   All prices are shown in US dollars (USD).  All observations were made in and around Los Angeles, CA, USA.

I.  White Gasoline (Coleman Type Fuel) 
Big 5 Sporting Goods
(03 Dec 2011)
Coleman        Gallon  $11.99
 
REI (Recreational Equipment, Inc.)
(03 Dec 2011)
Crown          Quart   $ 8.00
MSR            Quart   $12.95
Crown          Gallon  $14.00
Coleman        Gallon  $11.95

Sport Chalet
(05 Dec 2011)
Coleman        Quart   $ 6.97
MSR            Quart   $ 9.99
Coleman        Gallon  $10.97

Sports Authority
(05 Dec 2011)
Coleman        Quart   $ 6.99

Wal-Mart
(19 Nov 2011)
Coleman        Quart   $ 5.88
Coleman        Gallon  $ 9.68

II.  Gas (propane, isobutane, butane)
Big 5 Sporting Goods
(03 Dec 2011)
Camping Gaz    190g    $4.99    $0.0263/gram
Coleman        220g    $6.99    $0.0318/gram
Camping Gaz    230g    $6.99    $0.0303/gram (that price makes no sense compared to the 450g size, but that's what they quoted me)
Primus         230g    $5.99    $0.0260/gram
Camping Gaz*   450g    $6.99    $0.0155/gram
Coleman        465g    $4.49    $0.0097/gram (100% propane)
Worthington-2  465g    $8.99    $0.0097/gram (100% propane) (Two Pack)


REI (Recreational Equipment, Inc.)
(03 Dec 2011)
JetBoil        100g    $4.95    $0.0495/gram
Snow Peak      110g    $4.50    $0.0409/gram
MSR            113g    $4.95    $0.0438/gram
Snow Peak      220g    $5.50    $0.0250/gram 
MSR            227g    $5.95    $0.0262/gram 
JetBoil        230g    $5.95    $0.0259/gram
JetBoil        450g    $9.95    $0.0221/gram
Coleman        465g     Out of stock 03 Dec 2011

Sport Chalet
(05 Dec 2011)
JetBoil        100g    $4.99    $0.0499/gram
Optimus*       110g    $3.95    $0.0359/gram
Snow Peak      110g     Discontinued at Sport Chalet
MSR            113g    $3.99    $0.0353/gram
Optimus*       220g    $4.45    $0.0202/gram
Snow Peak      220g    $5.50    $0.0250/gram
MSR            227g    $4.99    $0.0220/gram  Updated 11 Jan 2012
Camping Gaz*   230g    $4.99    $0.0217/gram  
JetBoil        230g    $5.99    $0.0260/gram    
Camping Gaz*   450g    $6.99    $0.0155/gram
JetBoil        450g    $9.99    $0.0222/gram
Coleman        465g    $2.97    $0.0063/gram  (100% propane)

Sports Authority
(05 Dec 2011)
JetBoil        100g    $4.99    $0.0499/gram
MSR            113g    $4.99    $0.0441/gram 
Coleman*       220g    $6.99    $0.0318/gram
MSR            227g    $5.99    $0.0264/gram    
Coleman        465g    $2.99    $0.0064/gram  (100% propane)
Coleman-2      465gX2  $5.69    $0.0061/gram  (100% propane) (Two Pack)

Wal-Mart
(19 Nov 2011)
Coleman*       220g    $4.88    $0.0221/gram
Coleman        465g    $2.86    $0.0061/gram  (100% propane)
Worthington-2  465gX2  $5.12    $0.0055/gram  (100% propane) (Two Pack)

*NOT recommended for use below 50F/10C.  Why? See:  What's the Best Brand of Gas for Cold Weather?


III.  Kerosene or Kerosene "substitute"
Wal-Mart
(19 Nov 2011)
Coleman                      Quart   $ 5.88 ($23.52/gallon)

IV.  Alcohol
Home Depot
(28 Dec 2011)
Klean Strip SLX Denatured    Gallon  $15.98
Klean Strip Green Denatured  Quart   $ 6.69 ($26.76/gallon)

Wal-Mart
(28 Dec 2011)
Yellow HEET (methanol) 12oz  12pk    $16.44 ($14.61/gallon)


I hope you find the information helpful,

HJ