QuietStove.com

Sunday, February 5, 2012

Wood Fired Cooking on a Caldera Cone

It can be tough to do real cooking on a wood fire in the backcountry.  Sure, there are guys who can do it, but it's not all that easy, even for the experienced.  Is there a way we can make cooking on a wood fire a little more accessible?  As a matter of fact, there is:  A wood burning stove.

If you've been following my blog, you know I've been evaluating a Sidewinder version of the Ti-Tri Caldera Cone.

Other blog posts on the Ti-Tri Caldera Cone:

As I've used the titanium version of the Caldera Cone, I've become convinced that this would be a comparatively easy way to cook real food on a wood fire.   So I thought I'd try it out.  

For today's hike, I took the beautiful Kenyon Devore Trail from Mount Wilson.
The Kenyon Devore Trail
It's a really beautiful area, maybe an hour's drive from downtown Los Angeles.
The forest as seen from the Kenyon Devore Trail
Beautiful, until you descend a little farther and get into the burn zone from the 2009 Station Fire, the largest fire in the history of Los Angeles County.  The fire was human in origin.
The Kenyon Devore Trail passes through the burn zone from the 2009 Station Fire
The Station Fire burned an area of about 251 square mi/650 square km in size.  How big is 251 square mi/650 square km?  Well, Washington, DC, the capital of the United States is 68.3 square mi/177 square km.  In other words, the Station Fire burned an area over 3.5 times the area of the capital of the United States.  That's a pretty big fire.

There are miles and miles of this:
Burn area from the 2009 Station Fire
If you look at the above two photos, I think you'll see a powerful argument for something like a Ti-Tri Caldera Cone:  fire safety.  Will using a Ti-Tri Caldera Cone (or any wood stove) eliminate the danger of a wildfire?  No, of course not.  But a small, contained fire that is comparatively easy to extinguish is safer than a traditional open fire.  Regardless of whether you use a wood stove or not, I encourage you to be safe with fire.  Again, look at the above two photos, taken about 2.5 years after the fire.  Fires can be truly devastating.  When you leave a campsite, please make sure your campfire is out, dead out.

OK, Hikin' Jim will now get off his soapbox.  :)

Hey, HJ, how about some cooking?

Ah, yes, well that is the subject of today's blog post isn't it?  Well, let's have a look.  First, I set my Ti-Tri Caldera Cone up, fill it with wood, and fire it up.
A Sidewinder type Ti-Tri Caldera Cone in use with wood 
By the way, you'll notice a lot of leaf litter on the forest floor.  By all rights, I should have cleared it better than I did.  You can't tell here, but I'm on the banks of the W Fork of the San Gabriel River, and everything is a bit damp.  With all that water, I wasn't too worried about a fire spreading, but still I probably should have cleared it.   Mea culpa.

Today, I want to cook some "real" food.  For that I'll need the steady heat of mostly coals not the intensity of burning flames.  But no need to waste the wood, let's put a pot of water on.  A little tea while we cook won't hurt anyone, now will it?  
A pot of boiling water on Ti-Tri Caldera Cone
Once things have burned down a bit, let's try some real cooking.  Let's try something fairly easy:  scrambled eggs.  In go the eggs:
Starting scrambled eggs
Now, before I go on, let me be clear:  I'm doing a bit of kludging.  Every Caldera Cone is sized to fit a particular pot.  The Cone I'm using is sized for a 1300ml Evernew pot.  My pan is bigger than a 1300ml Evernew pot.  How did I cook with my pan?  Very carefully.  :)

All kidding aside, I placed the pan on the rim of the Caldera Cone.  In terms of stability, it worked OK, but not great.  Please note that I was using a very lightweight aluminum pan with two eggs.  In other words, I wasn't putting a lot of weight on the edge of the cone.  I'm not saying this is an approved or recommended method.  Really, I just wanted to see if I could cook real food on a wood fired Caldera Cone and whether or not it might be easier than using an open fire.

And indeed one can cook real food on a Caldera Cone.  Our scrambled eggs are coming along nicely.
Scrambled eggs in progress on a wood fired Caldera Cone
And now, the finished product: 
Scrambled eggs!
I have to say that these turned out about as well as if I had cooked them at home, and this was on a fairly cheap lightweight aluminum pan.  I was quite pleased with the results.  And the taste.  :)

Next, I thought I'd try something just a bit harder:  Eggs over easy.  Other than the fact that I broke one of the yolks when I cracked the egg, I'd say they turned out rather nicely.
Eggs, over easy.  Yum!
You know, for backcountry wood fired cooking, those are some pretty good looking eggs.  I was very pleased with how they turned out.  And the pan?  No burnt spots, and no sticking.  I was very pleased.
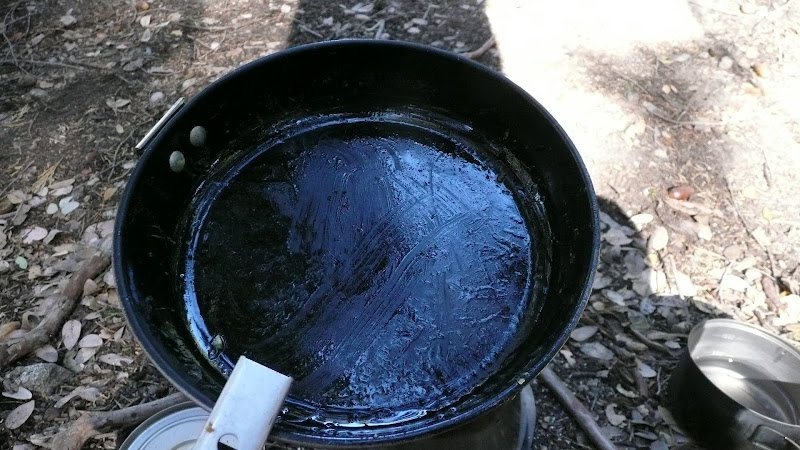
No burned food and no sticking
Now, is my sort of kludge of balancing pan on the rim of a Caldera Cone the best set up?  No, probably not.  Better would be to find a pan the same diameter as the pot so that you could rest the pan on the stove proper and not just the rim of the cone.  Still, this does work, and it works really quite well.

Overall, it's far easier to cook real food on a wood fire with a Caldera Cone than on an open fire -- even if you have to kludge a bit.  With the Cone, it's much easier control the amount of heat and to focus the heat.  If nothing else, focused heat means your pan gets hot but the pan's handles stay cool.  Sometimes getting a pan in and out of an open fire can be quite a trick!  

I found cooking with a wood fire with a Caldera Cone was surprisingly easy.  I was very, very pleased with the results, and I plan on doing more cooking of real food on a wood fired Caldera Cone.

Thanks for joining me on another Adventure in Stoving,

HJ

Other wood fired backpacking stove posts:

Other posts on the Caldera Cone:

Friday, February 3, 2012

(Pot) Sizing Up the FeatherFire Alcohol Stove

Recently, I reviewed the FeatherFire alcohol stove.  I also took a look at The FeatherFire with a Caldera Cone.  Today, I'd like to take a quick look at what pot sizes work well with the FeatherFire.

So what's the issue? Well, flame spillage for one.
Flames spilling up around the sides of a BPL Firelite 550 pot
If flames spill up around the side pot, they're gone, wasted.  If you want efficient heating, the flame needs to be completely under the pot.

Hey, so no problem; the FeatherFire's flame is fully adjustable, right?

Well, yes, but with a really small pot, you really have to turn that flame down low.  Some pots are going to be too small to really be practical.  Today, I'd like to take a quick look at a few pots just to get an idea of what will work well.

First pot:  The BPL Firelite 550, a small 550ml mug type pot.  Diameter:  Approximately 3 5/8" (92mm).
A BPL Firelite 550 on a FeatherFire.  
Take a look at that photo above.   There's a lot of room for that flame to come out and around that pot, and indeed if you saw the first photo, that's just what the flames do when turned up a bit.  I had to dial things down pretty low in order to avoid wasted flames, and the slightest puff of wind could displace the heat entirely.  A 550ml mug type pot is really too small to be practical on a FeatherFire with a conventional windscreen.  If you're using a specialized, high efficiency windscreen like a Caldera Cone, a 550ml mug type pot works pretty well.

Next up, the MSR Titan kettle, 850ml, 4.5"/114mm diameter.
An MSR Titan kettle on a FeatherFire
The Titan kettle is a little bit bigger than a Firelite 550, but you can still have problems with flame spillage.
Flame spillage on an MSR Titan kettle on a FeatherFire
But I found that I could dial it down a bit and that the flame spillage was minimized or eliminated.
The highly adjustable flame of a FeatherFire can be adequately tuned to work with a Titan kettle
I found that the FeatherFire works reasonably well with a Titan kettle, but I don't think you'd want to go much smaller.

Next up, a 1.3 liter Evernew titanium pot.
A 1.3 liter Evernew Ti pot on a FeatherFire
Well, it's probably no surprise, but a nice big pot like the Evernew 1.3 liter did really well.  Flame spillage of course was easily contained.  Of course, now you're running into the other end of the spectrum:  Pots too large for the stove.  I think the Evernew 1.3 liter did fine, but I wouldn't go much larger.  The pot supports on a FeatherFire are suprisingly strong, but, still, I think you're just asking for trouble if you go much larger than a 1.3 liter pot.

General Observations
A pot that is wider than it is tall is generally better in terms of heating efficiency.  Heating things with a FeatherFire is no exception.  You're going to be better off with a wide, low pot, but the Titan kettle, which is a bit more mug shaped than wide and low, worked reasonably well.

The flame on a FeatherFire is very adjustable.  So adjust it.  Flame spillage is just wasted heat and wasted fuel.  You've got an adjustable flame.  Use it.  With the FeatherFire, it's possible to get efficient heating with a much wider variety of pots than with most alcohol stoves.

Alcohol stoves are quite susceptible to wind.  During my testing, I sometimes saw the flame shifted way over to the side.
Flames shifted to the side by wind
This is another good reason to use a wider pot -- so that your flame will still be under the pot as the wind shifts the flame around.  This also drives home the point that a good windscreen is essential when working with alcohol stoves.

Well, there you have it, a brief look at what pot sizes will work well with a FeatherFire alcohol stove.

Thanks for joining me on another Adventure In Stoving,

HJ


Appendix -- Pot Sizes and Diameters

      Pot           Size      Diameter                Remarks        
BPL Firelite 550    550ml   3.625"/92mm   Really too small
MSR Titan kettle    850ml   4.5"/114mm    About as small as you'd want to use
Evernew 1.3L       1300ml   5.75"/146mm   About as big as you'd want to use

All measurements were taken by hand with a ruler and should be considered approximate.


FeatherFire Related Blog Posts

Wednesday, February 1, 2012

Blog Status, 1 Feb 2012

Well, I've got ads up now on my blog.  Last month I earned $15.55.  I put up 19 posts.  It takes me about 8 hours to do a post (on average).  That means I invested somewhere around 150 hours of my time and in return the blog earned $15.55 or about $0.10/hour.  Hmm.

Well, at ten cents per hour, ads are hardly worth it.  If the ads are annoying or anything like that, let me know and maybe I'll remove them.  I was hoping that the blog would at least pay my monthly stove fuel costs and fuel costs to drive to the trailheads, but no such luck.

Please don't click repeatedly on an ad or anything like that in a misguided effort to support the blog.  I believe that "they" will assume it's "foul play" and disqualify me from the ad program entirely.

By the way, I sincerely hope you find some good information here.  The blog was not started to earn money, neither is that its function now.

HJ

The FeatherFire With a Caldera Cone

Well, time to get out of the darned house.  About time I got outside.  Where to?

One of my favorite local venues:  Winter Creek.
Along the lower Winter Creek Trail
And, of course, while we're out, let's take along a stove or two, shall we?  Today, I'd like to take a look at the FeatherFire alcohol stove, and, in particular, how it does with a Caldera Cone.
A FeatherFire alcohol stove (with the cap on)
I have a variety of cones at my disposal, so let's have a look.
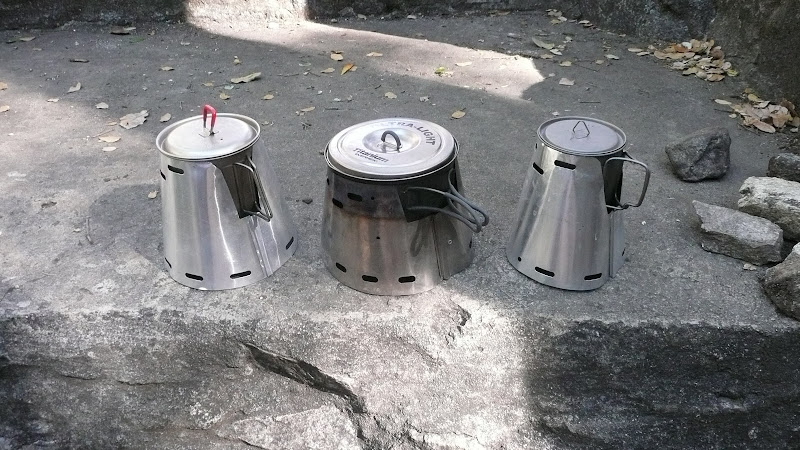
Various Caldera Cone set ups.
L to R:  "Classic" Caldera Cone with 850ml Titan kettle, Sidewinder Ti-Tri with 1300ml Evernew pt, and "classic" Caldera Cone with 550ml BPL Firelite 550 pot.
Now, one of the reasons I like Winter Creek so much is not just that it's a lovely sylvan spot, but also because of this:
The hearth of an old, abandoned cabin
The hearth of this old, abandoned cabin is perfect for stove testing.  And, not only that, nearby Winter Creek provides all the water one could ever want.
A small falls on Winter Creek
Now, let's have a better look at today's set ups.
"Classic" Cones on either end.  Sidewinder Cone in the middle.

Note that the Sidewinder Cone in the middle of the above photo is shorter than either of the classic cones.  Why might this be?  Well, its name tells us a lot:  You wind it up, lie it on its side, and into the pot it goes.  "Side winder," get it?  A very nice option for packing up.
A Sidewinder cone, wound up, lying on its side.

And what is to be used inside our cones?  A FeatherFire stove, here shown alongside two 12-10 stoves.  A 12-10 stove comes standard with a Caldera Cone.
A FeatherFire stove (left) and two 12-10 stoves.
Now, take a close look at the above photo.  Note the cable extending down from the FeatherFire stove.  This cable is the simmer control of the FeatherFire stove.  Indeed, this is the feature that sets the FeatherFire apart:  The FeatherFire simmers easily and well.  See my earlier post The FeatherFire Alcohol Stove for further information.

It simmers well, that's good, but is it compatible with something like a Caldera Cone?  Let's see.

First, will the control knob fit through the vents of a Caldera Cone?
The simmer control of a FeatherFire alcohol stove extended through a vent in a Caldera Cone
Well, kind of.  I mean it will, but it doesn't quite fit.  You have to push and pull.  You have to tweak the cone a bit.  And after doing it a few times, your vent hole is going to look a bit like this:
Deformations in a ventilation port of a Caldera Cone caused by repeated insertion and removal of a FeatherFire control knob
Not very pretty, but unlikely to affect your stove in any functional way.  But, there's a more important issue here.   Those cones fit their respective pots pretty tightly.  Pick up the pot, and you'll more than likely pick up the windscreen.  Pick up the windscreen, and you pick up the stove and not in any controlled fashion.  
The FeatherFire, still connected to the Cone even though the cone has been removed.
Yes, that's right, you'll have an open vessel dripping flaming alcohol hanging by a thread.  Might I suggest that this could be a problem?

Actually, I think passing the control cable under the edge of the windscreen is the better protocol.  YMMV.  It's a little fiddly, but not bad, and now, if you bump the windscreen or pick up the pot, the flaming, open stove is not likely to follow.

All right, safety briefing out of the way, how does it simmer?  
A nice, low boil on a Caldera Cone using a FeatherFire alcohol stove
Quite well actually.  The FeatherFire is the best commercial simmering set up for a Caldera Cone that I've yet seen. Yes, I know there are a lot of DIY rigs out there, and we'll get to those in due course, but of the commercially available simmering set ups, the FeatherFire is the best that I know of.  Now, could you use a Trangia burner?  Well, yes, you could, but while the FeatherFire is of the same general class of stove as normally comes with a Caldera Cone (a chimney type stove), the Trangia is of a different class of burner (a semi pressurized or open jet type).  My experience is that the chimney type is the best type for use in a Caldera Cone and that other types suffer in terms of efficiency. 

While the FeatherFire simmers pretty well, it's still a bit of a trick to get a good simmer in a Caldera Cone.  Why?  Because those darned cones are so efficient.  The heat transfer is so good in a Caldera Cone, it's hard to not go into a roiling boil, even with the low flame of a FeatherFire.  In my testing, I noticed that it was easier to simmer with my BPL Firelite 550 pot which sits a little farther away from the flame than with my Titan kettle.

Speaking of distance from the flame, I noticed that the Titan kettle did not fit all the way down into the cone and instead rested on the pot supports of the FeatherFire.
A Titan kettle does not fit all the way down into a Cone when used with a FeatherFire
 By Contrast, the Firelite 550, fit normally into its Cone.  Fit or lack thereof caused no operational difficulties, but as I say, it was harder to simmer with the Titan kettle which sits closer to the flame.

How about efficiency?
Measured amounts of HEET (methanol)
I ran some boil tests with measured amounts of alcohol.  On high, the FeatherFire is less efficient than the 12-10 stove.  With the measured amount of alcohol (about 25ml of HEET), a FeatherFire was not able to hold a boil as long.  That was on high.  Want greater efficiency?  Turn it down.  There's no reason that the FeatherFire can't be just as efficient as a 12-10.  Just don't run it on high.  With the FeatherFire, you've got a really nice, adjustable stove.  So adjust it.  Make use of all that good functionality.

A couple of other notes:  The snuffer cap (2g in weight), is worth bringing along.
The snuffer cap of a FeatherFire alcohol stove
For simmering tests, I added nearly the maximum amount the stove would hold and fired it up.  When the test was complete, I closed the vents using the simmer control and placed the simmer cap on top of the stove.  Job done.

The simmer cap has a nice feature -- it has a little rubber grip.  Even if the cap is hot, it's unlikely that you'll burn your fingers because of the grip.  It's little things like the grip that show the kind of attention to detail that is the hallmark of PackaFeather.  They've really put together a nice alcohol stove here.

Of course there are ways to snuff a 12-10 stove, albeit not quite as convenient or as lightweight as the 2g snuffer cap of the FeatherFire.
Snuffing a 12-10 stove with a Ti Sierra Cup
After my simmering tests were done, I simply vacuumed up all the excess alcohol with the excellent PackaFeather cap, another nice product from PackaFeather.  The vacuum feature of the PackaFeather cap works well with the 12-10 stove, not just the FeatherFire.  I imagine the cap would work with most alcohol stoves, although it probably wouldn't work well with stoves that soak up alcohol with some type of wicking material.

A PackaFeather cap.  Highly recommended.
Another fun experiment was to try out the new MSR (made by Kovea) piezoelectric lighter on alcohol.
The MSR piezoelectric ignition
 It actually worked pretty well, but my tests so far indicate that it will only work when it's relatively warm, when the alcohol is vaporizing well.  In colder weather, when the alcohol isn't vaporizing well, the igniter struggles.

Well, there you have it, a further look at the FeatherFire stove and its ability to work with a Caldera Cone.  I hope you enjoyed it.

Thanks for joining me on another Adventure in Stoving,

HJ


FeatherFire Related Blog Posts

Monday, January 30, 2012

Why a Wood Stove? More Thoughts on the Caldera Cone Ti-Tri.

Why a wood stove?  I mean why not just pile up a rock circle, throw in some wood, and fire it up?  In terms of a stove, what could be lighter than nothing?

I "cut my teeth" on wood cooking back in the day (60's & 70's), so I have some idea as to what's involved with just cooking on an open fire.

I've got to say, it's really nice to have a little wood burner like the Ti-Tri Caldera Cone with Inferno option along compared to just an open fire, particularly if you want to cook real food on a wood fire.
A Ti-Tri Caldera Cone (Sidewinder type)
First, heating is a lot faster. With the Caldera Cone, the heat is concentrated. When we (dad and I) used to cook, we'd drop a coffee can in the fire. Was the heat concentrated? No. Sometimes things would heat quickly and some times not.

Second, it's really easy to have a stable pot. We never dumped our dinner, but with just rocks as your pot support, it certainly could happen.

Third, it's really easy to get the pot on and off. We used to use a long loop of wire attached to the coffee pot and a stick. A bit clumsy, and again, the pot could catch on a rock as you swing it off the fire, dumping your dinner. With a Caldera Cone, it's easy on and easy off.
A pot is very stable on a Caldera Cone, and the pot handles are easily accessible
Fourth, it's easy to get the fire going. The stove provides a lot of ventilation. There's not a lot of blowing into the fire (and smoke inhalation!).  And once started, the fire doesn't go out.

Fifth, you don't have to gather as much wood. Fill the little bowl, and that's plenty for a couple of cups of water, probably more.

Sixth, there's little impact. Just some white ash after you're done that can be buried or wind dispersed (after you've check that the ashes are completely cold of course!).

Seventh, the fire is relatively well contained. Especially if you keep the fire down in size, there's very little in the way of escaping embers. I'd say this is a much safer way to burn wood than an open fire.

Eighth, the combustion is very thorough. What's probably the biggest danger from a campfire? The campfire not being completely out and the flames spring back to life later on, sparking a wildfire. When I've used the Ti-Tri with Inferno option, I've been very impressed with how complete the combustion is. There isn't much left after the Ti-Tri is done.  No smoldering remains, no wildfire danger.

Ninth, it's easier to get a good set of coals for lower heat cooking. You can cook eggs, pancakes, etc. on this stove.
Cooking eggs on a wood fired Caldera Cone
Tenth, in a way, you don't even have to carry a full stove in order to have a first rate wood burner. What do I mean by that? The Caldera Cone is a first class alcohol or hexamine (e.g. ESBIT) stove system in its own right.  On most of my trips I can't burn wood every meal, so I'm going to be carrying the Cone for alcohol or hexamine anyway. In a pinch, I can burn wood with just the Cone, but for an additional 81g, I can get a full blown, efficient wood burner with all the benefits noted above.  81g?  What is that?  Well, that's about the weight of a PocketRocket.  Without fuel.  So, in other words, you can have a full blown, good wood burner for about the weight of a PocketRocket.  I'd say that's not too shabby.

HJ

Other wood fired backpacking stove posts:

Other posts on the Caldera Cone: