In this article, I'd like to discuss what regulator valves and inverted canisters can do for the cold weather backcountry traveller. But first some background.
 |
| If one goes high enough, it can be cold any time of the year. |
You do. Well, if you intend to cook with canister gas, you do. Why? Well, the colder your canister gets, the less pressure it has. On a hot day, the gas will come blowing out of your canister with great force. On a cold day, you'll barely hear a hiss of escaping gas. Without a decent flow of gas, you can't get a proper flame, and, on a really cold day, you simply can't cook.
Particularly for mountaineers, the only way to get water is to melt snow. With no canister pressure, if you need to melt snow, you can't. No melting snow = no water = dehydration, and that's bad because dehydration can hasten hypothermia. Hypothermia is extremely serious and can be fatal.
But even if you're not a high elevation mountaineer, having to eat an uncooked backpacking dinner is pretty unpleasant and forgoing a hot beverage on a cold morning nearly equally so.
Coping with Cold Weather
When using canister gas as a fuel, there are two strategies for dealing with cold weather:
- Warming the canister
- Technology
With respect to warming the canister, really, it doesn't matter what the air temperature is provided that you can keep the canister warm. But can you realistically keep that canister warm when it's really cold out?
 |
| Notice the frost on the lower part of the canister. The temperature was above freezing at the time this photo was taken. Canisters cool from within as you use them. |
There are two issues here:
- Canisters cool from within as you use them. (This is why canister cozies are of limited value.)
- On a seriously cold day, that little metal canister can get very cold very quickly just from being out in the environment.
While technology can help us, there's no substitute for the basics. What are the basics?
- Choose good gas.
- Start warm
- Stay warm
We then use technology in conjunction with (NOT in lieu of) the basics.
With respect to the basics of cold weather gas stove use, I here refer you the article I re-wrote in 2014: Gas Stoves: How Cold Can I Go?
 |
| Wouldn't a nice, hot beverage be just the thing on a morning like this? Uh, you did choose the right stove technology before your trip, didn't you? |
What kinds of stove technology can help us use our gas stove in cold weather? There are two approaches:
What is a regulator valve, and how can it help? There are several layers here, so bear with me. It should make sense in the end.
First, a regulator valve has a pressure regulator built into it. This pressure regulator can insure that no more than a certain flow of gas is fed to the burner at a time.
Uh, Jim, that's great, but I thought you said the problem was not enough gas. Now, you're talking about a device that prevents too much gas.
Well, yes, and here's the issue: A stove has to be able to operate safely in hot weather as well as cold. If the stove designer "opens up" a stove too much in terms of gas flow, then there could be a disaster in the offing.
Here's what I mean: It's a hot day. Your canister pressure is at an all time high. You open up your valve all the way without really thinking about it. The gas rushes through with such force that the flame lifts off the burner and is pushed out and away from where the gas is coming from. If pushed far enough, the flame will go out even though there was no interruption to the flow of gas.
Now, let's think about this. We've got a red hot stove, and the flame is out. We've got volumes of highly flammable petroleum gas rushing out of the tank. Say, do you think that having a highly flammable, potentially explosive gas rushing toward red hot metal could be a problem? This could go bad very quickly. I think you get my drift here.
If a stove designer opens up a stove too much, he or she risks putting someone into the burn ward of the hospital unless... unless there's a pressure regulator present of course. Now, with a pressure regulator, the stove designer can "open up" the flow all he or she likes without worrying about exceeding a maximum safe amount. If the canister pressure gets too high, the regulator steps in and inhibits the pressure. In cold weather, our "opened up" stove lets plenty of gas through, and we can cook even when the canister pressure is fairly low.
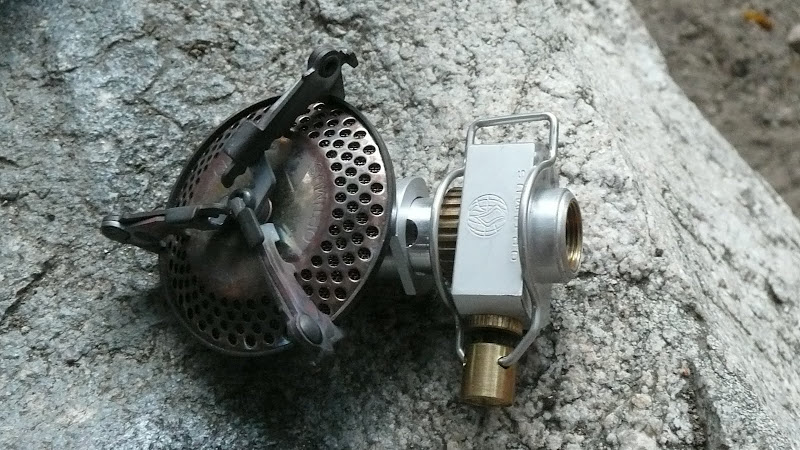
Take a look at the photo below. On the left is the jet of a regulator valved stove, a Soto WindMaster
(perhaps the highest quality upright canister stove on the market today). On the right is the jet of a non-regulator valved stove from Primus. You can see even with the naked eye that the aperture of the jet on the left is quite a bit larger. Measurements reveal that the regulator valved stove has a jet size of 0.4 mm. The non-regulator valved stove has a jet size of 0.23 mm. (It's a bit confusing because the jet on the right is stamped "32" which may be a part number, but the size is 0.23 mm.)
- Regulator valves (as opposed to the more typical needle valves)
- Inverted canister operation
What is a regulator valve, and how can it help? There are several layers here, so bear with me. It should make sense in the end.
First, a regulator valve has a pressure regulator built into it. This pressure regulator can insure that no more than a certain flow of gas is fed to the burner at a time.
Uh, Jim, that's great, but I thought you said the problem was not enough gas. Now, you're talking about a device that prevents too much gas.
Well, yes, and here's the issue: A stove has to be able to operate safely in hot weather as well as cold. If the stove designer "opens up" a stove too much in terms of gas flow, then there could be a disaster in the offing.
Here's what I mean: It's a hot day. Your canister pressure is at an all time high. You open up your valve all the way without really thinking about it. The gas rushes through with such force that the flame lifts off the burner and is pushed out and away from where the gas is coming from. If pushed far enough, the flame will go out even though there was no interruption to the flow of gas.
Now, let's think about this. We've got a red hot stove, and the flame is out. We've got volumes of highly flammable petroleum gas rushing out of the tank. Say, do you think that having a highly flammable, potentially explosive gas rushing toward red hot metal could be a problem? This could go bad very quickly. I think you get my drift here.
If a stove designer opens up a stove too much, he or she risks putting someone into the burn ward of the hospital unless... unless there's a pressure regulator present of course. Now, with a pressure regulator, the stove designer can "open up" the flow all he or she likes without worrying about exceeding a maximum safe amount. If the canister pressure gets too high, the regulator steps in and inhibits the pressure. In cold weather, our "opened up" stove lets plenty of gas through, and we can cook even when the canister pressure is fairly low.
Take a look at the photo below. On the left is the jet of a regulator valved stove, a Soto WindMaster
(perhaps the highest quality upright canister stove on the market today). On the right is the jet of a non-regulator valved stove from Primus. You can see even with the naked eye that the aperture of the jet on the left is quite a bit larger. Measurements reveal that the regulator valved stove has a jet size of 0.4 mm. The non-regulator valved stove has a jet size of 0.23 mm. (It's a bit confusing because the jet on the right is stamped "32" which may be a part number, but the size is 0.23 mm.)
If we calculate the cross sectional area of each jet, we find that the regulated jet's area is more than triple that of the non-regulated jet. You can get a lot more gas through that larger opening.
A non regulator valved stove can't be opened up like this; it just isn't safe. The designer has to build a non regulated stove such that it is safe at maximum canister pressure; there is no inhibiting regulator. He or she has to "choke" the stove, and cannot allow it to be opened up. When cold weather comes, a non-regulator valved stove doesn't have the capability to let enough gas through, and performance falls off quickly.
A regulator valved stove can be built such that the stove can operate at near 100% flame when there is, say, only 15% of maximum pressure available. On the other hand, a non-regulator valved stove operated at 15% of maximum pressure will have a flame that is about 15% of maximum. Being able to have a 100% flame at, say, 15% pressure is the true advantage of a regulator valved stove in cold weather. Note that I'm using "15%" here. This number is meant to be illustrative more than it is meant to be exact. Each stove's design will be different.
Ah, but what happens when pressure falls below that 15% mark? In that case, a regulator valved stove quickly loses performance. At truly low canister pressures, there is no real advantage to a regulator valved stove, and, no, I don't care what any stove company may tell you to the contrary. Technology only goes so far, and at a certain point, it can do no more. This is why I say one should use technology in conjunction with – not in lieu of – the basics of good cold weather gas stove operation. See links below for more information on the basics of good cold weather gas stove operation.
Don't believe me? Well, how about a demonstration? Below is a video of not one but two regulator valved stoves. Here are the test conditions and relevant background information:
I think you can see that a regulator valved stove can only take one so far. Technology must be used in conjunction with good cold weather gas stove practices.
Hopefully you now understand that a regulator valved stove, if is designed properly, can offer a distinct performance advantage in cold weather because it can be "opened up" whereas a non-regulator valved stove must be restricted in order to operate safely in all temperatures.
Approach 2. Inverted Canisters
I have been studiously avoiding going into much of the science behind all this. I don't want to lose people. Here, though, I have to talk just a little bit about the science or this will make no sense at all.
But fear not. I am (I hope) a reasonably good communicator of things technical. If you can't follow me, then post questions in the comments, and let's work together on this.
Why do canisters cool from within?
Recall that I said that canisters cool from within. I even posted above a photo of a canister with frost on it – frost despite the fact that the ambient temperature was above freezing.
Why do canisters cool from within? Well, this due to the contents changing state from a liquid to a vapor. Shake a half full canister some time. That sloshing sound you hear? That's liquid in there. Yes, I know that they're called "gas" canisters, but that gas in there is under so much pressure that it turns into a liquid.
When you open the valve on your stove, that pressure is released, and the liquid inside your canister starts turning back into a vapor. There's just one thing. A certain amount of heat is required, the heat of vaporization ("HVap" for those of you who like such things). For example, let's say you want to vaporize water. Typically, one would put a pot on the stove and apply heat. The water heats up, begins to boil, and turns into steam. Steam is a vapor. Just as the water you boil in your kitchen requires heat in order for it to turn into a vapor, so also the liquid in your canister requires heat in order to vaporize. Where does this heat come from? The surroundings. In the case of your stove, that heat is taken from the canister and fuel. As one part of the fuel vaporizes, the remainder of the fuel (and the canister itself) gets cold.
This is the same principle by which an air conditioner, refrigerator, or freezer works. In a refrigerator, freon (typically) is compressed into a liquid and then allowed to expand back into a vapor. The heat required to turn the freon into a vapor comes from the surroundings, and the air in a refrigerator is thus chilled. Think of your canister as its own mini refrigerator/freezer. The principle is the same.
OK, so why this science background? Well the point is this: In order for a gas stove to operate, there has to be enough heat to vaporize the fuel. Gas stoves run on, you guessed it, gas (i.e. a vapor). You've got to have gas, not a liquid, to run a gas stove. In order to have gas, you have to transform the liquid fuel in the canister into a vapor, and for that, you have to have a certain amount of heat. Where that heat comes from matters.
In normal operation, with the canister right side up, gas is drawn off the top. The heat required to turn the liquid into gas comes from the surrounding canister and fuel. If however you turn the canister upside down, then you are drawing liquid off the bottom. In drawing liquid, nothing is vaporizing in the canister. The liquid can then be fed to the burner. The burner. Get it? A burner is what? A burner is hot. Really freaking hot. In fact, there's all the heat we'll ever need at the burner to convert that liquid we've drawn off the bottom of the canister into a vapor so we can burn it. There's just one catch. Your stove MUST be designed to be able to handle this. The fuel has to significantly heated before it hits the actual flame in order for things to work properly. Typically this is done by means of a generator (a.k.a a "pre heat loop") such as the one in the photo below.
By using the heat of the flame itself to vaporize the fuel, we don't have to worry so much about the temperature of our surroundings, and our canister doesn't turn into a mini freezer.
Preferential vaporization/preferential burning
Not only is there the issue of canister chilling with upright canister use, but there is the issue of preferential burning. Let me explain: Backpacking canister fuels are typically a blend. There's some percentage each of propane, isobutane, and n-butane. Take a look at the below table:
Vaporization (Boiling) Point
n-butane -0.5°C 31°F
isobutane -12°C 11°F
propane -42°C -44°F
Each type of fuel has a temperature at which it will vaporize. The lower the fuel's vaporization point, the easier it is to maintain good gas pressure in your canister in cold weather. The various fuels are blended together with the intention of providing a mix that will a) not have such high pressure that it will burst the canister in hot weather while b) still providing decent canister pressure in cold weather.
Propane is going to vaporize all the way down to -42 C (-44 F). Propane is your best cold weather fuel. However, in normal right side up canister use, the propane vaporizes more readily and is drawn out of the blend at a faster rate. This is referred to as "preferential vaporization" or "preferential separation." Since you're pulling the propane out at a faster rate, you're burning it at a faster rate. This is referred to as "preferential burning." They're two sides of the same coin, and both are to be avoided.
For example, if one starts out with a good cold weather mix, say 20% propane and 80% isobutane, by the end of the life of the canister, the propane will be all but gone. Your blend instead 20/80 will be more something like 1/99. Whereas your blend started with a nice percentage of propane (which will vaporize all the way down to -42 C / -44 F), you will finish with almost all isobutane (which only vaporizes down to -12 C / +11 F). You'll have lost that part of your fuel which was serving, in effect, as a propellent. Recall also that the fuel has to be about 10 Celsius degrees (about 20 Fahrenheit degrees) above its vaporization point in order for there to be decent canister pressure with most stoves. You cannot use a fuel just barely above its vaporization point and expect decent pressure.
In our example, above, at the start of the life of your canister, you might have had a blend giving you good canister pressure down to maybe -15 Celsius / 5 F or even -20 / -4 F, but by the end of the canister, the blend you have left is maybe only good down to 0 Celsius / 32 F.
Avoiding Preferential Burning
In order to retain an effective cold weather gas blend, we have to avoid the loss of our best cold weather fuel components. If we pull vaporized fuel off the top of the canister, as in upright use, the propane is just naturally going to come out of the blend faster.
On the other hand, if we pull fuel off the bottom, as in inverted canister operation, it doesn't matter what vaporizes at what temperature. You're not vaporizing it! You're drawing off liquid. The liquid drawn off will be the same blend as the blend in the canister as a whole. Thus, when running with the canister upside down, your fuel blend does not change significantly. You start and end with roughly the same percentage of propane, your best winter fuel.
No chill and No Change
So, when you turn your canister upside down, you're essentially eliminating the two big enemies of cold weather performance:
Practical Application
OK, so I've talked about the two technologically based approaches to mitigating the effects of cold weather:
Which is best for what?
Well, truth be told, either approach will work, so long as you can keep the canister "warm." By warm here, I mean warm relative to the surroundings, not balmy tropical weather. When it's -15 C (5 F) out, then 0 C (32 F) is "warm." It's just that when it gets really cold, it's hard to keep the canister warm. When it gets really cold, you want to use the technological approach that gives you the biggest boost so that you don't have to struggle so much with keeping the canister warm.
Which approach is the more effective? Inverted canister operation. Why? As I said above,
"no chill and no change." No matter how well designed around a regulator valve a given upright canister stove is, there will still be internal canister chilling, and there will still be a change (for the worse) in fuel composition. Inverted canister use eliminates these two killers of cold weather performance.
In practical terms, maybe an upright canister stove is best used in temperatures above something on the order of -15 C (5F) – and I'm assuming here that you're already using good gas and keeping the canister warm. Could you go colder? Sure, so long as you can keep the canister sufficiently "warm." I just think it's going to get increasingly difficult to keep the canister warm as the temperature falls. I've seen a pot of boiling water thrown into the air where all the water freezes before it hits the ground. That's cold. If you can keep your canister warm under those conditions, you're a better man or woman than I.
So for really cold conditions, a stove that can handle inverted canister operation is the better choice. All you need is enough pressure in the canister to get the fuel to flow to and through the burner assembly. The heat of the flame will take care of the vaporization. You don't have to worry about the canister chilling from within, and you don't have have to worry about your propane preferentially burning off. Again, though, your stove must be designed for this. You can't just take any canister gas stove and run liquified petroleum gas to the burner.
And, there's no law against combining the two approaches. In fact, there is a stove that does just that, the Jetboil Joule. The Jetboil Joule is a snow melting monster. It has a regulated valve and it is designed to run with the canister upside down. Not only that, it has a heat exchanger pot. The heat exchanger causes more of the heat of the burner to get transferred to the contents of the pot.
Why not just use White Gas or Kerosene?
Oh, for crying out loud. I mean really, Jim. Why all this messing around? Why not just use white gasoline or kerosene?
Well, yes, and many people will do just that. With a white gasoline or kerosene type stove, you don't have to worry much about the temperature of the fuel. Pressure is not provided by the fuel itself but rather by an external pump.
However:
Summary
This has been a long and complex post, a fact for which I apologize. I hope that you have found this useful. If not, then comment below and let's get it properly revised.
HJ
 |
| A regulator valved stove, left (a Soto WindMaster). A non-regulator valved stove on the right. The regulator valved stove has a jet size of 0.4 mm. The non-regulator valved stove has a jet size of 0.23 mm |
A regulator valved stove can be built such that the stove can operate at near 100% flame when there is, say, only 15% of maximum pressure available. On the other hand, a non-regulator valved stove operated at 15% of maximum pressure will have a flame that is about 15% of maximum. Being able to have a 100% flame at, say, 15% pressure is the true advantage of a regulator valved stove in cold weather. Note that I'm using "15%" here. This number is meant to be illustrative more than it is meant to be exact. Each stove's design will be different.
Ah, but what happens when pressure falls below that 15% mark? In that case, a regulator valved stove quickly loses performance. At truly low canister pressures, there is no real advantage to a regulator valved stove, and, no, I don't care what any stove company may tell you to the contrary. Technology only goes so far, and at a certain point, it can do no more. This is why I say one should use technology in conjunction with – not in lieu of – the basics of good cold weather gas stove operation. See links below for more information on the basics of good cold weather gas stove operation.
Don't believe me? Well, how about a demonstration? Below is a video of not one but two regulator valved stoves. Here are the test conditions and relevant background information:
- The canisters contain 100% "plain" butane (not isobutane) with no propane.
- The canister temperature is near freezing, i.e. 32 Fahrenheit (0 Celsius).
- Butane vaporizes at 31 Fahrenheit (-0.5 Celsius).
- The canisters will cool from within as they are used.
- A canister needs to be about 20 Fahrenheit degrees (10 Celsius degrees) above the vaporization point of the fuel it contains in order to have good pressure.
I think you can see that a regulator valved stove can only take one so far. Technology must be used in conjunction with good cold weather gas stove practices.
Hopefully you now understand that a regulator valved stove, if is designed properly, can offer a distinct performance advantage in cold weather because it can be "opened up" whereas a non-regulator valved stove must be restricted in order to operate safely in all temperatures.
Approach 2. Inverted Canisters
I have been studiously avoiding going into much of the science behind all this. I don't want to lose people. Here, though, I have to talk just a little bit about the science or this will make no sense at all.
But fear not. I am (I hope) a reasonably good communicator of things technical. If you can't follow me, then post questions in the comments, and let's work together on this.
Why do canisters cool from within?
Recall that I said that canisters cool from within. I even posted above a photo of a canister with frost on it – frost despite the fact that the ambient temperature was above freezing.
Why do canisters cool from within? Well, this due to the contents changing state from a liquid to a vapor. Shake a half full canister some time. That sloshing sound you hear? That's liquid in there. Yes, I know that they're called "gas" canisters, but that gas in there is under so much pressure that it turns into a liquid.
When you open the valve on your stove, that pressure is released, and the liquid inside your canister starts turning back into a vapor. There's just one thing. A certain amount of heat is required, the heat of vaporization ("HVap" for those of you who like such things). For example, let's say you want to vaporize water. Typically, one would put a pot on the stove and apply heat. The water heats up, begins to boil, and turns into steam. Steam is a vapor. Just as the water you boil in your kitchen requires heat in order for it to turn into a vapor, so also the liquid in your canister requires heat in order to vaporize. Where does this heat come from? The surroundings. In the case of your stove, that heat is taken from the canister and fuel. As one part of the fuel vaporizes, the remainder of the fuel (and the canister itself) gets cold.
This is the same principle by which an air conditioner, refrigerator, or freezer works. In a refrigerator, freon (typically) is compressed into a liquid and then allowed to expand back into a vapor. The heat required to turn the freon into a vapor comes from the surroundings, and the air in a refrigerator is thus chilled. Think of your canister as its own mini refrigerator/freezer. The principle is the same.
OK, so why this science background? Well the point is this: In order for a gas stove to operate, there has to be enough heat to vaporize the fuel. Gas stoves run on, you guessed it, gas (i.e. a vapor). You've got to have gas, not a liquid, to run a gas stove. In order to have gas, you have to transform the liquid fuel in the canister into a vapor, and for that, you have to have a certain amount of heat. Where that heat comes from matters.
In normal operation, with the canister right side up, gas is drawn off the top. The heat required to turn the liquid into gas comes from the surrounding canister and fuel. If however you turn the canister upside down, then you are drawing liquid off the bottom. In drawing liquid, nothing is vaporizing in the canister. The liquid can then be fed to the burner. The burner. Get it? A burner is what? A burner is hot. Really freaking hot. In fact, there's all the heat we'll ever need at the burner to convert that liquid we've drawn off the bottom of the canister into a vapor so we can burn it. There's just one catch. Your stove MUST be designed to be able to handle this. The fuel has to significantly heated before it hits the actual flame in order for things to work properly. Typically this is done by means of a generator (a.k.a a "pre heat loop") such as the one in the photo below.
 |
| A Kovea Hydra stove. Note the fuel line passing through the flame. As liquid fuel flows through the fuel line, it is heated greatly and expands into a vapor. |
Preferential vaporization/preferential burning
Not only is there the issue of canister chilling with upright canister use, but there is the issue of preferential burning. Let me explain: Backpacking canister fuels are typically a blend. There's some percentage each of propane, isobutane, and n-butane. Take a look at the below table:
Vaporization (Boiling) Point
n-butane -0.5°C 31°F
isobutane -12°C 11°F
propane -42°C -44°F
Propane is going to vaporize all the way down to -42 C (-44 F). Propane is your best cold weather fuel. However, in normal right side up canister use, the propane vaporizes more readily and is drawn out of the blend at a faster rate. This is referred to as "preferential vaporization" or "preferential separation." Since you're pulling the propane out at a faster rate, you're burning it at a faster rate. This is referred to as "preferential burning." They're two sides of the same coin, and both are to be avoided.
For example, if one starts out with a good cold weather mix, say 20% propane and 80% isobutane, by the end of the life of the canister, the propane will be all but gone. Your blend instead 20/80 will be more something like 1/99. Whereas your blend started with a nice percentage of propane (which will vaporize all the way down to -42 C / -44 F), you will finish with almost all isobutane (which only vaporizes down to -12 C / +11 F). You'll have lost that part of your fuel which was serving, in effect, as a propellent. Recall also that the fuel has to be about 10 Celsius degrees (about 20 Fahrenheit degrees) above its vaporization point in order for there to be decent canister pressure with most stoves. You cannot use a fuel just barely above its vaporization point and expect decent pressure.
In our example, above, at the start of the life of your canister, you might have had a blend giving you good canister pressure down to maybe -15 Celsius / 5 F or even -20 / -4 F, but by the end of the canister, the blend you have left is maybe only good down to 0 Celsius / 32 F.
Avoiding Preferential Burning
In order to retain an effective cold weather gas blend, we have to avoid the loss of our best cold weather fuel components. If we pull vaporized fuel off the top of the canister, as in upright use, the propane is just naturally going to come out of the blend faster.
On the other hand, if we pull fuel off the bottom, as in inverted canister operation, it doesn't matter what vaporizes at what temperature. You're not vaporizing it! You're drawing off liquid. The liquid drawn off will be the same blend as the blend in the canister as a whole. Thus, when running with the canister upside down, your fuel blend does not change significantly. You start and end with roughly the same percentage of propane, your best winter fuel.
No chill and No Change
So, when you turn your canister upside down, you're essentially eliminating the two big enemies of cold weather performance:
- Internal canister chilling
- Changing (for the worse) fuel blend.
Practical Application
OK, so I've talked about the two technologically based approaches to mitigating the effects of cold weather:
- A stove built around a regulator valve and
- A stove designed to handle inverted canister operation.
Which is best for what?
Well, truth be told, either approach will work, so long as you can keep the canister "warm." By warm here, I mean warm relative to the surroundings, not balmy tropical weather. When it's -15 C (5 F) out, then 0 C (32 F) is "warm." It's just that when it gets really cold, it's hard to keep the canister warm. When it gets really cold, you want to use the technological approach that gives you the biggest boost so that you don't have to struggle so much with keeping the canister warm.
Which approach is the more effective? Inverted canister operation. Why? As I said above,
"no chill and no change." No matter how well designed around a regulator valve a given upright canister stove is, there will still be internal canister chilling, and there will still be a change (for the worse) in fuel composition. Inverted canister use eliminates these two killers of cold weather performance.
In practical terms, maybe an upright canister stove is best used in temperatures above something on the order of -15 C (5F) – and I'm assuming here that you're already using good gas and keeping the canister warm. Could you go colder? Sure, so long as you can keep the canister sufficiently "warm." I just think it's going to get increasingly difficult to keep the canister warm as the temperature falls. I've seen a pot of boiling water thrown into the air where all the water freezes before it hits the ground. That's cold. If you can keep your canister warm under those conditions, you're a better man or woman than I.
So for really cold conditions, a stove that can handle inverted canister operation is the better choice. All you need is enough pressure in the canister to get the fuel to flow to and through the burner assembly. The heat of the flame will take care of the vaporization. You don't have to worry about the canister chilling from within, and you don't have have to worry about your propane preferentially burning off. Again, though, your stove must be designed for this. You can't just take any canister gas stove and run liquified petroleum gas to the burner.
 |
| A Jetboil Joule |
Why not just use White Gas or Kerosene?
Oh, for crying out loud. I mean really, Jim. Why all this messing around? Why not just use white gasoline or kerosene?
Well, yes, and many people will do just that. With a white gasoline or kerosene type stove, you don't have to worry much about the temperature of the fuel. Pressure is not provided by the fuel itself but rather by an external pump.
However:
- Priming a liquid fueled stove (gasoline or kerosene) takes skill, dexterity (it's cold, remember), extra fuel, and extra time.
- In truly cold weather, one is often forced to cook in one's shelter. Do you really want to prime a stove inside a tent or other shelter?
- Pumps often fail in cold weather.
- Gas stoves are generally lighter and are more mechanically reliable than liquid fueled stoves.
In truly cold weather, my recommendation is that teams coordinate carrying both liquid fueled and canister gas stoves such that there are back ups in case one or the other proves unworkable. Ideally, a backup pump (as well as a maintenance kit and spare parts) should be taken for each white gasoline/kerosene stove.
By the way, MSR has just come out with a new pump, specifically designed for cold weather, the MSR Arctic Pump. It is not supposed to be used above 32 F / 0 C. It's seals and pump cup are designed to remain flexible in extreme cold.
By the way, MSR has just come out with a new pump, specifically designed for cold weather, the MSR Arctic Pump. It is not supposed to be used above 32 F / 0 C. It's seals and pump cup are designed to remain flexible in extreme cold.
 |
| The new MSR Arctic Pump – designed for extreme cold weather use |
Summary
- Canister pressure drops in cold weather.
- Canisters chill not only due to cold outside temperature but also chill from within during use.
- In order to maintain sufficient canister pressure, one must learn the basics of cold weather gas stove operation. See list of links, below.
- Technology can help augment the basics of cold weather canister stove operation.
- There are two technological approaches to augmenting the basics:
- Using a stove designed around a regulator valve or
- Using a stove designed for inverted canister operation.
- Regulator valve technology can be very helpful in cold weather, but regulator valves can only take one so far (and must always be used in conjunction with the basics of cold weather gas stove operation).
- Perhaps a practical cut off point for upright canister stoves is something on the order of -15 C (5F) – if you're using the basics of cold weather gas stove operation augmented by technology.
- A stove designed for inverted canister operation may be best for temperatures below those where an upright canister stove is typically practical.
- The two technological approaches can be combined and used simultaneously as in the Jetboil Joule.
- In extreme cold weather, teams should coordinate carrying a combination of canister gas and liquid fueled (white gasoline/kerosene) type stoves.
This has been a long and complex post, a fact for which I apologize. I hope that you have found this useful. If not, then comment below and let's get it properly revised.
HJ
Related articles and posts:
- Cold Weather Tips for Gas Stoves
- What's the Best Gas for Cold Weather?
- Gas Stoves: How Cold Can I Go?
- Canisters, Cold, and Altitude: Gas in a Nutshell
- Canister Stoves 101: Thread Care
- Gas Blends and Cold Weather Performance. (Why not just use propane?)
- The "Super Gnat" (Camping Gaz or threaded canisters with one lightweight stove)
- Backpacking Gas Canisters 101
- Gas in Extreme Cold: Yes or No?
- Gas in Cold Weather: The Myth of "Fractioning"
- Stoves For Cold Weather I (Upright canister stoves) – Seattle Backpacker's Magazine
- Stoves for Cold Weather II (Inverted remote canister stoves) – Seattle Backpacker's Magazine
Warming a canister, demonstration:
If a picture is worth a thousand words, what's a video worth? Dunno, but here's a video showing an integrated upright canister stove in cold weather. You will notice that it is struggling as the canister cools from within. Part way through the video, I will place the canister in some lukewarm water, and... well, watch what happens.