I've been asked a number of times a question something like this: "Hey, Jim, I'm just getting into backpacking; what stove should I get?"
Good question, and I've got a couple of ideas, naturally. :)
My recommendation for a "starter" stove for someone getting into backpacking is typically going to be a canister gas stove, that is a stove that runs on a canister of compressed gas (typically propane mixed with either isobutane or regular butane). A canister stove is going to be the most like a gas stove that you might have at home and probably has the easiest "learning curve" to negotiate of any of the major types of stoves. If you want to start out on wood, alcohol, ESBIT, or liquid petroleum fuels, knock yourself out, but my recommendation is for a canister gas stove.
And when I say "starter" stove, I don't mean some "El Cheapo" piece of junk that you're going to want to dump in the trash after you've used it a few times. I'm going to recommend some good value-for-the-dollar options that might very well be the only stove you'll ever need. Of course some of you will be bitten by the "stove bug" and want to branch out, but what I'll present today are some good options that should stand you in good stead for many years to come.
As usual, I won't try to do your thinking for you. I'm going to present some options, and you'll need to then select a stove based on your needs and your price constraints. I'm going to present some choices in two sub categories of canister stoves: regular upright canister stoves and integrated canister stoves. I'll address each sub category in turn.
Regular Upright Canister Stoves
An upright canister stove is just a small gas burner that mounts directly on top of a canister of gas. By "regular," I mean just the typical stove sold alone, not a stove that is tied to a particular pot. Examples of some popular regular upright canister stoves include the MSR PocketRocket, the Optimus Crux, the Soto MicroRegulator, and the Snow Peak GigaPower.
My typical recommendation for a good stove for the dollar is the Snow Peak GigaPower (GS-100) which is $40.00 (not including any taxes and shipping) for the manual version. That's an excellent value. It's not the lightest nor the most compact, but it's a very good stove and reasonably compact.
But what to cook in? Tall, mug shaped pots are quite popular, but honestly I don't recommend them. Such mug shaped pots are very narrow, and a lot of heat gets wasted up the sides. The smallest I would go with is the MSR Titan Kettle which is 850ml. I actually think a 1000ml (1 liter in other words) pot is the most versatile pot size. It's maybe slightly big (but not much) for one person, but it's very versatile, and if you get a pot that is wider than it is tall, it's more efficient in terms of catching the flame and not wasting flames up the side of the pot. Always run your stove on medium flame for best efficiency. A high flame is seldom needed and wastes fuel.
What should that pot be made out of? Titanium cookware is best for boiling water. If you want to do more than boiling water, then I recommend aluminum cookware, particularly hard anodized aluminum. Hard anodized aluminum is typically cheaper than titanium, nearly as durable, and nearly as light, but aluminum is far better for cooking inasmuch as it distributes heat well whereas titanium is infamous for "hot spotting" (where the spot where the flame hits gets hot and burns).
Regular canister stoves are quite vulnerable to wind. I typically use some kind of a windscreen. You have to be careful though. Trap too much heat, and you might overheat the canister and it might explode. One must feel the canister frequently and consistently with one's hand. If the canister feels hot, immediately turn the stove down, open up the windscreen, and take the pot off the stove until things cool down. Only diligent, attentive people should use a windscreen with a canister stove. If one is the type whose mind wanders or is easily distracted, a windscreen might not be such a good idea. Manufacturers of course state that a windscreen should never be used at all, so you're on your own if you use a windscreen. I personally believe that windscreens are safe if you are checking the canister frequently. Be aware that not only could a canister explosion result from allowing too much heat to build up but that one could also melt any plastic parts of a stove.
Integrated Canister Stoves
By "integrated" I mean a pot and stove that are sold together and are designed for each other. Examples of integrated canister stoves would be the JetBoil PCS, Flash, Zip, and Sol as well as the MSR Reactor. Everyone knows that integrated canister stoves are efficient and boil water quickly, but if you get an integrated canister stove, you also get a "secret" feature: wind resistance. The burner is protected to varying degrees by the heat exchanger. Particularly the MSR Reactor is windproof.
Also with an integrated canister stove, one does not have to worry about what pot to select; a pot is provided, and the pot provided works very well with the stove.
A good integrated canister stove isn't cheap, but when you consider the cost of a pot and a stove, some of the lower priced integrated canister stoves stack up pretty well in the cost department. In particular, the Jetboil Zip (MSRP $75) is a real deal. For those who want a higher end stove and are willing to pay for it, the aluminum Jetboil Sol (MSRP $120) is an excellent choice. Jetboil also has a titanium Jetboil Sol (MSRP $150) that as far as I can tell is only one ounce lighter than the aluminum version. The Jetboil website says two ounces lighter, but the cup is not included in the weight listed for the titanium version whereas the cup is listed for the aluminum version. When a comparison is done that includes the same components, the aluminum and titanium versions appear to be only about one ounce different. I'm not sure that one ounce in weight savings is worth an additional $30, but that is up to the individual to decide. There have been some reports where the heat exchanger fins have melted on the titanium version of the Jetboil Sol when doing more than boiling water (e.g. cooking soups, dehydrated meals, etc.). There have even been a few, very few, reports of heat exchanger fins melting when all that was being done was boiling water. Lastly, there have also been some reports that the titanium Jetboil Sol might be dangerous, but, after looking into the issue, I do not believe that the titanium Sol is dangerous.
If one were wanted a good stove set up, a Jetboil Zip or aluminum Sol are excellent choices. I'm not recommending the titanium Sol at this time.
I will have a review of the Jetboil Sol available soon. Check back in about a week.
Conclusion
Which is better, a regular canister stove or an integrated canister stove? Hard to say, really. The regular is typically cheaper and lighter but is less efficient and more vulnerable to wind. The integrated is typically more expensive and heavier but is more efficient and more wind resistant. While I can present some pros and cons, ultimately the choice must be left up to the individual. Whether you pick up a regular canister stove like a Snow Peak GigaPower (and the pot of your choice) or you pick up, say, a JetBoil, I think you'll have a stove that will serve you well. Either would be a good choice.
I thank you for joining me on another Adventure in Stoving,
HJ
QuietStove.com

Saturday, March 10, 2012


Friday, March 9, 2012
BushBuddy vs Ti-Tri Cone
Recently, I reviewed the Ti-Tri Cone and the BushBuddy Ultra. Today, I thought I'd do a quick comparison of the two.
First, let me say right up front, that these are two really good quality wood burning stoves. They're both well designed, well constructed, and a pleasure to use. If you're in the market for a wood burning backpacking stove, I have no problem commending either one to you. However, as with all stoves, one or the other will work better for a given individual, depending on that individual's situation and style. So, let's compare!
Quality of Workmanship
Both have excellent build quality, but the BushBuddy Ultra is a tour de force in craftsmanship. It is just really well put together by someone who clearly is a master fabricator. I used this photo in my review, but it's so illustrative that it bears repeating.
Just look at the regularity of the spot welds. My information is that those are all done by hand (!). Now, that's craftsmanship. Of course we're here to burn wood not put something up on the mantle as an art piece, but still, one can't help but admire the workmanship of the BushBuddy Ultra.
Note that the BushBuddy's craftsmanship in no wise puts the Ti-Tri Cone in a bad light. The Ti-Tri Cone is a well made product.
Packability
The Ti-Tri Cone has a clear edge here. The main cone, inferno option inner cone, and floor roll up into a little package. Now, that's pretty sweet.
The fire grate fits on the floor of the pot; the two tent stakes fit inside the rolled up cone; the wire support for the grate rolls up and stores next to the rolled up cone; and there's still room inside for more. I can toss in a lighter, measuring cup, alcohol stove, spoon, a couple of ESBIT cubes, etc.
By contrast, a BushBuddy in the pot means you generally won't get too much else in the pot. Now, don't get me wrong. The BushBuddy's trick of simply rotating the pot supports 180 degrees and storing them within the body of the BushBuddy is brilliant, but the BushBuddy just isn't as compact as a Tri-Ti Cone.
You can fit an alcohol stove or some ESBIT inside, but the BushBuddy isn't quite as space efficient as a Sidewinder Ti-Tri Cone.
Ease of Set Up
The BushBuddy is a snap. Pull out the pot supports, rotate 180 degrees so that the pot supports point up, and set the pot supports in the grove that runs along the top of the BushBuddy. You're done. It might take all of about 30 seconds, if that. On the other hand, the Ti-Tri Cone has an outer cone to assemble, the floor to emplace, the wire roll to position, the grate to set atop the wire roll, the inner cone must be connected, and the two tent stakes must be slid through their respective holes, Clearly the BushBuddy is the winner here.
However, we're talking about a wood fire here. Compared to gathering wood, building a fire lay, and getting a fire started, I don't think either set up is particularly bad. In the context of the amount of work that a wood fire requires, the set up on either one is not a big deal.
Ease of Take Down
As you might expect, it's more work to pack up a Ti-Tri Cone with the Inferno Option. I don't think it's a huge hassle, especially after you've done it a couple of times, but it is more work. The one thing I do notice is that my hands get dirtier when taking down a Ti-Tri Cone after wood burning. I guess one just needs to be prepared for that and pack some baby wipes.
Ease of Cooking
The real difference here is capacity. Even though the Ti-Tri Cone packs smaller, it sets up larger. The larger capacity means you load once for a boil.
The smaller BushBuddy needed to be fed repeatedly while in use in order to get a boil. If you're wanting to do cooking that requires coals for even heating, the Ti-Tri Cone holds more coals and provides more sustained, even heat. I've been able to prepare things like a four egg omelet, which is pretty thick when cooked in a small backpacking type pan, without any problems on a wood-fired Ti-Tri Cone.
Non-Wood Use
OK, here's where the Ti-Tri Cone just plain beats the BushBuddy. Yes, you can kludge up a way to run an alcohol or ESBIT stove with a BushBuddy, but it really doesn't work that well, particularly in wind.
On the other hand, the Ti-Tri Cone is an alcohol stove set up of the first order. The Ti-Tri Cone is also an excellent ESBIT set up. Really it is excellence in non-wood mode that sets the Ti-Tri Cone apart. The BushBuddy is great if you're going to be able to burn wood a high percentage of the time and only occasionally have to burn alcohol or ESBIT. If however you're going to do any significant portion of a trip with non-wood fuels, the Ti-Tri Cone wins hands down.
Weight
Just below, I've put down the weights corresponding to the various modes that one could run a Ti-Tri Cone in. These weights are measured on my kitchen gram scale. Note that I'm using a Ti-Tri Cone sized for a 1300ml Evernew pot which does not need stakes when used with alcohol. Smaller pots will require the use of stakes. Each stake weighs 7g.
By contrast, the BushBuddy weighs 139g/4.9 ounces on my scale. No matter what configuration in which the Ti-Tri Cone is used, the Ti-Tri Cone is lighter.
Keep in mind also that you'll need a windscreen for the BushBuddy if you use alcohol or ESBIT. The weight of a windscreen will add weight to the above listed weight.
Pot Stability
Both stoves provide good pot stability. I'd say the edge goes to the Ti-Tri Cone, particularly in sloping or uneven terrain.
Price
The Bushbuddy Ultra is $120.00 Canadian Dollars including shipping to addresses within Canada and $128.00 Canadian Dollars including shipping to the United States including Alaska and Hawaii. No pot is included.
The price of a Sidewinder Ti-Tri Cone will vary with the options you select. For the full wood burning set up listed below, the price is $130.00 US dollars which does not include shipping. No pot is included, but a 20% discount is offered if you buy a pot along with the Ti-Tri Cone. Shipping to my location is $6.37 for the below listed components. Shipping to your location may vary. California residents must pay sales tax which I believe is 7.6% in the county where Trail Designs is located.
The BushBuddy is slightly less and includes shipping but the Ti-Tri Cone set up includes more, and Trail Designs offers a 20% discount if you buy a pot for your set. Take your pick.
Sidewinder Ti-Tri Cone Component List
a) Sidewinder Ti-Tri Cone (outer cone)
b) Two titanium tent stakes
c) 12-10 alcohol stove
d) "Gram Cracker" ESBIT stove with drip plate
e) Inferno insert (inner cone)
f) Fire grate and wire support
g) Floor
h) Tyvek sacks to house the various components.
i) Fuel bottle (for alcohol)
j) Small measuring cup (for measuring alcohol)
LNT Considerations
I have experienced some scorching of the ground after using the Ti-Tri Cone for an extended period of time (long periods of testing with multiple items cooked in a row) despite using the floor. I have not experienced scorching with normal use.
The scorch marks are very shallow and easily removed, but one should clear the ground before use and inspect the ground after use.
I have experienced no scorch marks when using a BushBuddy Ultra. Indeed, the bottom of a BushBuddy doesn't even get hot while in use.
It's also worth mentioning that with either stove, fuel consumption is far less than with an open fire. Using less fuel means that there is less impact on the environment.
Flexibility
Here, the BushBuddy wins, no question about it. With the BushBuddy, you can use pretty much any pot, kettle, or pan.
Note however that if you want to pack the BushBuddy in your pot that you'll need a relatively tall pot. A BushBuddy will not fit in a shorter pot. The BushBuddy Ultra is sized to fit well in a Snow Peak Trek 900 pot.
With a Ti-Tri Cone, you are generally restricted to whatever pot the Cone was built for. Each Ti-Tri Cone is sized for a particular pot. The Ti-Tri Cone seen here is sized for a 1300ml Evernew pot. However, I have been able to balance a pan on top of the edges of the cone. In other words, I actually have a few more options than just the pot the Ti-Tri Cone was made for.
Note: I would not try cooking with a pan placed on top of an aluminum Caldera Cone.
Conclusion
Overall, I prefer the Ti-Tri Cone because of it's lighter weight, greater capacity, better packability, wind resistance, better stability, and ability to run equally well on wood and non-wood fuels. Particularly where I live where wood fire bans are a fact of life, the ability to run equally well on wood and non-wood fuels is key.
Moreover, I would think that for anyone who camps both above and below tree line that the Ti-Tri Cone would be the wood burning stove of choice.
So, there you have it, a quick look at the BushBuddy Ultra and the Ti-Tri Cone in terms of how they compare to one another.
I thank you for joining me on another Adventure In Stoving.
HJ
Acknowledgments
The two stoves featured in this comparison were provided by BPL members Christian D. and Randy N. Thank you to Christian and Randy!
 |
| A Ti Tri Cone (Sidewinder type), left, and a BushBuddy Ultra, right. |
Quality of Workmanship
Both have excellent build quality, but the BushBuddy Ultra is a tour de force in craftsmanship. It is just really well put together by someone who clearly is a master fabricator. I used this photo in my review, but it's so illustrative that it bears repeating.
 |
| The wonderful craftsmanship of a BushBuddy Ultra |
Note that the BushBuddy's craftsmanship in no wise puts the Ti-Tri Cone in a bad light. The Ti-Tri Cone is a well made product.
Packability
The Ti-Tri Cone has a clear edge here. The main cone, inferno option inner cone, and floor roll up into a little package. Now, that's pretty sweet.
 |
| The main cone, inner cone ("Inferno Option"), and the floor. |
 |
| A packed up Ti-Tri Cone (left). A packed up BushBuddy (right). |
 |
| The BushBuddy's pot supports rotate 180 degrees and store inside. |
Ease of Set Up
The BushBuddy is a snap. Pull out the pot supports, rotate 180 degrees so that the pot supports point up, and set the pot supports in the grove that runs along the top of the BushBuddy. You're done. It might take all of about 30 seconds, if that. On the other hand, the Ti-Tri Cone has an outer cone to assemble, the floor to emplace, the wire roll to position, the grate to set atop the wire roll, the inner cone must be connected, and the two tent stakes must be slid through their respective holes, Clearly the BushBuddy is the winner here.
However, we're talking about a wood fire here. Compared to gathering wood, building a fire lay, and getting a fire started, I don't think either set up is particularly bad. In the context of the amount of work that a wood fire requires, the set up on either one is not a big deal.
Ease of Take Down
As you might expect, it's more work to pack up a Ti-Tri Cone with the Inferno Option. I don't think it's a huge hassle, especially after you've done it a couple of times, but it is more work. The one thing I do notice is that my hands get dirtier when taking down a Ti-Tri Cone after wood burning. I guess one just needs to be prepared for that and pack some baby wipes.
Ease of Cooking
The real difference here is capacity. Even though the Ti-Tri Cone packs smaller, it sets up larger. The larger capacity means you load once for a boil.
 |
| The Ti-Tri Cone (left) has a much larger fire box than the BushBuddy (right). |
 |
| An omelet prepared on a wood-fired Sidewinder Ti-Tri Cone |
OK, here's where the Ti-Tri Cone just plain beats the BushBuddy. Yes, you can kludge up a way to run an alcohol or ESBIT stove with a BushBuddy, but it really doesn't work that well, particularly in wind.
 |
| An alcohol stove in use with a BushBuddy. It works. Kind of. |
Wind Resistance
The Ti-Tri Cone system uses the highly effective Caldera Cone as its pot support and windscreen. Except for the handle cut out, the pot has no gap between itself and the upper edge of the windcreen.
 |
| The tight fitting Caldera Cone windsreen. |
On the other hand, the BushBuddy has a 360 degree gap that allows wind to sweep through.
 |
| There is a gap that wind can blow through between the pot and the stove with a BushBuddy Ultra. |
With wood, efficiency is a little less critical since if the wind blows away your heat you can presumably just add some more wood to make up the difference. In higher winds, a stove without good wind resistance can be a problem.
If one is using alcohol or ESBIT, then wind resistance is quite a bit more critical. The Ti-Tri Cone is the clear winner in the wind resistance category.
If one is using alcohol or ESBIT, then wind resistance is quite a bit more critical. The Ti-Tri Cone is the clear winner in the wind resistance category.
Weight
Just below, I've put down the weights corresponding to the various modes that one could run a Ti-Tri Cone in. These weights are measured on my kitchen gram scale. Note that I'm using a Ti-Tri Cone sized for a 1300ml Evernew pot which does not need stakes when used with alcohol. Smaller pots will require the use of stakes. Each stake weighs 7g.
| Ti-Tri Cone | Grams | Ounces | ||
| Full Wood Mode (Inferno Option) | 126 | 4.44 | ||
| Minimum Wood Mode (with floor) | 77 | 2.72 | ||
| Non-LNT Wood Mode (no floor) | 59 | 2.08 | ||
| Alcohol Mode (no stakes) | 60 | 2.12 | ||
| ESBIT Mode (with stakes) | 57 | 2.01 |
By contrast, the BushBuddy weighs 139g/4.9 ounces on my scale. No matter what configuration in which the Ti-Tri Cone is used, the Ti-Tri Cone is lighter.
Keep in mind also that you'll need a windscreen for the BushBuddy if you use alcohol or ESBIT. The weight of a windscreen will add weight to the above listed weight.
Pot Stability
Both stoves provide good pot stability. I'd say the edge goes to the Ti-Tri Cone, particularly in sloping or uneven terrain.
 |
| Two Evernew 1300ml pots on (left) a Sidewinder Ti-Tri Cone and (right) a BushBuddy Ultra. The Ti-Tri Cone is more stable in varied terrain. |
The Bushbuddy Ultra is $120.00 Canadian Dollars including shipping to addresses within Canada and $128.00 Canadian Dollars including shipping to the United States including Alaska and Hawaii. No pot is included.
The price of a Sidewinder Ti-Tri Cone will vary with the options you select. For the full wood burning set up listed below, the price is $130.00 US dollars which does not include shipping. No pot is included, but a 20% discount is offered if you buy a pot along with the Ti-Tri Cone. Shipping to my location is $6.37 for the below listed components. Shipping to your location may vary. California residents must pay sales tax which I believe is 7.6% in the county where Trail Designs is located.
The BushBuddy is slightly less and includes shipping but the Ti-Tri Cone set up includes more, and Trail Designs offers a 20% discount if you buy a pot for your set. Take your pick.
Sidewinder Ti-Tri Cone Component List
a) Sidewinder Ti-Tri Cone (outer cone)
b) Two titanium tent stakes
c) 12-10 alcohol stove
d) "Gram Cracker" ESBIT stove with drip plate
e) Inferno insert (inner cone)
f) Fire grate and wire support
g) Floor
h) Tyvek sacks to house the various components.
i) Fuel bottle (for alcohol)
j) Small measuring cup (for measuring alcohol)
LNT Considerations
I have experienced some scorching of the ground after using the Ti-Tri Cone for an extended period of time (long periods of testing with multiple items cooked in a row) despite using the floor. I have not experienced scorching with normal use.
 |
| Superficial scorch mark left on the ground by a Ti-Tri Cone |
I have experienced no scorch marks when using a BushBuddy Ultra. Indeed, the bottom of a BushBuddy doesn't even get hot while in use.
It's also worth mentioning that with either stove, fuel consumption is far less than with an open fire. Using less fuel means that there is less impact on the environment.
Flexibility
Here, the BushBuddy wins, no question about it. With the BushBuddy, you can use pretty much any pot, kettle, or pan.
 |
| A BushBuddy Ultra with a 1300ml Evernew pot |
 |
| The same BushBuddy with a 1000ml Snow Peak pot |
 |
| A BushBuddy Ultra will not fit in, for example, an Evernew 1300ml pot. A taller pot is needed. |
 |
| Cooking scrambled eggs in a pan placed on top of a Ti-Tri Cone |
Conclusion
Overall, I prefer the Ti-Tri Cone because of it's lighter weight, greater capacity, better packability, wind resistance, better stability, and ability to run equally well on wood and non-wood fuels. Particularly where I live where wood fire bans are a fact of life, the ability to run equally well on wood and non-wood fuels is key.
Moreover, I would think that for anyone who camps both above and below tree line that the Ti-Tri Cone would be the wood burning stove of choice.
So, there you have it, a quick look at the BushBuddy Ultra and the Ti-Tri Cone in terms of how they compare to one another.
I thank you for joining me on another Adventure In Stoving.
HJ
Acknowledgments
The two stoves featured in this comparison were provided by BPL members Christian D. and Randy N. Thank you to Christian and Randy!
Other wood fired backpacking stove posts:
- The BushBuddy Ultra. Craftsmanship has not gone out of style.
- The Ti-Tri Cone -- The Ultimate Ultralight Stove System?
- Why a Wood Stove? More Thoughts on the Ti-Tri Cone.
- Wood Fired Cooking on a Ti-Tri Cone. Cooking real food with wood.
- BushBuddy vs Ti-Tri Cone. Wood stoves, compared.
Posts on the Caldera Cone:
- Caldera Cone Alcohol Stove Review (on Seattle Backpackers Magazine)
- Caldera Cone Review Supplement -- Additional Photos and Technical Appendix with Weights
- Caldera Cone vs. Clikstand Alcohol Stove Tests
- The Caldera Cone's 12-10 Burner
- What "Color" is your Caldera?
- The "Magic" of the Caldera Cone (Why is the Caldera Cone so efficient?)
Thursday, March 1, 2012
Primus Omnifuel vs. MSR Whisperlite Universal
There are some really nice expedition class stoves out there on the market right now. One of the really nice features that's come out in the last couple of years is the "hybrid" stove, a stove that can burn not only liquid fuels like gasoline and kerosene but also nice, clean, no-priming-needed canister gas. Perhaps the two best known stoves in this category are the Primus Omnifuel and the MSR Whisperlite Universal. I thought I'd do a brief comparison of the two.
For more information on the individual stoves themselves, please see the following reviews:
First, travel mode. Both come with nice stuff sacks. Both stuff sacks have a nice zipper pouch so you don't lose any small parts.
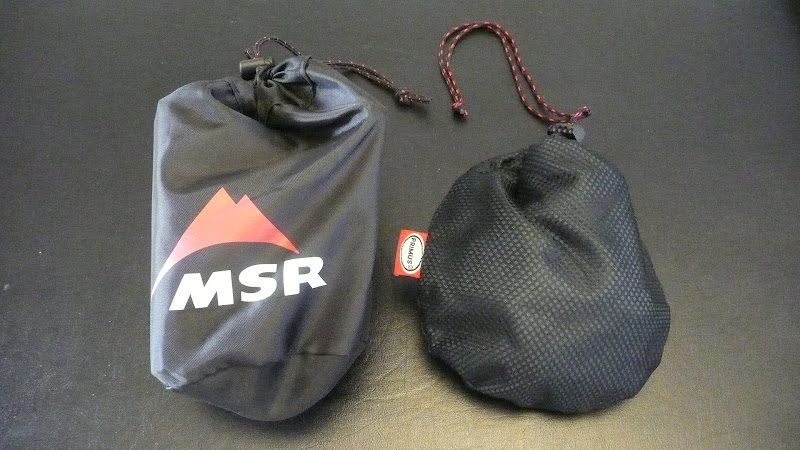 |
The MSR Whisperlite Universal (left) and the Primus Omnifuel (right) |
Note that the Whisperlite Universal makes a little bigger package than the Omnifuel. This is because a) the Whisperlite Universal is the bulkier of the two and b) you get more items included with the Whisperlite Universal.
Here are the major components that come with the Whisperlite Universal:
 |
The major components that come with a Whisperlite Universal. Back row (L to R): Heat reflector, inverted canister stand, and windscreen. Front row (L to R): burner, fuel pump |
The major components are listed in the caption above. Of course you also get a stuff sack, a liquid fuel adapter, and a little parts baggie with spare jets, a wrench/tool, and lubricant.
By contrast, the Omnifuel:
 |
The components that come with an Omnifuel |
Basically, you just get the burner and the fuel pump (and of course the stuff sack with the wrench/tool, spare jets, and lubricant). You (typically) don't get a heat reflector, windscreen, or inverted canister stand. Note: There are a lot of package deals out there with the Omnifuel; shop around. Some packages even include a fuel bottle. The Whisperlite Universal is typically sold separately from a fuel bottle.
The MSRP of the Whisperlite Universal is $140. The MSRP of the Omnifuel is $160. However, always look for deals. I've seen all sorts of special packages and deals out there on the Omnifuel. Be sure to shop around.
Value for the Dollar
Generally though, I'd say the Whisperlite wins on a value for the dollar basis. There's just more included with a Whisperlite. A windscreen is really important. It's included with the Whisperlite Universal. You've got to buy it separately with the Omnifuel. I've read that there's a "built in windscreen" with the Omnifuel. I don't buy that. You need an external windscreen for anything more than a breeze.
Also, that little canister stand that comes with the Whisperlite Universal is actually pretty handy.
 |
The inverted canister stand of a Whisperlite Universal |
Convenience in cold weather operation
What does the canister stand buy you? Convenience in cold weather operation with canister gas. Yes, you could just switch to liquid fuel for cold weather operation, but there are advantages to gas like improved simmering, greater mechanical reliability, and the elimination of priming. With the stand, you can easily invert a canister for improved cold weather operation. Generally, inverting the canister means you can operate your stove in weather that is 20F/10C colder than you could if the canister were right side up.
 |
The really nice inverted canister stand of the Whisperlite Universal |
Notice the Omnifuel's connector just to the left of the Whisperlite Universal's canister stand. Not only does the Omnifuel not come with a stand, but the control knob makes it hard to keep a canister inverted. Sure, you can DIY something, but the nice, professional stand that MSR gives you is really pretty nice.
Convenience in switching between gas and liquid fuels
In terms of switching between gas and liquid fuels, the Omnfuel wins, hands down. On the Whisperlite Universal, you have to change adapters on the end of the fuel line, and you have to change the jet. On the Omnifuel, there's no adapter to change; you just change the jet. Whether gas or liquid, the end of the fuel line stays the same with the Omnifuel.
Overall Build Quality
The Primus Omnifuel is a thing of beauty. It's precision engineering at it's best. It's almost more work of art than stove. It's hard to sum up the difference in a photo or two, but let's take a quick look at the respective pumps.
 |
| Top: The MSR standard pump. Bottom: The Primus Ergopump. |
Now, the plastic MSR pump is a perfectly serviceable pump, but there's just no comparison to the engineering marvel that is the Primus Ergopump. The smooth, precise stroke of the Primus pump is such a pleasure. The MSR pump feels a bit tinny by comparison. Don't get me wrong. I think they're both good stoves, but if you like precise Swiss watch-like engineering, the Omnifuel is for you.
Simmering
The Omnifuel has a valve at the burner, and is the better simmerer, particularly on liquid fuel. With the Omnifuel, it's easy to simmer, and anybody, even the rankest newbie, can do it. However, the Whisperlites are the best non-valve-at-the-burner simmering stoves that MSR makes and are a huge improvement over previous generations of the Whisperlite. Simmering with the Whisperlite Universal takes a few tricks, like leaving a lot of air space in the fuel bottle and only pumping up the bottle with about 1/4 the normal amount of pump strokes. With a bit of practice, the Whisperlite Universal really can simmer, but it's not as easy nor as automatic as with the Omnifuel. The Whisperlite Universal does have a large burner head which distributes the flame well which reduces the chances of hot spotting.
Compactness
The Omnifuel has a real advantage here. The Whisperlite Universal has a larger burner head in the first place, and for whatever reason MSR decided to go with a really stiff fuel line, a fuel line that's a real pain in the neck to pack up.
 |
| The Primus Omnifuel is far more compact than the Whisperlite Universal |
Note how in the below photo that the hose on the Whisperlite Universal sticks up in the air, supporting not only its own weight but also the weight of the canister adapter at its tip. Now that is a stiff hose.
 |
| The Whisperlite Universal has a very stiff fuel hose, so stiff that it will stick into the air, unsupported |
By contrast, the Omnifuel's hose wraps easily around the body of the stove. NICE.
 |
| The flexible hose of the Omnifuel is easily wrapped around the stove and tucked into the folded pot supports. |
Noise
The Omnifuel is just plain loud. It's not the loudest I've ever heard, but it's definitely not going to enhance the peace of the wilderness.
 |
| The Omnifuel with a roarer burner (left) and the Whisperlite with a ported (or baffled) burner (right) |
The Omnifuel has a "roarer" type burner, and roar it does. Now, the good thing about a roarer burner is that it's easy to clean and handles wind well. But it is loud. The Whisperlite, as one might surmise from its name, is far quieter.
There is however a solution to the noise problem of the Omnifuel: You can get an after market silent cap. The best cap I've seen is the OmniDawg silent cap from Bluewater Stove Restoration. It's a wonderfully quiet solution that also reduces the carbon monoxide emissions of the stove, but it's typically pricey.
 |
| An OmniDawg silent cap shown between a Primus Omnifuel (left) and an MSR Whisperlite Universal (right). |
See my Omnifuel review for more information including videos on the OmniDawg silent cap. OmniDawg silent caps are only sold through "BernieDawg's Store" on eBay.
Disclosure: I am not affiliated with Bluewater stove restoration or "BernieDawg's Store." I am merely a satisfied customer. I cannot help you obtain a silent cap. Please use eBay if you would like a silent cap for your stove.
Disclosure: I am not affiliated with Bluewater stove restoration or "BernieDawg's Store." I am merely a satisfied customer. I cannot help you obtain a silent cap. Please use eBay if you would like a silent cap for your stove.
Pot Stability
I'd say the Whisperlite Universal has the edge on pot stability. I tested the Whisperlite Universal with an enormous (in backpacking terms) one gallon (3.8L) tea kettle. Steady as a rock. The pot supports on the Whisperlite Universal have a radius of approximately 94mm. That's a pretty good sized pot support! That's larger than the previous generation of Whisperlites which already had great pot stability. With pot supports like that, you can use large pots for snow melting, an essential expedition task.
Now, that's not to say that the Omnifuel has poor pot stability -- far from it, but the Whisperlite Universal has the edge here. The Omnifuel has pot supports with a radius of approximately 84mm.
Pot Compatibility
On pot compatibility, the roles are a bit reversed, at least with smaller pots. The Whisperlite Universal with it's big burner head has trouble with smaller pots. There is a gap of approximately 42mm from the center of the Whisperlite Universal's burner to the inner end of the pot supports. In other words, your pot has to be wider than 84mm in order to be used on a Whisperlite Universal. Obviously, the Whisperlite Universal wasn't meant for small, solo style mug type pots. Unless you've got something like an MSR Espresso Star, which spans pot supports so that you can use a small pot or espresso maker, stick with a bigger pot.
 |
| An MSR Espresso Star on a Whisperlite Universal |
Weight
Here's where I think the Whisperlite Universal really shines, particularly on liquid fuel. Let's take a look at the numbers.
Canister Gas
Primus Omnifuel 427g/15.06oz
Whisperlite Universal 315g/11.11oz
Liquid Fuel
Primus Omnifuel 530g/18.70oz
Whisperlite Universal 369g/13.02oz
Basically, on canister gas, the Whisperlite Universal is about 112g/4oz lighter than the Omnifuel, and on liquid fuel, the Whisperlite Universal is about 161g/5.7oz lighter than the Omnifuel. Yes, the Omnifuel has a beautiful metal pump, but you pay for it in the weight department. Whether on canister gas or on liquid fuel, you save at least a quarter pound with the Whisperlite, and your weight savigs go up to almost 3/8th of a pound when using liquid fuel.
Note: For the purposes of comparison, I did not include the windscreen, heat reflector, or canister stand since those only come with one of the stoves. I wanted an "apples to apples" comparison. Included are the stuff sacks, one jet, spare parts and tools, stove, and pump (for liquid fuel only obviously). On the Whisperlite Universal, the appropriate adapter on the end of the fuel hose was included.
Concluding Remarks
So, which is the better stove overall? You tell me. :)
Seriously, it's up to you. Take a look at the various categories I've laid out above. It's up to you to decide which mix of price, weight, and features matter to you. Some people won't get an Omnifuel just because it's loud. Others won't go with the Whisperlite Universal simply because it has a plastic pump. I can't decide for you which categories matter to you and in what way, but I hope that by laying out some facts, figures, and thoughts, this post will help you get a better understanding of which stove might better suit your needs.
Seriously, it's up to you. Take a look at the various categories I've laid out above. It's up to you to decide which mix of price, weight, and features matter to you. Some people won't get an Omnifuel just because it's loud. Others won't go with the Whisperlite Universal simply because it has a plastic pump. I can't decide for you which categories matter to you and in what way, but I hope that by laying out some facts, figures, and thoughts, this post will help you get a better understanding of which stove might better suit your needs.
Special thanks to Martin C. who helped me recover this post after it was obliterated in a Blogger error.
As always, I thank you for joining me on another Adventure in Stoving,
HJ
Technical Appendix -- Detail Weights
Whisperlite Universal Weights
| Item | Grams | Include? | Grams | Ounces | Pounds | |
| 1 | Stove | 232 | Y | 232 | 8.18 | 0.51 |
| 2 | Pump | 65 | Y | 65 | 2.29 | 0.14 |
| 3 | Windscreen | 60 | N | 0 | 0.00 | 0.00 |
| 4 | Manual | 57 | N | 0 | 0.00 | 0.00 |
| 5 | Stuff Sack | 35 | Y | 35 | 1.23 | 0.08 |
| 6 | Canister Adapter | 31 | N | 0 | 0.00 | 0.00 |
| 7 | Liquid Fuel Adapter | 22 | Y | 22 | 0.78 | 0.05 |
| 8 | Reflector | 17 | N | 0 | 0.00 | 0.00 |
| 9 | Canister Stand | 14 | N | 0 | 0.00 | 0.00 |
| 10 | Spare Parts Kit | 12 | Y | 12 | 0.42 | 0.03 |
| 11 | Canister Gas Jet | 5 | N | 0 | 0.00 | 0.00 |
| 12 | Kerosene Jet | 3 | Y | 3 | 0.11 | 0.01 |
| 13 | Gasoline Jet | 3 | N | 0 | 0.00 | 0.00 |
| TOTAL | 369 | 13.02 | 0.81 | |||
| Upright Gas | 315 | 11.11 | 0.69 | |||
| Inverted Gas | 329 | 11.61 | 0.73 | |||
| Liquid Fuel | 369 | 13.02 | 0.81 |
Primus Omnifuel Weights
| Item | Grams | Include? | Grams | Ounces | Pounds | |
| 1 | Stove | 348 | Y | 348 | 12.28 | 0.77 |
| 2 | Pump | 103 | Y | 103 | 3.63 | 0.23 |
| 3 | Tool | 42 | Y | 42 | 1.48 | 0.09 |
| 4 | Stuff Sack | 30 | Y | 30 | 1.06 | 0.07 |
| 5 | Lubricant | 5 | Y | 5 | 0.18 | 0.01 |
| 6 | Canister Gas Jet | 2 | N | 0 | 0.00 | 0.00 |
| 7 | Kerosene Jet | 2 | N | 0 | 0.00 | 0.00 |
| 8 | Gasoline Jet | 2 | Y | 2 | 0.07 | 0.00 |
| TOTAL | 530 | 18.70 | 1.17 | |||
| Upright Gas | 427 | 15.06 | 0.94 | |||
| Inverted Gas | 427 | 15.06 | 0.94 | |||
| Liquid Fuel | 530 | 18.70 | 1.17 |
Aluminum JetBoil Sol -- Cooking Report #1
I'm in the process of reviewing the new Sol cooking system from JetBoil. I'm reviewing the aluminum version. There is also a titanium version, but I will not be covering the titanium version at this time.
So, let's take a look. Here, the Adventures In Stoving spokesmodel shows us what a JetBoil Sol looks like.
That's fresh out of my backpack. I had been using it the evening prior for what the JetBoil is famous for: boiling water, a task for which it is exceptionally well suited.
However, today I'd like to try my hand at a little cooking. Rumor has it that you can't get a decent low flame out of the thing. Let's see.
Now, let's turn it down a bit.
When I really turned down the Sol, I got a yellow flame. Not good. BUT that flame is so low, it's not really a flame I'd cook with. The real question is whether I can get a low flame that is practical for cooking.
There! Now thats a little better. A flame that is low yet not absurdly so. That's a practical cooking flame. Note that there's no yellow in the flame.
So let's try some cooking. One of the exceptionally wonderful things about the JetBoil is that it comes with an attachment that allows one to use any pot or pan that they might like. So, you can either use the wonderfully efficient pot that comes with the burner that integrates so well, or you can use just about any other pot, pan, or kettle you might have on hand (within reason given the burner's size of course).
The adapter has a neat feature. Turn clockwise, and the adapter locks in place. In other words, that adapter isn't just resting on top of the rim of the burner, just waiting to be knocked off. That adapter has a good solid connection to the burner and isn't going to be easily knocked around. Very nicely done, Jetboil.
For today's cooking, I'll be using my favorite backpacking type pan, my MSR Blacklite pan. JetBoil does make a fry pan, but I've never used the JetBoil pan, so I won't cover the JetBoil pan in this cooking report.
A little butter to grease the pan, and we're off! Today's menu? A salami and cheese four egg omelet.
Why four eggs? Well, I've got three mouths to feed, so four eggs is about right, and four eggs is a really great test for this size of pan. If I can't control the flame properly, I'll get an omelet that's scorched on one side and raw on another. A good omelet requires steady low heat. Not ultra-low, but you don't want to crank the heat up or you'll be eating charcoal briquettes not an omelet.
So, how'd it go?
Pretty good in my opinion. My daughter's comment was "more." (My daughter is two). I think that means she liked it. :)
Seriously though, it tasted great, and the eggs turned out nice and fluffy, just the way I like them. The cheese was fully melted, and the salami was nice and hot.
There was some normal browning (from cooking with butter) on the bottom, but definitely no burnt spots.
And no sticking to the pan.
I'd say that was a successful omelet. :)
Now, lest I make it look all together too easy, let's realize that I was cooking indoors. Cooking outdoors is another matter. I feel like the stove has enough stability in the flame to cook outdoors, but I need to give that a test before I pronounce the matter settled.
Also, flame adjustment is tricky at low flame. Sometimes, I'd turn the flame adjuster up, but the flame would get smaller??!? Hunh? I think this has to do with the regulator valve, but suffice it to say that flame adjustment is a little tricky in the lower range of the stove. Still, I was able to get good, steady flame without any yellow, a flame that I think will work for me outdoors. I'll be posting another report soon on just that very subject.
Thanks for joining me on another Adventure in Stoving,
HJ
So, let's take a look. Here, the Adventures In Stoving spokesmodel shows us what a JetBoil Sol looks like.
 |
| Spokesmodel Joyce shows us the aluminum version of the JetBoil Sol |
However, today I'd like to try my hand at a little cooking. Rumor has it that you can't get a decent low flame out of the thing. Let's see.
 |
| A low to moderate flame on a JetBoil Sol |
 |
| A yellow flame resulted when I really turned down a JetBoil Sol |
 |
| A low flame on a Jetboil Sol |
So let's try some cooking. One of the exceptionally wonderful things about the JetBoil is that it comes with an attachment that allows one to use any pot or pan that they might like. So, you can either use the wonderfully efficient pot that comes with the burner that integrates so well, or you can use just about any other pot, pan, or kettle you might have on hand (within reason given the burner's size of course).
 |
| The JetBoil Sol comes with an adapter (shown here) that allows one to use any pot or pan. |
For today's cooking, I'll be using my favorite backpacking type pan, my MSR Blacklite pan. JetBoil does make a fry pan, but I've never used the JetBoil pan, so I won't cover the JetBoil pan in this cooking report.
 |
| An MSR Blacklite pan atop a JetBoil Sol |
Why four eggs? Well, I've got three mouths to feed, so four eggs is about right, and four eggs is a really great test for this size of pan. If I can't control the flame properly, I'll get an omelet that's scorched on one side and raw on another. A good omelet requires steady low heat. Not ultra-low, but you don't want to crank the heat up or you'll be eating charcoal briquettes not an omelet.
So, how'd it go?
 |
| A nice, fluffy omelet cooked on a JetBoil Sol |
 |
| Evenly done, fluffy, cheese fully melted. Yum! |
There was some normal browning (from cooking with butter) on the bottom, but definitely no burnt spots.
 |
| Nice browning on the underside, but no burning. |
 |
| Absolutely no sticking on the pan. |
Now, lest I make it look all together too easy, let's realize that I was cooking indoors. Cooking outdoors is another matter. I feel like the stove has enough stability in the flame to cook outdoors, but I need to give that a test before I pronounce the matter settled.
Also, flame adjustment is tricky at low flame. Sometimes, I'd turn the flame adjuster up, but the flame would get smaller??!? Hunh? I think this has to do with the regulator valve, but suffice it to say that flame adjustment is a little tricky in the lower range of the stove. Still, I was able to get good, steady flame without any yellow, a flame that I think will work for me outdoors. I'll be posting another report soon on just that very subject.
Thanks for joining me on another Adventure in Stoving,
HJ
JetBoil related posts
- Titanium JetBoil Sol -- Caution
- Aluminum JetBoil Sol -- Cooking Report #1
- Aluminum JetBoil Sol -- Trail Report #1 and Cooking Report #2
- Aluminum JetBoil Sol -- Cooking Report #3
- Aluminum JetBoil Sol -- Trail Report #2 and Cooking Report #4
- Final Review: The New Jetboil Sol (on Seattle Backpackers Magazine)
Wednesday, February 29, 2012
MSR Espresso Star
So, say you like your morning espresso (yum!). :) But that little tiny backpacking espresso maker just falls between the pot supports on your stove. :( What to do?
Well, let's take the example of the MSR Whisperlite. With a Whisperlite, it's really no problem if you've got an MSR Espresso Star.
Just lay the Espresso Star across your pot supports, and you're good to go.
Of course, there are other stoves besides a Whisperlite that have pot supports that might be a bit wide for a little espresso maker. So, I thought I'd try it on another stove. Here's the MSR Espresso Star on a Primus Omnifuel.
Obviously, I haven't exhaustively checked every possible stove out there, but if you've got a three legged stove where the legs are evenly spaced (120 degree angles), radiating outward from a central point, then the MSR Espresso Star will most likely work.
Now the bad news: These are now available second hand only (eBay, Craig's List, etc). The MSR Espresso Star is a nifty little gadget, but apparently it didn't sell well enough to be retained in MSR's product line up. Having struggled with jury rigging an espresso maker on my winter stove, I was delighted to find one on Craig's List. Search, and you might be able to pick one up too.
Thanks for joining me on another Adventure in Stoving,
HJ
Technical Appendix -- Weights
MSR Espresso Star . . . . 19g/0.67oz
Well, let's take the example of the MSR Whisperlite. With a Whisperlite, it's really no problem if you've got an MSR Espresso Star.
 |
| An MSR Espresso Star |
 |
| An MSR Espresso Star on a Whisperlite Universal |
 |
| An MSR Espresso Star on a Primus Omnifuel |
Now the bad news: These are now available second hand only (eBay, Craig's List, etc). The MSR Espresso Star is a nifty little gadget, but apparently it didn't sell well enough to be retained in MSR's product line up. Having struggled with jury rigging an espresso maker on my winter stove, I was delighted to find one on Craig's List. Search, and you might be able to pick one up too.
Thanks for joining me on another Adventure in Stoving,
HJ
Technical Appendix -- Weights
MSR Espresso Star . . . . 19g/0.67oz
 |
| The MSR Espresso Star |
Subscribe to:
Posts (Atom)