
Well, Saturday. Time to get out on the trail! :) I'm looking forward to testing a new wood stove.
Arriving at the creek, I see some recent blow down. The fuel depot is open. :)
It only takes a minute to gather enough wood for a wood stove, a distinct advantage to just using a pot over an open fire.
And today's stove? The BushBuddy Ultra.
The first thing to note is that a BushBuddy Ultra is a tall stove. You'll need a pot with some height in order to be able to put the stove in the pot.
Here, I'm using a Snow Peak 1000ml pot which has a frying pan type lid. Without this lid, I couldn't store a BushBuddy Ultra inside a pot with these proportions.
A BushBuddy Ultra pretty much needs to be stored upright. It won't even begin to fit in my pot sideways.
A wide, short pot without a frying pay lid may have trouble accommodating a BushBuddy Ultra. For example, an Evernew 1.3L pot cannot hold a BushBuddy Ultra. You really need a taller pot.
Neither can you lay the stove on its side.
Well, let's pull that BushBuddy out of the pot and have a look. The pot support cleverly fits upside down inside the body of the stove.
Note the grill in the above photo. This is important. The grill keeps the wood off the floor of the stove, allowing air to flow up from underneath during a burn.
Pulling the pot support out, I notice a row of vent holes just below the rim of the stove.
There are more vents on the outside at the base of the stove.
Basically, the BushBuddy Ultra is a chimney type stove. Cooler air enters from outside at the base, is heated between the inner and outer walls of the stove, and as the air is heated, it expands and accelerates out the ventilation ports just below the rim of the stove in the interior, causing a strong inflow of oxygen rich air. It's a pretty good design. Someone obviously knew what they were doing.
The pot support rests on the rim of the body of the stove.
The pot support has a gap in it that can be seen at the left in this photo. Additional wood can be inserted through the gap during use.
Taking a step back from the details, the first thing I notice is the craftsmanship. Everything is really well made and well put together. Just look at how regular the pattern of the spot welds is on the bottom of the stove.
This stove is not something that someone just slap dashed together. This is a well thought out stove with truly excellent build quality. A lot of labor clearly goes into the manufacture of these stoves.
Well, let's fire her up!
Today, I'll be testing with a 1.3L Evernew pot with 500ml of cold creek water.
A 1.3L pot like the Evernew is a little bit wide for the BushBuddy, but I found the BushBuddy to be reasonably stable. I was careful to pick fairly level ground.
One thing I notice with a BushBuddy Ultra is that it's a little hard to predict where the flames will come out. This make it a little tricky to keep the pot handles out of the flame. I found that by simply watching the burn and periodically repositioning the pot as needed kept the pot handles reasonably cool.
The other thing I found during testing was that one load of wood wasn't enough to boil 500ml of cold creek water. I had to reload the stove. It's possible to insert some wood through the gap in the pot support.
However, to really get even loading, I found it easier to remove the pot. If one is inserting wood through the gap in the pot support, it's important to watch the ends of the sticks you insert. Burning bits can fall of the ends of the sticks.
When additional wood is inserted, the excellent ventilation of the BushBuddy Ultra quickly causes the additional wood to become part of the fire.
I didn't time it, but I was quickly able to get a good boil using the BushBuddy Ultra.
Now, here's one of the nice things about a wood stove: There are more heat settings than just "boil." I let the wood burn down to just coals.
Then I add my noodles.
I add a few dried vegetables.
And a few minutes later, everything has re-hydrated nicely.
And the best part? No scorching, and no burning. It's wonderful to have multiple heat settings on a stove.
And after the burn? Nice, complete combustion.
In short, the BushBuddy Ultra is a really nice wood burner. It has a fairly small combustion chamber, so you do have to add wood while a boil is in progress, but no big deal.
Of course, there are times when you can't burn wood every meal. For example, sometimes fuel is scarce (or wet) or perhaps you're at too high of an altitude or perhaps you're in such a popular area that wood fires are restricted. Whatever the reason, there are times when wood fires just aren't going to work out. With the BushBuddy Ultra, do you have a plan "B?"
To find out, I thought I'd try a quick experiment with an alcohol stove.
Using a Trail Designs 12-10 alcohol stove and 0.75 fl. oz. of SLX denatured alcohol, I thought I'd try to boil 500ml of cold creek water.
Normally, I'd expect 0.75 fl. oz. of SLX denatured alcohol to bring 500ml of cold creek water to a boil. It didn't.
I added an additional 0.75 fl. oz. of SLX denatured alcohol and re-lit the alcohol stove. This time, toward the end of the burn, I got a boil. Not a strong boil, but the water did boil.
In other words, it took 1.5 fl. oz. of SLX denatured alcohol just to get a rather uninspired boil. So, do you have a plan "B" with a BushBuddy Ultra? Well, yes, but the BushBuddy Ultra really isn't an alcohol set up. The BushBuddy's strength is wood burning. While the BushBuddy Ultra can be run on alcohol, it doesn't work all that well. The BushBuddy Ultra is a wood burning stove and is best used for that purpose.
I didn't get a chance to test with hexamine (e.g. ESBIT), but I believe the results will be similar to running with alcohol. The best use for a BushBuddy Ultra would seem to be for trips where you can almost always burn wood and then go to a secondary fuel only if you really have to.
Are there other ways to use the BushBuddy with non-wood fuels than what I've shown? Of course, and I think they're worth exploring. However, a simple substitution (as done above) of an alternative fuel did not produce good results. Got a better way? Lay it on me. :)
CONCLUDING REMARKS
Cooking with a wood fire using a stove is so much easier than using an open fire. There's also much less chance of starting a wildfire given the contained nature of a wood stove and the complete nature of the combustion, and there's very little trace left when you're done. Having tested a couple of wood stoves now, I really wouldn't consider going back to an open fire for cooking except in an emergency.
I have to say that it was a real pleasure to be able to use a BushBuddy Ultra. Special thanks to Christian D. for the loan of his BushBuddy Ultra for this testing.
Thanks for joining me for another Adventure in Stoving.
HJ
Other wood fired backpacking stove posts:
Appendix
BushBuddy Ultra,
Weight ..... 139g/4.9oz
MSRP ..... $120.00 CAD including shipping within Canada. $128.00 CAD for shipping to the US including Alaska and Hawaii*
Per the bushbuddy website: All stainless steel construction, with an outer shell of .004" fully hardened 304 stainless steel, firebox walls of .010" annealed 304 stainless steel, and a hand made grate of nichrome wire for long life with minimum weight.
*Note that prices are in Canadian Dollars not US Dollars.
 |
| Heading up the trail |
 |
| Plenty of fuel |
 |
| Fuel for today's tests |
 |
| The BushBuddy Ultra |
Here, I'm using a Snow Peak 1000ml pot which has a frying pan type lid. Without this lid, I couldn't store a BushBuddy Ultra inside a pot with these proportions.
 |
| A 1000ml Snow Peak pot with a frying pan type lid will hold a BushBuddy Ultra |
 |
| A BushBuddy Ultra will not fit sideways in a 1000ml Snow Peak pot |
 |
| A BushBuddy Ultra will not fit upright in a wide, short pot like this 1.3L Evernew pot |
 |
| A BushBuddy Ultra will not fit on its side in a 1.3L Evernew pot |
 |
| A BushBuddy Ultra with the pot support upside down stored inside the body of the stove. |
Pulling the pot support out, I notice a row of vent holes just below the rim of the stove.
 |
| Note ventilation ports just below the rim of the stove |
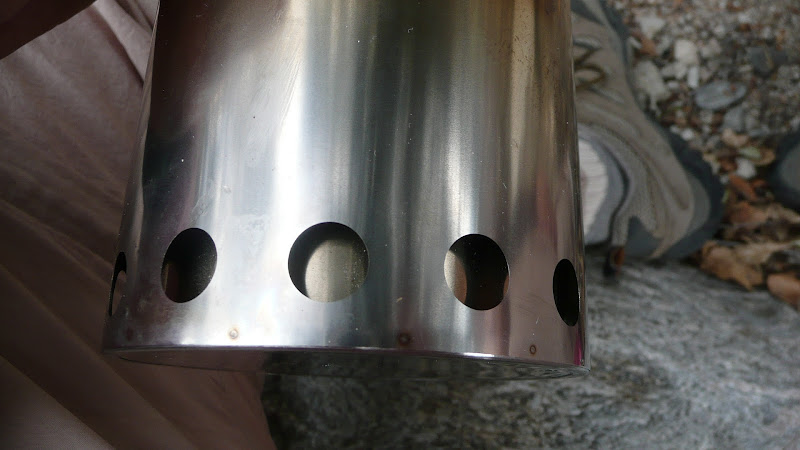 |
| On the exterior, there are additional ventilation ports at the base of the stove. |
The pot support rests on the rim of the body of the stove.
 |
| The pot support emplaced on a BushBuddy Ultra |
 |
| Looking down from above on a BushBuddy Ultra. Note gap in pot support at upper left. |
 |
| The base of a BushBuddy Ultra |
Well, let's fire her up!
 |
| A BushBuddy Ultra starting a burn |
 |
| A 1.3L Evernew pot on a BushBuddy |
One thing I notice with a BushBuddy Ultra is that it's a little hard to predict where the flames will come out. This make it a little tricky to keep the pot handles out of the flame. I found that by simply watching the burn and periodically repositioning the pot as needed kept the pot handles reasonably cool.
 |
| Flames can arise from any point around the perimeter of a BushBuddy Ultra |
 |
| Inserting additional wood through the gap in the pot support |
 |
| Burning ends of sticks can fall out if wood is inserted through the gap in the pot support |
 |
| The excellent drafting qualities of the BushBuddy Ultra quickly cause inserted wood to ignite. |
 |
| Boiling water on a BushBuddy Ultra |
 |
| Coals in a BushBuddy Ultra |
 |
| Preparing noodles over coals |
 |
| Adding vegetables to the mix |
 |
| Nicely hydrated noodles and vegetables |
And after the burn? Nice, complete combustion.
 |
| The white ash of thorough combustion. |
Of course, there are times when you can't burn wood every meal. For example, sometimes fuel is scarce (or wet) or perhaps you're at too high of an altitude or perhaps you're in such a popular area that wood fires are restricted. Whatever the reason, there are times when wood fires just aren't going to work out. With the BushBuddy Ultra, do you have a plan "B?"
To find out, I thought I'd try a quick experiment with an alcohol stove.
 |
| An alcohol stove resting on the grill of a BushBuddy Ultra |
 |
| An alcohol stove burning inside a BushBuddy Ultra |
I added an additional 0.75 fl. oz. of SLX denatured alcohol and re-lit the alcohol stove. This time, toward the end of the burn, I got a boil. Not a strong boil, but the water did boil.
 |
| A weak boil was achieved with 1.5 fl. oz. of SLX denatured alcohol |
I didn't get a chance to test with hexamine (e.g. ESBIT), but I believe the results will be similar to running with alcohol. The best use for a BushBuddy Ultra would seem to be for trips where you can almost always burn wood and then go to a secondary fuel only if you really have to.
Are there other ways to use the BushBuddy with non-wood fuels than what I've shown? Of course, and I think they're worth exploring. However, a simple substitution (as done above) of an alternative fuel did not produce good results. Got a better way? Lay it on me. :)
CONCLUDING REMARKS
Cooking with a wood fire using a stove is so much easier than using an open fire. There's also much less chance of starting a wildfire given the contained nature of a wood stove and the complete nature of the combustion, and there's very little trace left when you're done. Having tested a couple of wood stoves now, I really wouldn't consider going back to an open fire for cooking except in an emergency.
I have to say that it was a real pleasure to be able to use a BushBuddy Ultra. Special thanks to Christian D. for the loan of his BushBuddy Ultra for this testing.
Thanks for joining me for another Adventure in Stoving.
HJ
Other wood fired backpacking stove posts:
- The BushBuddy Ultra. Craftsmanship has not gone out of style.
- The Ti-Tri Caldera Cone -- The Ultimate Ultralight Stove System?
- Why a Wood Stove? More Thoughts on the Caldera Cone Ti-Tri.
- Wood Fired Cooking on a Caldera Cone. Cooking real food with wood.
- BushBuddy vs Ti-Tri Caldera Cone. Wood stoves, compared.
Appendix
BushBuddy Ultra,
Weight ..... 139g/4.9oz
MSRP ..... $120.00 CAD including shipping within Canada. $128.00 CAD for shipping to the US including Alaska and Hawaii*
Per the bushbuddy website: All stainless steel construction, with an outer shell of .004" fully hardened 304 stainless steel, firebox walls of .010" annealed 304 stainless steel, and a hand made grate of nichrome wire for long life with minimum weight.
*Note that prices are in Canadian Dollars not US Dollars.
What a coincidence, I purchased a Bushbuddy over a year ago and just now took it out to use today on a day hike in the Los Padres with friends. It was a pain, I had to constantly feed the beast. If you pause the fuel stream, boil times increase dramatically. I also had a Trangia 25 and... well for me, Trangia was much easier to use, weight be damned. I will give the BB a high grade for efficiency. As advertised, it burned fuel to complete ash but if you are tired, cold, and hungry, this stove will not be your buddy.
ReplyDeleteI tested it with a 12-10 stove inserted in the fire chamber and got better results than with a wood fuel. For me cooking with fire is not fun so I will save my money and not invest in the Caldera Tri. When compared to my previous wood burning stove, The Sierra Stove, it comes in second place.
Hi, Axel,
ReplyDeleteThe capacity of the BushBuddy is a little bit small, and you do have to keep feeding it. I didn't find it to be a big deal, but I also had a good pile of fire wood on hand ready to go. If you feed it once and expect it to boil, you're absolutely right that it's going to be problematic.
I haven't ever tried out a Sierra Stove. I'd like to some time. Not sure about having to carry batteries, but the Sierra Stove has a very good reputation and a loyal following.
HJ
Thanks for the report and trying the 12-10 stove. I wonder if the 12-10 stove would be more efficient if closer to the pot. Not sure if there would be enough clearance above it but use just the top of the Bushbuddy as a pot stand on the ground and windscreen for the 12-10.
ReplyDeleteHi, Chris,
ReplyDeleteYes you can take the pot support off the stove and put an alcohol stove inside the pot support. You'll probably want to bring some kind of windscreen as well. I think what you're suggesting is probably the best idea though: abandon the stove entirely and just use the pot support with an alcohol stove.
HJ
Two things I'd like to address. First you do a top down burn by completely loading the stove with thickest pieces on the bottom and progressively getting smaller. You light the fire at the top and it will Burn down much more slowly and cleaner. I have never had to add additional wood while heating up to two cups of water.
ReplyDeleteSecond, it is much more efficient when using an alky stove to simply place the alky stove inside the pot support right on the ground as it places the pot at the optimal distance from the stove. When you place the alky stove inside the Bushbuddy the distance from the flame is too great, hence the slow burn times.
I've also used esbit tabs on the ground inside the pot stand with equally good results. You do need a windscreen when using the esbit and alcohol mode and simple piece of foil will suffice.
I did over 500 miles on the AT last year using only the Bushbuddy. I used an esbit tab only twice during rain and only due to laziness on my part. I love the fact I never had to locate liquid fuel or carry it. I also enjoyed a Mimi campfire after every meal. I highly recommend the Bushbuddy.
Hi. Great review. I happen to have a Solo Stove I'm selling. $40 plus shipping. Email me. Kikngar@yahoo.com if interested. Identical to the Bush Buddy. Tad heavier. Tad stronger?
ReplyDeleteHi, do you still have that Solo Stove by any chance?
DeleteHi Again. I just read my old comment and now I am happy to report the Bushbuddy as one of my favorite stoves to use! I have had good results using the 12-10 burner, especially if the wind can be controlled with some sort of screen.
ReplyDeleteExcellent. I like both the burner and the stove.
DeleteHJ