QuietStove.com

Tuesday, February 28, 2012

Titanium JetBoil Sol -- Caution

The titanium version of the JetBoil Sol might have an occasional* problem.  The problem appears to be fairly limited, and many people have used the titanium version of the JetBoil Sol without problems and are completely satisfied with the product.

Please note that my concerns pertain to the titanium version of the JetBoil Sol only.

There have been a few failures noted in the aluminum "flux ring" (heat exchanger) that is joined to the bottom of the titanium pot.  Typically (I'll get to the more extreme cases in a minute), what appears to be happening is that someone is heating something other than just water in their JetBoil.  Heat builds up in the aluminum heat exchanger, more heat than the heat exchanger can handle, and the heat exchanger becomes damaged.   The damage typically appears to be a melting of the heat exchanger.   It's possible that the aluminum could be undergoing combustion.  Whether melting or combustion, the heat exchanger is damaged.
A damaged aluminum "flux ring" (heat exchanger) on a titanium JetBoil Sol.  Photo courtesy of John Abela of HikeLighter.com.  Used by permission.
So, caution number one:  If you screw up while cooking with the titanium version of the JetBoil Sol, you might really damage your heat exchanger.

What are some ways to minimize the risk of damaging the heat exchanger?
1.  Only boil water.  Water typically does not exceed 212F/100C in temperature.  Yes, salts and minerals in the water may raise the boiling point a bit, but it will still be somewhere near the typical boiling point.  Water makes a very effective way of putting an upper bound on the amount of heat the pot and heat exchanger is subjected to.
2.  Moderate your flame.  Yes, I know, you bought your JetBoil because it's faster than a speeding bullet, but really, will a moderate flame make that much difference?  What, 30 seconds more?  How much is an undamaged heat exchanger worth?  A few more seconds wait is well worth it if you save your heat exchanger.  The titanium version of the JetBoil Sol isn't cheap, now is it?  So slow it down a bit, yes?
3.  If you do heat up something that's a bit more than water, stir it continuously.  If you burn something to the bottom of the pot, it could form an insulating layer.  That insulating layer will act as a barrier and not allow heat to be transferred from the exchanger into contents of the pot.  You do NOT want anything to block the normal heat transfer.  If the heat builds up in the fairly thin aluminum of the heat exchanger, that's when damage is most likely to occur.
4.  Don't heat up something with a low moisture content.  The JetBoil's instructions (see appendices, below) state as much.  Personally, I wouldn't heat up anything thicker than the slurry formed by adding water to a freeze dried meal, but whatever you heat up, make sure it has a lot of water content.

Now, for the above, I said "typical case."  By that I mean typical case where there has been some type of problem.  Of course 99+ percent of the time there is no problem.
A typical heat exchanger on a JetBoil Sol Ti (perfectly normal).  Photo courtesy of Martin Rye of Summit and Valley Lightweight Backpacking.  Used by permission.
Beyond the typical problem cases as described above, there have been a few, very few, cases where something more unusual happens.

One blogger reports that he was just heating water on a moderate flame when part of his heat exchanger melted:  A blog post describing a melted JetBoil Ti Sol heat exchanger

Also, here's a YouTube video where the heat exchanger becomes separated from the pot:

What happened?  Well, we can't tell exactly from this video, but we do know that aluminum and titanium are rather dissimilar metals.  The rates of expansion and contraction during heating and cooling between the two metals are quite different.  Every time you heat or cool the two metals, the two metals will be pulling on whatever joins them, presumably a weld in this case.  Given that the above happened in cold weather, the two metals may have been put through quite a temperature range, causing the weld to separate.  I'm speculating of course, and this is the only reported case I've seen of this type, so I wouldn't read too much into it.  However, neither would I plunge a hot titanium JetBoil Sol into an ice bath.

So, caution two:  Rapid swings in temperature might cause problems with the heat exchanger.  Taking steps to moderate the rate of temperature increases and decreases is only prudent.


Now, one last case, and this one a bit more troubling.  But, while troubling, this is only one case out of the presumably thousands of titanium JetBoil Sols out there.

Let's go back to the JetBoil Sol Ti originally shown in the first photo above.
A melted aluminum heat exchanger on a titanium JetBoil Sol.  Photo courtesy of John Abela of HikeLighter.com.  Used by permision
Let me include the original post that I saw on the internet which prompted me to issue my "caution:"
I looked over at my jetboil and all I saw was this massive flame. The flames were probably three feet in the air. I ran over and dumped the last of my water on it (and thus went that night and the next morning w/o water) and when everything cooled down, there was evidences of some serious super heating. The little 'flux rings' ended up super heating and they were just going ballistic. The flux ring material got so hot that it started dripping down onto the ground (which did not go out when my threw my water on it, that stuff was crazy hot) and the drops of super heated metal were all over the canister - which scared me the most. A few of them actually melted/welded onto the canister of gas. The stupid orange thing was completely melted (I had to take a dremel to cut it off when I got back home - which is where I learned how easy it was to take them off). The bottom of the pot (not the flux, the bottom) as you can see in the photos above suffered major heat damage - and remember, titanium has a melting point of 3034(F).
I honestly can't see any heat damage on the titanium pot other than normal "rainbow" discoloration, but if there were three foot flames and temperatures hot enough to melt aluminum, that's very serious, and that kind of heat could potentially cause a canister explosion.  What we don't know here is what led to that flame.  Did the water boil over onto the canister?  If water did boil over, as on all canister stoves, the boiling water could cause the internal pressure within the canister to dramatically increase which might cause a flare which might lead to the kind of flame and damage reported above.  

Therefore, caution three:  As with all canister stoves (this certainly isn't unique to the titanium JetBoil Sol), avoid boil overs.  The JetBoil is a very powerful stove.  Do not leave the stove unattended.

And, yes, I've left various stoves unattended before; we probably all have.  Maybe with a stove as powerful as a JetBoil that's not something you want to do.

If you saw earlier versions of this post, my earlier caution indicated that you might want to a) hold off on buying a titanium version of the JetBoil Sol until more was known and b) if you've already got one that you might want to set your titanium JetBol Sol aside for a bit, again until more is known.  I made those recommendations in light of the potentially serious incident with the three foot flames.  With such potentially serious consequences, I felt such a caution was warranted.

Now, after gathering more facts, conferring with others, and analyzing in greater detail the available cases, I don't think such measures are necessary.  Far more people have come forward saying that their titanium JetBol Sol works perfectly fine than people who have had a problem, and the one severe problem may have been caused by a boil over, not a product defect.  A boil over would affect any canister stove, not just a JetBoil.  Therefore:
I see no inordinate danger in the titanium JetBoil Sol at this time.
Do, however, see the above three cautions, and heed them.  You should also follow the directions provided by JetBoil, excerpts from which are included in the appendices, below.

Stoving.  Sometimes it's a whole lot more Adventurous than we expect.  :)  But then that's why you read this blog.  I thank you for joining me.

HJ

P.S.  JetBoil, if you're reading this, I would love to have any additional insight or advice that you might be able to provide.  You can reach me at hikin dot jim3 at gmail dot com (replace the word "dot" with a "." and the word "at" with an "@").  I would be happy to add your input to my blog.


*By "occasional" I mean that very few units seem to have been impacted.  I do not mean that all units will occasionally have a problem!


Links
Update, 1 Mar 2012:  The above linked BPL forum posts have been removed from public viewing.


Appendix I -- JetBoil Sol Instructions -- Excerpts
The following are excerpts from the instructions for the JetBoil Sol.  All of them appear to be sound advice.  Note that they stress how important it is to avoid a boil over.  Update 2 Mar 2012:  I've added photos of the actual instructions that come with the JetBoil Sol Ti in Appendix IV.  

OPERATION WARNINGS
Do not leave Jetboil SOL unattended while in use.

DO NOT fry or cook foods with low moisture content.  Use low flame settings when heating liquid foods to avoid boil over.  If heating liquids near maximum capacity, use only low flame settings and exercise caution to prevent boil over.

OPERATING INSTRUCTIONS
If you overheat the canister, it will explode.  Ignite burner before placing pot or cup on burner. 
DO NOT HEAT EMPTY COOKING CUP.  Add liquid or liquid food to the cooking cup.  Use low heat when filling above 0.5L, boil over can result.


Appendix II -- Melting Points
Aluminum melts at 1220.666° F/660.37° C.

Appendix III -- Disclosures
I own several JetBoil stoves including the aluminum version of the JetBoil Sol, but I do not own a titanium JetBoil Sol.  I am very happy with the JetBoil products I own.  I have used JetBoil stoves at altitudes up to and above 11,000 ft/3300m without problems (well, except for the piezoelectric ignition, but that's a known and pretty minor issue).  I believe JetBoil is a good company with a good product.

Appendix IV -- Photos of the JetBoil Sol Ti's Instructions
Added 2 Mar 2012
These instructions are crucial


Sunday, February 26, 2012

Wood Fired Cooking II

In my last post on wood fired cooking, I cooked scrambled eggs and eggs over easy.  Well, scrambled eggs aren't exactly the trickiest dish to cook.  Don't get me wrong, I was very pleased to be able to cook scrambled eggs so easily on a wood fire.  Wood fired cooking on a Ti-Tri Caldera Cone is as easy as pie compared to cooking on an open fire.  But I thought I could do more.

Well, how about an omelet?  And not just any omelet, but a four egg omelet in a fairly small pan.   And why might the number of eggs matter?  Well, more eggs, means more thickness.  To get the eggs to cook evenly all the way through, I'm going to have to have the temperature pretty dialed in.  Not so easy, but let's give it a whirl.

So, once again, I let the wood burn down to mostly coals.  I put in my eggs, a little salmon, and some shredded cheese.  How did it go?

Actually, it went pretty darned well.
A four egg salmon and cheese omelet prepared on a wood-fired Ti-Tri Caldera Cone stove.
I was out on a two day back pack here in Henry Coe State Park, so the salmon was canned not fresh, but still, the omelet turned out fairly well.  The eggs were cooked but not burnt, the salmon was hot the whole way through, and the cheese was fully melted.

Best of all, take a look at the pan I used (far left in the below photo).
No sticking or burnt spots occurred when cooking the four egg omelet. 
No sticking and no burnt spots.  Nice!  And this was just a little cheap lightweight non-stick aluminum backpacking type pan.  No fancy cookware here; just some very basic stuff.

If I can properly cook a thick omelet without sticking or burning, then I think there are relatively few restrictions as to what one can cook on a wood-fired Ti-Tri Caldera Cone.  The more I use one, the more I like the Ti-Tri Caldera Cone.  The Ti-Tri Caldera Cone is fast becoming my #1 favorite stove.  For a guy with as many stoves as I've got, that's really saying something.

I thank you for joining me on another Adventure in Stoving,

HJ

The Soto Muka Stove (OD-1NP) -- Review Supplement

Soto has recently put out the powerful yet quiet Muka gasoline stove (OD-1NP).
The Soto Muka stove (OD-1NP) in operation.
The Soto Muka is a little bit different than the typical liquid fueled stove in that it does not require priming.  I've just recently completed a full review of the Soto Muka which is now available on Seattle Backpackers Magazine.  I've also got a video review of the Soto Muka available.

This page serves as a supplement to the full review.  Herein, I will put up a few additional photos that are worth a look that I just couldn't fit into the magazine review.

First, the vari-vent windscreen. This is a really nice windscreen, the nicest windscreen of its type that I've seen.
The vari-vent windscreen emplaced around a Soto Muka stove
The windscreen is lighter than most in its class, and it has vents that can be opened up or closed down as needed to suit particular conditions.  Note:  The Muka does need a fair amount of air in order to atomize the fuel properly.  You generally don't want to close all the vents all the way.  You do want to take care to roll the windscreen (typically around the fuel bottle) rather than fold it.  Folding it up will shorten the life of the windscreen.

Here, that I've got a 0.9L Primus LiTech kettle on the stove.  In this photo, I've tightened down the windscreen and clipped it in place.  Soto actually provides a clip -- a much nice clip than the one I'm using here -- that I neglected to use the day I shot these photos.  Notice though that there's quite a bit of "excess" windscreen doubled around the pot.  They didn't skimp on this windscreen; there's plenty of windscreen to go around a substantially larger pot -- the kind of pot you might use for a group or for snow melting.
The windscreen easily accommodates a 0.9L kettle and has plenty of "slack" available to accommodate much larger pots
Another small detail I'd like to call attention to is this fine pored filter on the fuel intake.
The opening of the fuel pick up tube is covered by a fine mesh filter
This is exactly the right place to catch any impurities or adulterants that might be in your fuel.  I've seen other companies put filters much further down the line.  Nip them in the bud I say:  Stop clogs before they start by leaving any crud in the tank.  Don't run crud through the pump and down into the stove before you catch it for crying out loud.    It's much easier to clean an external filter like the one on the Soto Muka than a fuel filter embedded in a fuel line.

Now, here's another thing to notice about the Soto Muka:  Look at how small it packs up yet how big that burner head is.  Show me another stove in this class that has that large of a burner head and yet packs down this small.  That large burner head means you have a well distributed flame.  There are no burnt spots from a "pencil torch" flame with a Soto Muka.
Even though the Soto Muka packs down small, it has a relatively large burner head with a well dispersed flame.
And pack down small it does.  Even though the Soto Muka has a relatively long fuel hose, the highly flexible fuel hose packs away very nicely.  For those of you who have used stoves with stiff fuel hoses, just take a look at the below photo.  Nice!
Despite its long fuel hose, the Soto Muka packs down small
There you have it, a few photos of small yet important details -- details that the designers at Soto did not overlook.

Thanks for joining me on another Adventure in Stoving,

HJ

Related Posts and Articles

Wednesday, February 15, 2012

The MSR SimmerLite: DISCONTINUED

Recently, I noticed that the MSR SimmerLite stove was no longer listed on the Cascade Designs/MSR website.

An MSR SimmerLite
Curious, I wrote MSR to ask if the SimmerLite had in fact been discontinued.  Here is the answer I received:
Yes, the SimmerLite has been discontinued. Sad to see it go, but it never saw the adoption it needed. It could become a collector’s item in short order, though; I still believe it’s one of the best white gas-only stoves you can get.
I echo that feeling.  I've always felt that the SimmerLite was a good basic white gas stove.  I say "basic" because irrespective of its name, it really doesn't simmer.  It's a water boiler/snow melter, but it's not a gourmet cook's stove.  I certainly found the SimmerLite to be at least as good as a WhisperLite, but the WhisperLite was of course $20.00 cheaper and had the same functionality.

OK, so it's not a gourmet cook's stove.  What it was though, was a very lightweight, very packable stove, certainly one of the lightest weight white gas stoves out there.  I'm sad to see it go.

HJ

Refilling Coleman PowerMax Canisters

It's no secret that I like Coleman PowerMax gas canisters.  Note:  PowerMax canisters are called just plain "Max" in some locations outside the US.

First, they're aluminum which means they're quite light. The canister weight (tare weight) of a large 300g PowerMax canister is less than the canister weight of a small 110g standard threaded canister.

An aluminum Coleman PowerMax canister connected to an Xtreme stove
Second, at least in the US market, PowerMax canisters have the very best cold weather gas mix available (35% propane/65% butane). Outside the US, I've seen Max canisters labeled 40% propane/60% butane which is better still.  That gas mix when used in liquid feed mode (as designed in other words) can run in temperatures down to -4F/-20C (per Coleman).

Unfortunately, PowerMax/Max didn't make it in the market place. Most people either didn't understand the difference or weren't willing to commit to a proprietary, non-standard canister. Much like superior BetaMax lost out to inferior VHS, PowerMax lost out standard threaded canisters.

For those of us with PowerMax appliances, what to do? Well, of course you can use an adapter, but that's extra weight, extra bulk, and extra fiddle. Wouldn't it be nice if you could simply refill the PowerMax canisters? Of course it would. But how?

Well, I don't have all the answers, but I have a couple of ideas that I thought I'd throw out there and see where they go.

First a simple idea. Take a Brunton Fuel Tool or the like (Snow Peak and Primus sell something similar).
A Brunton Fuel Tool
Attach it by some means to an appropriate fuel source.
A Brunton Fuel Tool attached to a donor 100% butane canister via an angled adapter
Then insert the fuel tool into the PowerMax canister.
A Brunton Fuel Tool inserted into a Coleman PowerMax canister
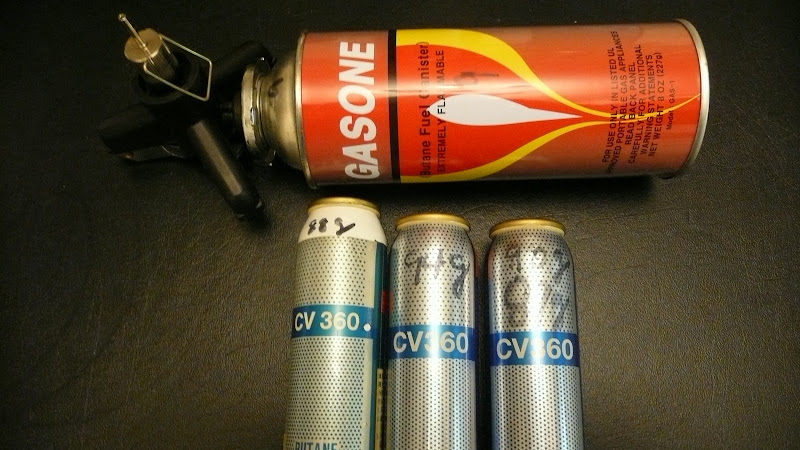
I've had good success with this technique with refilling Rando 360 cartridges.
CV360 cartridges refilled by a Brunton Fuel Tool
Unfortunately, the aperture on a PowerMax canister is wider than on a Rando 360 cartridge.
The connector on a Coleman PowerMax canister
This technique doesn't work very well with the Brunton Fuel Tool "as is." However, if one were to add some "O" rings and spacers (which I haven't tried yet), I think this technique would work well for refilling.

However, this would be a fairly manually intensive technique. The Fuel Tool requires pressure to release the internal valve. In other words, the valve of the Fuel Tool has to be held in place by hand in order to transfer any fuel. With a 100% butane 50g Rando 360 cartridge, this is no big deal. With a 300g PowerMax canister that requires two different component gasses, this could be a bit of a pain in the neck.

But perhaps there is another way.

Let's take a look at a Coleman "X" stove. They're all fairly similar. In this case, I'll show a Coleman Xpert stove.
A Coleman Xpert Stove
Now note how the fuel line comes in from the right. A nut affixes the fuel line from the canister to the fuel line of the burner.

I think that if one were to unscrew the nut shown in the below photo
The nut shown above attaches the fuel line from the canister to the burner
that one could create an adapter that would affix to the underlying threads. In that way, we could use the connector of the stove itself to attach to a PowerMax canister. This would be a non-destructive use of the components of one's stove.

Now there are other candidate ways to connect to a PowerMax canister. 
1. A Kovea TKA-9504 type butane adapter affixes to a butane canister via a "cam and fingers" system similar to the way a PowerMax stove connector affixes to a PowerMax canister. But alas the connector on a PowerMax canister is too wide to fit into the adapter's opening. Even if it were to fit, the adapter has no pin with which to depress the Lindal valve of a PowerMax Canister.
A butane adapter with a "cam and fingers" connector similar to a PowerMax stove connector
2. The base of an MSR SuperFly stove clamps on to the collar of a canister rather than screwing or otherwide attaching to the canister connector itself. The "clamp" does fit on to the collar of a PowerMax canister, but unfortunately, as on a TKA-9504, the PowerMax canister's connector is too wide to fit into the opening of a SuperFly's connector. You can clamp on, but you can't get any gas to flow.
A SuperFly stove clamped to a PowerMax canister.  Unfortunately the connectors are incompatible and no gas will flow.
Neither of the above two candidates for attaching to a PowerMax canister is really suitable.

It seems to me that the best connector for a PowerMax canister is the one we already have; the one that came with the stove.

The "cam and fingers" connector of a Coleman PowerMax type stove
I don't have the machinery and tooling to construct an adapter that would connect to the end of a PowerMax stove's fuel line, but I think that's where a good solution to the problem of refilling PowerMax canisters lies. I hope someone with the proper skills and equipment can make use of the idea.

Note that PowerMax canisters are NOT designed to be refilled.  Refilling a non-refillable canister like a Coleman PowerMax canister in inherently risky.  If you refill a PowerMax canister, you are doing something that was never intended to be done to that canister, and you do so at your own risk.  I won't try to lay out all of the issues involved, but if you choose to refill non-refillable canisters like a PowerMax canister, you should read up on the issues involved, understand the dangers, and be very methodical and careful.  Please note that my surmise that refilling a PowerMax is possible does not mean it's a good idea.

There you have it; my thoughts at this juncture on refilling PowerMax canisters.

Thanks for joining me on another Adventure in Stoving,

HJ