QuietStove.com

Thursday, March 1, 2012

Primus Omnifuel vs. MSR Whisperlite Universal

There are some really nice expedition class stoves out there on the market right now.  One of the really nice features that's come out in the last couple of years is the "hybrid" stove, a stove that can burn not only liquid fuels like gasoline and kerosene but also nice, clean, no-priming-needed canister gas.  Perhaps the two best known stoves in this category are the Primus Omnifuel and the MSR Whisperlite Universal.  I thought I'd do a brief comparison of the two.

For more information on the individual stoves themselves, please see the following reviews:

First, travel mode.  Both come with nice stuff sacks.  Both stuff sacks have a nice zipper pouch so you don't lose any small parts.
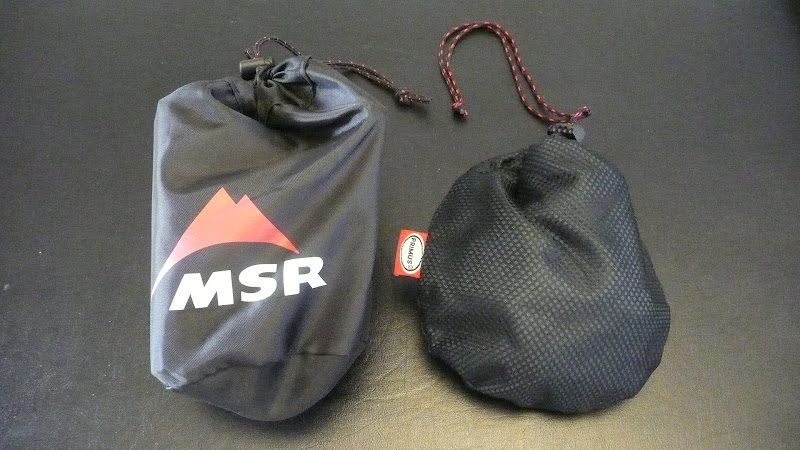
The MSR Whisperlite Universal (left) and the Primus Omnifuel (right)
Note that the Whisperlite Universal makes a little bigger package than the Omnifuel.  This is because a) the Whisperlite Universal is the bulkier of the two and b) you get more items included with the Whisperlite Universal.

Here are the major components that come with the Whisperlite Universal:
The major components that come with a Whisperlite Universal.
Back row (L to R):  Heat reflector, inverted canister stand, and windscreen.
Front row (L to R):  burner,  fuel pump
The major components are listed in the caption above.  Of course you also get a stuff sack, a liquid fuel adapter, and a little parts baggie with spare jets, a wrench/tool, and lubricant.

By contrast, the Omnifuel:
The components that come with an Omnifuel
Basically, you just get the burner and the fuel pump (and of course the stuff sack with the wrench/tool, spare jets, and lubricant).  You (typically) don't get a heat reflector, windscreen, or inverted canister stand.  Note:  There are a lot of package deals out there with the Omnifuel; shop around.  Some packages even include a fuel bottle.  The Whisperlite Universal is typically sold separately from a fuel bottle.

The MSRP of the Whisperlite Universal is $140.  The MSRP of the Omnifuel is $160.  However, always look for deals.  I've seen all sorts of special packages and deals out there on the Omnifuel.  Be sure to shop around.

Value for the Dollar
Generally though, I'd say the Whisperlite wins on a value for the dollar basis.  There's just more included with a Whisperlite.  A windscreen is really important.  It's included with the Whisperlite Universal.  You've got to buy it separately with the Omnifuel.  I've read that there's a "built in windscreen" with the Omnifuel.  I don't buy that.  You need an external windscreen for anything more than a breeze.

Also, that little canister stand that comes with the Whisperlite Universal is actually pretty handy.
The inverted canister stand of a Whisperlite Universal
Convenience in cold weather operation
What does the canister stand buy you?  Convenience in cold weather operation with canister gas.  Yes, you could just switch to liquid fuel for cold weather operation, but there are advantages to gas like improved simmering, greater mechanical reliability, and the elimination of priming.  With the stand, you can easily invert a canister for improved cold weather operation.  Generally, inverting the canister means you can operate your stove in weather that is 20F/10C colder than you could if the canister were right side up.

The really nice inverted canister stand of the Whisperlite Universal
Notice the Omnifuel's connector just to the left of the Whisperlite Universal's canister stand.  Not only does the Omnifuel not come with a stand, but the control knob makes it hard to keep a canister inverted.  Sure, you can DIY something, but the nice, professional stand that MSR gives you is really pretty nice.

Convenience in switching between gas and liquid fuels
In terms of switching between gas and liquid fuels, the Omnfuel wins, hands down.   On the Whisperlite Universal, you have to change adapters on the end of the fuel line, and you have to change the jet.  On the Omnifuel, there's no adapter to change; you just change the jet.  Whether gas or liquid, the end of the fuel line stays the same with the Omnifuel.

Overall Build Quality
The Primus Omnifuel is a thing of beauty.  It's precision engineering at it's best.  It's almost more work of art than stove.  It's hard to sum up the difference in a photo or two, but let's take a quick look at the respective pumps.
Top:  The MSR standard pump.  Bottom:  The Primus Ergopump.
Now,  the plastic MSR pump is a perfectly serviceable pump, but there's just no comparison to the engineering marvel that is the Primus Ergopump.  The smooth, precise stroke of the Primus pump is such a pleasure.   The MSR pump feels a bit tinny by comparison.   Don't get me wrong.  I think they're both good stoves, but if you like precise Swiss watch-like engineering, the Omnifuel is for you.

Simmering
The Omnifuel has a valve at the burner, and is the better simmerer, particularly on liquid fuel.  With the Omnifuel, it's easy to simmer, and anybody, even the rankest newbie, can do it.  However, the Whisperlites are the best non-valve-at-the-burner simmering stoves that MSR makes and are a huge improvement over previous generations of the Whisperlite.  Simmering with the Whisperlite Universal takes a few tricks, like leaving a lot of air space in the fuel bottle and only pumping up the bottle with about 1/4 the normal amount of pump strokes.  With a bit of practice, the Whisperlite Universal really can simmer, but it's not as easy nor as automatic as with the Omnifuel.  The Whisperlite Universal does have a large burner head which distributes the flame well which reduces the chances of hot spotting.

Compactness
The Omnifuel has a real advantage here.  The Whisperlite Universal has a larger burner head in the first place, and for whatever reason MSR decided to go with a really stiff fuel line, a fuel line that's a real pain in the neck to pack up.  
The Primus Omnifuel is far more compact than the Whisperlite Universal
Note how in the below photo that the hose on the Whisperlite Universal sticks up in the air, supporting not only its own weight but also the weight of the canister adapter at its tip.  Now that is a stiff hose.
The Whisperlite Universal has a very stiff fuel hose, so stiff that it will stick into the air, unsupported
By contrast, the Omnifuel's hose wraps easily around the body of the stove.  NICE.
The flexible hose of the Omnifuel is easily wrapped around the stove and tucked into the folded pot supports.
Noise
The Omnifuel is just plain loud.  It's not the loudest I've ever heard, but it's definitely not going to enhance the peace of the wilderness.  
The Omnifuel with a roarer burner (left) and the Whisperlite with a ported (or baffled) burner (right)
The Omnifuel has a "roarer" type burner, and roar it does.  Now, the good thing about a roarer burner is that it's easy to clean and handles wind well.  But it is loud.  The Whisperlite, as one might surmise from its name, is far quieter.

There is however a solution to the noise problem of the Omnifuel:  You can get an after market silent cap.  The best cap I've seen is the OmniDawg silent cap from Bluewater Stove Restoration.  It's a wonderfully quiet solution that also reduces the carbon monoxide emissions of the stove, but it's typically pricey. 
An OmniDawg silent cap shown between a Primus Omnifuel (left) and an MSR Whisperlite Universal (right).
See my Omnifuel review for more information including videos on the OmniDawg silent cap.  OmniDawg silent caps are only sold through "BernieDawg's Store" on eBay.

Disclosure:  I am not affiliated with Bluewater stove restoration or "BernieDawg's Store."  I am merely a satisfied customer.  I cannot help you obtain a silent cap.  Please use eBay if you would like a silent cap for your stove.

Pot Stability
I'd say the Whisperlite Universal has the edge on pot stability.  I tested the Whisperlite Universal with an enormous (in backpacking terms) one gallon (3.8L) tea kettle.  Steady as a rock.  The pot supports on the Whisperlite Universal have a radius of approximately 94mm.  That's a pretty good sized pot support!  That's larger than the previous generation of Whisperlites which already had great pot stability.  With pot supports like that, you can use large pots for snow melting, an essential expedition task.

Now, that's not to say that the Omnifuel has poor pot stability -- far from it, but the Whisperlite Universal has the edge here.  The Omnifuel has pot supports with a radius of approximately 84mm.

Pot Compatibility
On pot compatibility, the roles are a bit reversed, at least with smaller pots.  The Whisperlite Universal with it's big burner head has trouble with smaller pots.  There is a gap of approximately 42mm from the center of the Whisperlite Universal's burner to the inner end of the pot supports.  In other words, your pot has to be wider than 84mm in order to be used on a Whisperlite Universal.  Obviously, the Whisperlite Universal wasn't meant for small, solo style mug type pots.  Unless you've got something like an MSR Espresso Star, which spans pot supports so that you can use a small pot or espresso maker, stick with a bigger pot.
An MSR Espresso Star on a Whisperlite Universal
Weight
Here's where I think the Whisperlite Universal really shines, particularly on liquid fuel.  Let's take a look at the numbers. 

Canister Gas
Primus Omnifuel        427g/15.06oz         
Whisperlite Universal  315g/11.11oz

Liquid Fuel
Primus Omnifuel        530g/18.70oz
Whisperlite Universal  369g/13.02oz

Basically, on canister gas, the Whisperlite Universal is about 112g/4oz lighter than the Omnifuel, and on liquid fuel, the Whisperlite Universal is about 161g/5.7oz lighter than the Omnifuel.  Yes, the Omnifuel has a beautiful metal pump, but you pay for it in the weight department.  Whether on canister gas or on liquid fuel, you save at least a quarter pound with the Whisperlite, and your weight savigs go up to almost 3/8th of a pound when using liquid fuel.

Note:  For the purposes of comparison, I did not include the windscreen, heat reflector, or canister stand since those only come with one of the stoves.  I wanted an "apples to apples" comparison.  Included are the stuff sacks, one jet, spare parts and tools, stove, and pump (for liquid fuel only obviously).  On the Whisperlite Universal, the appropriate adapter on the end of the fuel hose was included.

Concluding Remarks
So, which is the better stove overall?  You tell me.  :)

Seriously, it's up to you.  Take a look at the various categories I've laid out above.  It's up to you to decide which mix of price, weight, and features matter to you.  Some people won't get an Omnifuel just because it's loud.  Others won't go with the Whisperlite Universal simply because it has a plastic pump.  I can't decide for you which categories matter to you and in what way, but I hope that by laying out some facts, figures, and thoughts, this post will help you get a better understanding of which stove might better suit your needs.

Special thanks to Martin C. who helped me recover this post after it was obliterated in a Blogger error.

As always, I thank you for joining me on another Adventure in Stoving,

HJ

Technical Appendix -- Detail Weights

Whisperlite Universal Weights
Item Grams Include? Grams Ounces Pounds
1 Stove 232 Y 232 8.18 0.51
2 Pump 65 Y 65 2.29 0.14
3 Windscreen 60 N 0 0.00 0.00
4 Manual 57 N 0 0.00 0.00
5 Stuff Sack 35 Y 35 1.23 0.08
6 Canister Adapter 31 N 0 0.00 0.00
7 Liquid Fuel Adapter 22 Y 22 0.78 0.05
8 Reflector 17 N 0 0.00 0.00
9 Canister Stand 14 N 0 0.00 0.00
10 Spare Parts Kit 12 Y 12 0.42 0.03
11 Canister Gas Jet 5 N 0 0.00 0.00
12 Kerosene Jet 3 Y 3 0.11 0.01
13 Gasoline Jet 3 N 0 0.00 0.00
TOTAL 369 13.02 0.81
Upright Gas 315 11.11 0.69
Inverted Gas 329 11.61 0.73
Liquid Fuel 369 13.02 0.81


Primus Omnifuel Weights
Item Grams Include? Grams Ounces Pounds
1 Stove 348 Y 348 12.28 0.77
2 Pump 103 Y 103 3.63 0.23
3 Tool 42 Y 42 1.48 0.09
4 Stuff Sack 30 Y 30 1.06 0.07
5 Lubricant 5 Y 5 0.18 0.01
6 Canister Gas Jet 2 N 0 0.00 0.00
7 Kerosene Jet 2 N 0 0.00 0.00
8 Gasoline Jet 2 Y 2 0.07 0.00
TOTAL 530 18.70 1.17
Upright Gas 427 15.06 0.94
Inverted Gas 427 15.06 0.94
Liquid Fuel 530 18.70 1.17


Aluminum JetBoil Sol -- Cooking Report #1

I'm in the process of reviewing the new Sol cooking system from JetBoil.  I'm reviewing the aluminum version.  There is also a titanium version, but I will not be covering the titanium version at this time.

So, let's take a look.  Here, the Adventures In Stoving spokesmodel shows us what a JetBoil Sol looks like.
Spokesmodel Joyce shows us the aluminum version of the JetBoil Sol
That's fresh out of my backpack.  I had been using it the evening prior for what the JetBoil is famous for:  boiling water, a task for which it is exceptionally well suited.

However, today I'd like to try my hand at a little cooking.  Rumor has it that you can't get a decent low flame out of the thing.  Let's see.
A low to moderate flame on a JetBoil Sol
Now, let's turn it down a bit.
A yellow flame resulted when I really turned down a JetBoil Sol
When I really turned down the Sol, I got a yellow flame.  Not good.  BUT that flame is so low, it's not really a flame I'd cook with.  The real question is whether I can get a low flame that is practical for cooking.
A low flame on a Jetboil Sol
There!  Now thats a little better.  A flame that is low yet not absurdly so.  That's a practical cooking flame.  Note that there's no yellow in the flame.

So let's try some cooking.  One of the exceptionally wonderful things about the JetBoil is that it comes with an attachment that allows one to use any pot or pan that they might like.  So, you can either use the wonderfully efficient pot that comes with the burner that integrates so well, or you can use just about any other pot, pan, or kettle you might have on hand (within reason given the burner's size of course).
The JetBoil Sol comes with an adapter (shown here) that allows one to use any pot or pan.
The adapter has a neat feature.  Turn clockwise, and the adapter locks in place.  In other words, that adapter isn't just resting on top of the rim of the burner, just waiting to be knocked off.  That adapter has a good solid connection to the burner and isn't going to be easily knocked around.  Very nicely done, Jetboil.

For today's cooking, I'll be using my favorite backpacking type pan, my MSR Blacklite pan.  JetBoil does make a fry pan, but I've never used the JetBoil pan, so I won't cover the JetBoil pan in this cooking report.
An MSR Blacklite pan atop a JetBoil Sol
A little butter to grease the pan, and we're off!  Today's menu? A salami and cheese four egg omelet.

Why four eggs?  Well, I've got three mouths to feed, so four eggs is about right, and four eggs is a really great test for this size of pan.  If I can't control the flame properly, I'll get an omelet that's scorched on one side and raw on another.  A good omelet requires steady low heat.  Not ultra-low, but you don't want to crank the heat up or you'll be eating charcoal briquettes not an omelet.

So, how'd it go?
A nice, fluffy omelet cooked on a JetBoil Sol
 Pretty good in my opinion.  My daughter's comment was "more."  (My daughter is two).  I think that means she liked it.  :)

Evenly done, fluffy, cheese fully melted.  Yum!
Seriously though, it tasted great, and the eggs turned out nice and fluffy, just the way I like them.  The cheese was fully melted, and the salami was nice and hot.

There was some normal browning (from cooking with butter) on the bottom, but definitely no burnt spots.
Nice browning on the underside, but no burning.
And no sticking to the pan.
Absolutely no sticking on the pan.
I'd say that was a successful omelet.  :)

Now, lest I make it look all together too easy, let's realize that I was cooking indoors.  Cooking outdoors is another matter.  I feel like the stove has enough stability in the flame to cook outdoors, but I need to give that a test before I pronounce the matter settled.

Also, flame adjustment is tricky at low flame.  Sometimes, I'd turn the flame adjuster up, but the flame would get smaller??!?  Hunh?  I think this has to do with the regulator valve, but suffice it to say that flame adjustment is a little tricky in the lower range of the stove.  Still, I was able to get good, steady flame without any yellow, a flame that I think will work for me outdoors.  I'll be posting another report soon on just that very subject.

Thanks for joining me on another Adventure in Stoving,

HJ


      Wednesday, February 29, 2012

      MSR Espresso Star

      So, say you like your morning espresso (yum!).  :)  But that little tiny backpacking espresso maker just falls between the pot supports on your stove.  :(  What to do?

      Well, let's take the example of the MSR Whisperlite.  With a Whisperlite, it's really no problem if you've got an MSR Espresso Star.
      An MSR Espresso Star
      Just lay the Espresso Star across your pot supports, and you're good to go.
      An MSR Espresso Star on a Whisperlite Universal
      Of course, there are other stoves besides a Whisperlite that have pot supports that might be a bit wide for a little espresso maker.  So, I thought I'd try it on another stove.  Here's the MSR Espresso Star on a Primus Omnifuel.
      An MSR Espresso Star on a Primus Omnifuel
      Obviously, I haven't exhaustively checked every possible stove out there, but if you've got a three legged stove where the legs are evenly spaced (120 degree angles), radiating outward from a central point, then the MSR Espresso Star will most likely work.

      Now the bad news:  These are now available second hand only (eBay, Craig's List, etc).  The MSR Espresso Star is a nifty little gadget, but apparently it didn't sell well enough to be retained in MSR's product line up.  Having struggled with jury rigging an espresso maker on my winter stove, I was delighted to find one on Craig's List.  Search, and you might be able to pick one up too.

      Thanks for joining me on another Adventure in Stoving,

      HJ

      Technical Appendix -- Weights
      MSR Espresso Star . . . .  19g/0.67oz

      The MSR Espresso Star

      Tuesday, February 28, 2012

      Titanium JetBoil Sol -- Caution

      The titanium version of the JetBoil Sol might have an occasional* problem.  The problem appears to be fairly limited, and many people have used the titanium version of the JetBoil Sol without problems and are completely satisfied with the product.

      Please note that my concerns pertain to the titanium version of the JetBoil Sol only.

      There have been a few failures noted in the aluminum "flux ring" (heat exchanger) that is joined to the bottom of the titanium pot.  Typically (I'll get to the more extreme cases in a minute), what appears to be happening is that someone is heating something other than just water in their JetBoil.  Heat builds up in the aluminum heat exchanger, more heat than the heat exchanger can handle, and the heat exchanger becomes damaged.   The damage typically appears to be a melting of the heat exchanger.   It's possible that the aluminum could be undergoing combustion.  Whether melting or combustion, the heat exchanger is damaged.
      A damaged aluminum "flux ring" (heat exchanger) on a titanium JetBoil Sol.  Photo courtesy of John Abela of HikeLighter.com.  Used by permission.
      So, caution number one:  If you screw up while cooking with the titanium version of the JetBoil Sol, you might really damage your heat exchanger.

      What are some ways to minimize the risk of damaging the heat exchanger?
      1.  Only boil water.  Water typically does not exceed 212F/100C in temperature.  Yes, salts and minerals in the water may raise the boiling point a bit, but it will still be somewhere near the typical boiling point.  Water makes a very effective way of putting an upper bound on the amount of heat the pot and heat exchanger is subjected to.
      2.  Moderate your flame.  Yes, I know, you bought your JetBoil because it's faster than a speeding bullet, but really, will a moderate flame make that much difference?  What, 30 seconds more?  How much is an undamaged heat exchanger worth?  A few more seconds wait is well worth it if you save your heat exchanger.  The titanium version of the JetBoil Sol isn't cheap, now is it?  So slow it down a bit, yes?
      3.  If you do heat up something that's a bit more than water, stir it continuously.  If you burn something to the bottom of the pot, it could form an insulating layer.  That insulating layer will act as a barrier and not allow heat to be transferred from the exchanger into contents of the pot.  You do NOT want anything to block the normal heat transfer.  If the heat builds up in the fairly thin aluminum of the heat exchanger, that's when damage is most likely to occur.
      4.  Don't heat up something with a low moisture content.  The JetBoil's instructions (see appendices, below) state as much.  Personally, I wouldn't heat up anything thicker than the slurry formed by adding water to a freeze dried meal, but whatever you heat up, make sure it has a lot of water content.

      Now, for the above, I said "typical case."  By that I mean typical case where there has been some type of problem.  Of course 99+ percent of the time there is no problem.
      A typical heat exchanger on a JetBoil Sol Ti (perfectly normal).  Photo courtesy of Martin Rye of Summit and Valley Lightweight Backpacking.  Used by permission.
      Beyond the typical problem cases as described above, there have been a few, very few, cases where something more unusual happens.

      One blogger reports that he was just heating water on a moderate flame when part of his heat exchanger melted:  A blog post describing a melted JetBoil Ti Sol heat exchanger

      Also, here's a YouTube video where the heat exchanger becomes separated from the pot:

      What happened?  Well, we can't tell exactly from this video, but we do know that aluminum and titanium are rather dissimilar metals.  The rates of expansion and contraction during heating and cooling between the two metals are quite different.  Every time you heat or cool the two metals, the two metals will be pulling on whatever joins them, presumably a weld in this case.  Given that the above happened in cold weather, the two metals may have been put through quite a temperature range, causing the weld to separate.  I'm speculating of course, and this is the only reported case I've seen of this type, so I wouldn't read too much into it.  However, neither would I plunge a hot titanium JetBoil Sol into an ice bath.

      So, caution two:  Rapid swings in temperature might cause problems with the heat exchanger.  Taking steps to moderate the rate of temperature increases and decreases is only prudent.


      Now, one last case, and this one a bit more troubling.  But, while troubling, this is only one case out of the presumably thousands of titanium JetBoil Sols out there.

      Let's go back to the JetBoil Sol Ti originally shown in the first photo above.
      A melted aluminum heat exchanger on a titanium JetBoil Sol.  Photo courtesy of John Abela of HikeLighter.com.  Used by permision
      Let me include the original post that I saw on the internet which prompted me to issue my "caution:"
      I looked over at my jetboil and all I saw was this massive flame. The flames were probably three feet in the air. I ran over and dumped the last of my water on it (and thus went that night and the next morning w/o water) and when everything cooled down, there was evidences of some serious super heating. The little 'flux rings' ended up super heating and they were just going ballistic. The flux ring material got so hot that it started dripping down onto the ground (which did not go out when my threw my water on it, that stuff was crazy hot) and the drops of super heated metal were all over the canister - which scared me the most. A few of them actually melted/welded onto the canister of gas. The stupid orange thing was completely melted (I had to take a dremel to cut it off when I got back home - which is where I learned how easy it was to take them off). The bottom of the pot (not the flux, the bottom) as you can see in the photos above suffered major heat damage - and remember, titanium has a melting point of 3034(F).
      I honestly can't see any heat damage on the titanium pot other than normal "rainbow" discoloration, but if there were three foot flames and temperatures hot enough to melt aluminum, that's very serious, and that kind of heat could potentially cause a canister explosion.  What we don't know here is what led to that flame.  Did the water boil over onto the canister?  If water did boil over, as on all canister stoves, the boiling water could cause the internal pressure within the canister to dramatically increase which might cause a flare which might lead to the kind of flame and damage reported above.  

      Therefore, caution three:  As with all canister stoves (this certainly isn't unique to the titanium JetBoil Sol), avoid boil overs.  The JetBoil is a very powerful stove.  Do not leave the stove unattended.

      And, yes, I've left various stoves unattended before; we probably all have.  Maybe with a stove as powerful as a JetBoil that's not something you want to do.

      If you saw earlier versions of this post, my earlier caution indicated that you might want to a) hold off on buying a titanium version of the JetBoil Sol until more was known and b) if you've already got one that you might want to set your titanium JetBol Sol aside for a bit, again until more is known.  I made those recommendations in light of the potentially serious incident with the three foot flames.  With such potentially serious consequences, I felt such a caution was warranted.

      Now, after gathering more facts, conferring with others, and analyzing in greater detail the available cases, I don't think such measures are necessary.  Far more people have come forward saying that their titanium JetBol Sol works perfectly fine than people who have had a problem, and the one severe problem may have been caused by a boil over, not a product defect.  A boil over would affect any canister stove, not just a JetBoil.  Therefore:
      I see no inordinate danger in the titanium JetBoil Sol at this time.
      Do, however, see the above three cautions, and heed them.  You should also follow the directions provided by JetBoil, excerpts from which are included in the appendices, below.

      Stoving.  Sometimes it's a whole lot more Adventurous than we expect.  :)  But then that's why you read this blog.  I thank you for joining me.

      HJ

      P.S.  JetBoil, if you're reading this, I would love to have any additional insight or advice that you might be able to provide.  You can reach me at hikin dot jim3 at gmail dot com (replace the word "dot" with a "." and the word "at" with an "@").  I would be happy to add your input to my blog.


      *By "occasional" I mean that very few units seem to have been impacted.  I do not mean that all units will occasionally have a problem!


      Links
      Update, 1 Mar 2012:  The above linked BPL forum posts have been removed from public viewing.


      Appendix I -- JetBoil Sol Instructions -- Excerpts
      The following are excerpts from the instructions for the JetBoil Sol.  All of them appear to be sound advice.  Note that they stress how important it is to avoid a boil over.  Update 2 Mar 2012:  I've added photos of the actual instructions that come with the JetBoil Sol Ti in Appendix IV.  

      OPERATION WARNINGS
      Do not leave Jetboil SOL unattended while in use.

      DO NOT fry or cook foods with low moisture content.  Use low flame settings when heating liquid foods to avoid boil over.  If heating liquids near maximum capacity, use only low flame settings and exercise caution to prevent boil over.

      OPERATING INSTRUCTIONS
      If you overheat the canister, it will explode.  Ignite burner before placing pot or cup on burner. 
      DO NOT HEAT EMPTY COOKING CUP.  Add liquid or liquid food to the cooking cup.  Use low heat when filling above 0.5L, boil over can result.


      Appendix II -- Melting Points
      Aluminum melts at 1220.666° F/660.37° C.

      Appendix III -- Disclosures
      I own several JetBoil stoves including the aluminum version of the JetBoil Sol, but I do not own a titanium JetBoil Sol.  I am very happy with the JetBoil products I own.  I have used JetBoil stoves at altitudes up to and above 11,000 ft/3300m without problems (well, except for the piezoelectric ignition, but that's a known and pretty minor issue).  I believe JetBoil is a good company with a good product.

      Appendix IV -- Photos of the JetBoil Sol Ti's Instructions
      Added 2 Mar 2012
      These instructions are crucial


      Sunday, February 26, 2012

      Wood Fired Cooking II

      In my last post on wood fired cooking, I cooked scrambled eggs and eggs over easy.  Well, scrambled eggs aren't exactly the trickiest dish to cook.  Don't get me wrong, I was very pleased to be able to cook scrambled eggs so easily on a wood fire.  Wood fired cooking on a Ti-Tri Caldera Cone is as easy as pie compared to cooking on an open fire.  But I thought I could do more.

      Well, how about an omelet?  And not just any omelet, but a four egg omelet in a fairly small pan.   And why might the number of eggs matter?  Well, more eggs, means more thickness.  To get the eggs to cook evenly all the way through, I'm going to have to have the temperature pretty dialed in.  Not so easy, but let's give it a whirl.

      So, once again, I let the wood burn down to mostly coals.  I put in my eggs, a little salmon, and some shredded cheese.  How did it go?

      Actually, it went pretty darned well.
      A four egg salmon and cheese omelet prepared on a wood-fired Ti-Tri Caldera Cone stove.
      I was out on a two day back pack here in Henry Coe State Park, so the salmon was canned not fresh, but still, the omelet turned out fairly well.  The eggs were cooked but not burnt, the salmon was hot the whole way through, and the cheese was fully melted.

      Best of all, take a look at the pan I used (far left in the below photo).
      No sticking or burnt spots occurred when cooking the four egg omelet. 
      No sticking and no burnt spots.  Nice!  And this was just a little cheap lightweight non-stick aluminum backpacking type pan.  No fancy cookware here; just some very basic stuff.

      If I can properly cook a thick omelet without sticking or burning, then I think there are relatively few restrictions as to what one can cook on a wood-fired Ti-Tri Caldera Cone.  The more I use one, the more I like the Ti-Tri Caldera Cone.  The Ti-Tri Caldera Cone is fast becoming my #1 favorite stove.  For a guy with as many stoves as I've got, that's really saying something.

      I thank you for joining me on another Adventure in Stoving,

      HJ