QuietStove.com

Tuesday, March 27, 2012

Canister Refiller -- WARNING

I've been seeing a particular canister refilling device on eBay lately as a "MacCoupler Liquefied Gas Refill Adaptor Gas Charging Valve Inflatable converter" [sic].    This particular device is just downright dangerous and in general should be avoided.  I'll explain why I say "in general" in a minute.

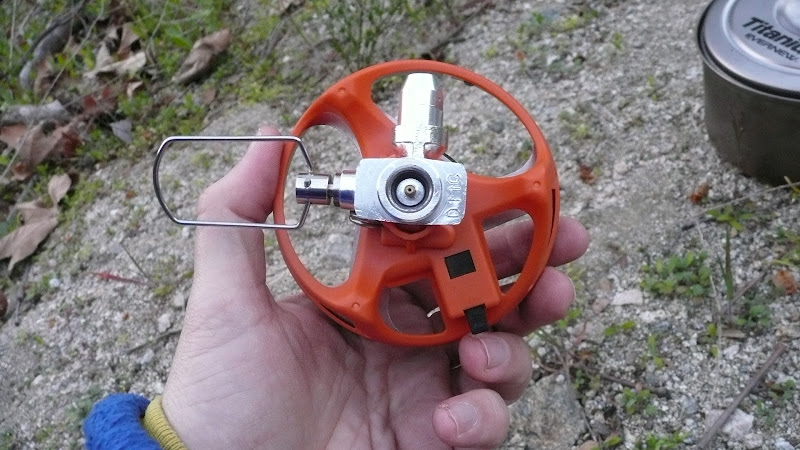
A very dangerous canister refiller.  ** AVOID! **
OK, so what's wrong with this refiller?  Well, in case you don't recognize the fittings, this refiller will refill backpacking type gas canisters from a "bulk" propane tank.
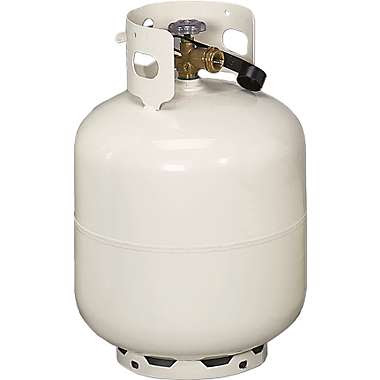
A "bulk" type 100% propane tank
Hey, now doesn't that sound like a great idea?  Hey!  I can take cheap gas out of my bulk propane tank (like for a BBQ) and refill my expensive backpacking canister.  Pennies on the dollar!  Sweet!  What could possibly go wrong?

What could go wrong?  A whole lot, and it could be bad, very bad.  First, backpacking canisters do NOT contain 100% propane.   Standard backpacking type canisters in the US are rated at not more than 20% propane (mixed with 80% isobutane) or 30% propane (mixed with 70% butane).  Propane is a very high pressure gas.  Put 100% propane in a canister rated for only 20 to 30 percent propane and what do you get?  Quite possibly a very nasty explosion.

Oh!  I know!  If my canister is only rated for 20 to 30% propane, I'll just fill it up to 20% of capacity and leave the rest empty!  Duh!  Problem solved.

Uh, not exactly.  When combined with butane or isobutane, propane actually forms a blend.  The resultant blend has a lower vapor pressure than 100% propane.  Odd as it sounds, you'll actually have less vapor pressure in a canister with 20% propane and 80% isobutane than a canister 20% full with propane alone.  Besides, what good is a canister you can only fill to 20% of capacity anyway?

Basically, you should never fill a backpacking type canister with 100% propane.


But what if you filled a canister to  80% of capacity with butane first?  If you filled to 80% of capacity with butane first and were exactingly careful about not exceeding the overall rated capacity, then maybe this adapter would be safe.  I'm not saying that it is safe, I'm saying that there's the possibility that the adapter might be safe -- from the perspective of the mix of gasses.  The adapter might still have other problems in terms of materials, design, and construction.  The very fact that someone put a dangerous refiller like this together suggests that they really don't know about gasses.  I have NO confidence that such a person has the ability to build a refiller that is safe in other respects.  I'm certainly not tempted to buy one.

Putting it into perspective
Now, am I just a "Nervous Nellie?"  Maybe this is actually pretty safe, but you know this is modern society, and we have to protect people from themselves, don't we?

I submit to you that I am no Nervous Nellie.  I refill my backpacking canisters all the time (with butane!!).  I use a windscreen with my upright canister gas stove.  I sometimes use my stove inside a tent.  In other words, I do all sorts of things that manufacturers tell us not to do lest doom and disaster overtake us.  I do things like refill, use a windscreen, and cook inside my tent because I've studied the objective dangers and found them reasonable for a person who is careful and has an understanding of how to mitigate the dangers.  But I will NEVER fill a standard backpacking type canister with 100% propane.  It's just too dangerous.  Period.

This refill adapter is:  NOT recommended (in the strongest possible terms).

I thank you for joining me on another Adventure In Stoving.

HJ

Monday, March 26, 2012

The New Jetboil Sol

In 2004, backpacking stoves experienced something of a revolution:  The Jetboil PCS was introduced.  The Jetboil PCS is the very definition of a "game changer" -- The Jetboil PCS really shook up the backpacking stove world (in a good way, I might add).

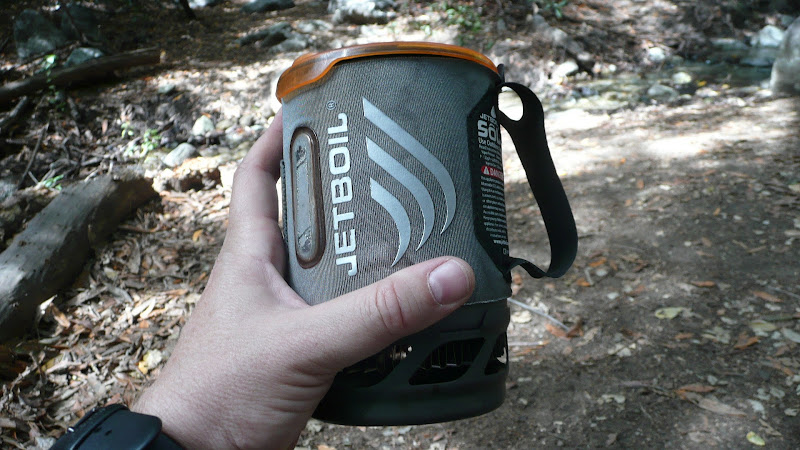
Has Jetboil rested on its laurels?  No, indeed not.  Jetboil is now on what I would consider its third generation of stoves, the new, high-tech Jetboil Sol.
The new, compact, lightweight Jetboil Sol
I've now completed my review of the Jetboil Sol.  Below, I'll list all the blog posts I did in the process of reviewing the stove as well as a to my final review which is hosted on Seattle Backpackers Magazine.  Below the links, I'll include a few items that I didn't have space for in the magazine article.

The new version of the Jetboil has a significantly lightened up burner consisting of far less material.
The new burner of the Jetboil Sol
The new burner includes a much improved piezoelectric ignition system.
The improved piezoelectric ignition of the Jetboil Sol (upper left of burner head)
Included with the pot and burner are the canister legs (stabilizer) and universal pot support.  With the first generation of Jetboils, these items had to be purchased separately.
Universal pot support (top) and folded up canister legs (bottom)
Notice in the below photo that the ground is sloping.  With the high center of gravity of a narrow pot like on a Jetboil, one might be worried about the stove tipping over.
The canister legs help prevent the stove from tipping over
The canister legs make the stove significantly more stable on sloping or uneven ground.

The universal pot support locks securely into place.  This isn't just some cheesey little metal thing that rests up on top of the burner just waiting to be knocked off.  No, when rotated and locked into place, I found that I could suspend the stove from the universal pot support.  Now, that is a solid connection!
You can hold the stove up by the pot supports -- when they're locked in place.
With the universal pot supports, you can use any pot from any manufacturer (within reasonable size and weight restrictions)
A Jetboil Sol with an Evernew 1300ml pot on top
The Jetboil Sol has a lot of nice features, including the ability to do some real cooking (if you're willing to fiddle with the valve a bit -- it's tricky in the lower range of the stove).
Preparing to do some real cooking on a Jetboil Sol
I really like what I see in this the third generation of products from Jetboil.  If a person wanted to get just one stove that would do pretty much everything for three season cooking, the Jetboil Sol will do you.  For temperatures below about 20F (at sea level), I think another stove system might better serve.

I thank you for joining me on another Adventure in Stoving,

HJ

All JetBoil related posts
Coming Soon:

A review of the new Jetboil Sumo pot (1.8 liter)
The new Jetboil Sumo pot (1.8 liter)

Monday, March 19, 2012

Canisters, Cold, and Altitude: Gas in a Nutshell

OK, so here's the deal on canisters in cold weather and at higher elevations, in step-by-step form:

1.  Choose good gas.  For weather below 50°F/10°C, avoid butane mixes. Get an isobutane mix.  I've got all the major US brands sized up on my blog in What's the Best Brand of Gas for Cold Weather?  Above 50°F/10°C, it typically doesn't matter what brand or blend you buy.

2.  Know your limits.  Canisters containing isobutane mixes work reasonably well down to about 20F/-7C at sea level throughout the life of the canister if you use good gas (see item #1, above) and good technique (see item #4, below).  Now, that's just a number, which isn't a bad number if you just want the short version, but if you want to know more about that number, how I came up with it, and how to plan using it, see Gas Stoves: How Cold Can I Go?  Canisters get colder as you use them (canister "chilling") which can negatively impact performance.  See item #4, below, for how to compensate for canister chilling.

3.  Adjust for Altitude.  The higher you go, the lower the outside pressure.  The lower the outside pressure, the colder you can operate a canister gas stove.  You receive approximately a 1F per 1000' of gain colder advantage (about 0.5°C per 300m gain).  The idea that canister gas stoves don't work well at altitude is a myth.

4.  Use good technique.  Basically, start with a warm canister and keep the canister warm.  For "best practices," see Cold Weather Tips for Gas Stoves.

Now, in the above, I'm speaking primarily about "regular" gas stoves, the kind that screw right on to the top of a canister.  If you have a remote canister stove that is capable of inverted operation (see my Stoves for Cold Weather II article in Seattle Backpacker's Magazine for more information), then the limit in item #2, above, changes from about 20°F/-7°C to about 0°F/-18°C.  All of the other items still typically apply.  If you want to go out in weather that is that cold, I strongly suggest you do your homework, part of which should be to read Gas Stoves: How Cold Can I Go?

There, in the proverbial "nutshell," is how to deal with cold weather and adjust for altitude for canister gas stoves.

HJ

Related articles and posts:

Thursday, March 15, 2012

Aluminum JetBoil Sol -- Trail Report #2 and Cooking Report #4

I'd done several cooking reports on the aluminum JetBoil Sol already.
But I wanted to be sure that the JetBoil Sol that I was testing wasn't somehow unique.  So, I called a buddy -- a buddy who owns a JetBoil.

So, I thought I'd do side by side omelettes on two different JetBoil Sol's.  I don't have two identical pans, so we'll just have to do the best we can.

The first pan is an MSR Blacklite, which is a very nice, high-quality backpacking pan.
Eggs cooking up with the cheese already added in an MSR Blacklite fry pan
And pan number two is my $5 garage sale special.  Not exactly the world's best pan, but let's see if we can get enough flame control from a Jetboil Sol to cook an omelette.
Eggs and cheese cooking in pan #2, my "garage sale special"
I allow the eggs to set just slightly, and then I add tuna from one of those convenient foil pouches that are so perfect for the trail.  I've also tried the salmon, and I have to say that I prefer the salmon.  Alas, no salmon today, but we press on.  Looks like the eggs are cooking up nicely so far.
Tuna in the MSR Blacklite pan
Tuna in the cheap, garage sale pan
Well, looks like the omelette in the Blacklite pan is about done.
A finished omelette in an MSR Blacklite frying pan
And our garage sale pan omelette is fully complete.
A fully cooked omelette in a garage sale pan
So, how'd they turn out?  Well, let's have a look.
Two omelettes, one from an MSR Blacklite pan (left) and one from a garage sale pan (right)
VERY nice.  Both omelettes turned out very well.  I got a little more browning on the omelette in the cheap, garage sale pan, but that's to be expected.  Both omelettes were very tasty.

Best of all?  No sticking.
The nice MSR Blacklite pan, as you might expect, was as clean as a whistle.  I really like the non-stick coating.
The non-stick coating in an MSR Blacklite pan works like a charm
And even my cheap, garage sale pan did a pretty fair job.  No burnt food.
My cheap pan isn't as nice as my MSR Blacklite, but it did a pretty fair job of it.
Now, I said that both omelettes were tasty.  But don't take my word for it, goodness, no!  I now turn you over to the very competent hands of the chief tester of the Adventures in Stoving Taste Test Team.  Let's see how our ace tester reacts.

The omelette is served:
"Dad, are you sure this is edible?
And the first bite.

And the reaction:
"Hey, dad, not bad!"
Yes!  She liked it!  Er, I mean, the omelette passed the highly scientific battery of tests prepared by our Taste Test Team.  ;)

Seriously, though, my daughter is an excellent test of the taste of foods.  If she doesn't like it, she's not shy about letting you know.  If any of you are parents of a two-year-old, you know what I mean.

The bottom line?  The JetBoil I tested on was not a fluke.  You can cook on a JetBoil, even with a cheap garage sale pan like mine.  The JetBoil is a lot more versatile than most people think.

I thank you for joining me on another Adventure in Stoving.

HJ


JetBoil related posts

    Aluminum JetBoil Sol -- Cooking Report #3

    I did some fancier cooking in Cooking Report #1 and Cooking Report #2 -- but I didn't use the Jetboil Sol's "cup."  I used a nice MSR Blacklite fry pan.

    So, what about the Jetboil Sol's cup?  Is it only good for boiling water?  Or can it do a little more?

    I thought I'd find out.
    An aluminum JetBoil Sol cup
    So, time to try one of my old standard trail meals, ramen noodles with dried veggies.  For today's cooking, I'll be using an aluminum Jetboil Sol cup.
    One of my typical trail meals, "Sapporo Ichiban" ramen noodles with dried veggies.  
    OK, so I'll spare you the part about boiling the water.  It's safe to say that the Jetboil does just fine there.

    Now, the instructions on these noodles say to first boil the water, then add the noodles, and then to cook these noodles over low heat for three minutes.  Low heat for three minutes?  Can the Jetboil do it?  Let's try.

    OK, so in go our noodles.
    Noodles simmering in a Jetboil Sol
    Then let's mix in our dried veggies.
    Noodles with veggies added
    And then, let's cover and simmer for a while.  Getting a low flame on a Jetboil Sol is a bit of a trick, but it can be done.
    Low flame on a Jetboil Sol
    And three minutes later?
    Nicely re-hydrated noodles and vegetables.  Yum!
    Say, now that's not bad at all!  Why those noodles and vegetables are positively fluffy.  Nice!

    And, best of all,
    I encountered no burnt on food when simmering noodles for multiple minutes in a Jetboil Sol cup
    No burning or sticking.  Nice!  :)

    So, is the Jetboil Sol's cup able to be used for more than just boiling water?
    Noodles prepared on a Jetboil Sol
    Yes, I'd say the Jetboil Sol is up to the task.

    Again, please note that I used the aluminum Jetboil Sol cup.  This report does not cover the titanium version.

    Thanks for joining me on another Adventure in Stoving.

    HJ


    JetBoil related posts