QuietStove.com

Showing posts with label gear review. Show all posts

Sunday, March 20, 2011

Stove of the Week: Primus Omnifuel

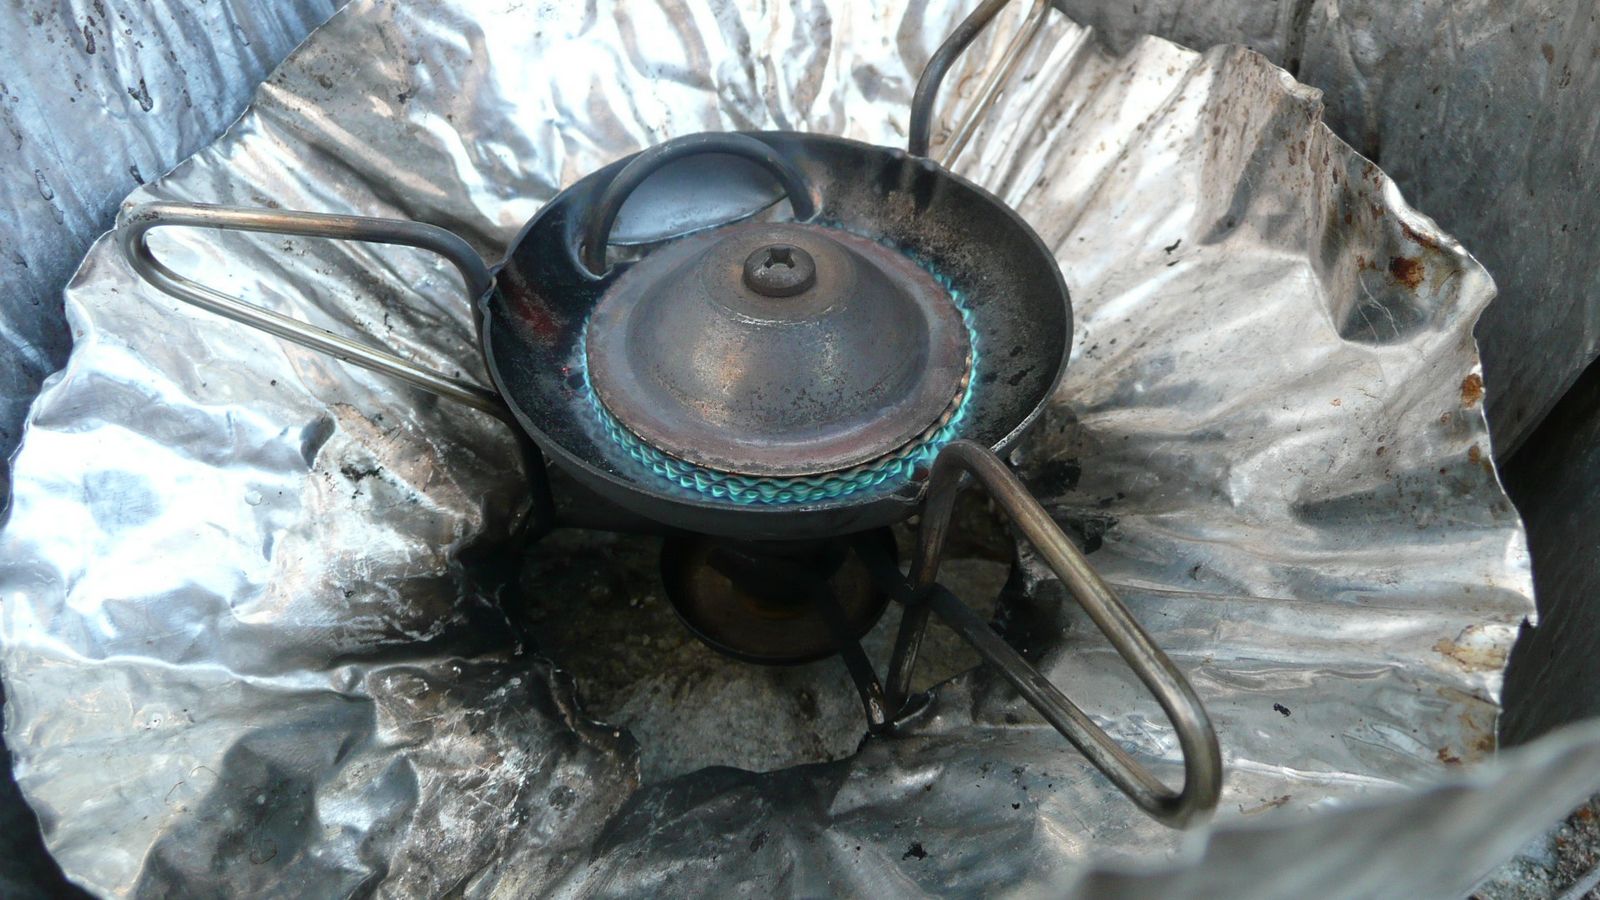
If you want a stove that runs like a Swiss watch, then the Primus Omnifuel is your stove. It's precision engineering at it's best.  I mean this thing is a stovie's dream. Just look at that beautiful blue flame. 

The pump's action is a smooth as silk.  Everything fits together just so.  This is one high end stove.  But enough praise, let's take a look.  First, the burner.
It's a roarer style burner.  I expected it to be loud, as most roarers are, but I was pleasantly surprised.  It's really quite quiet for its type. However, one would hardly refer to the Omnifuel as quiet when the flame is on high.  The Omnifuel's three legs make it quite stable, and the pot supports are well engineered to accommodate a wide (and narrow!) assortment of pots.


The pump is sturdy aluminum, a far more robust pump than, say, a plastic MSR pump.  One interesting feature to the Omnifuel is it's rotating attachment to the fuel pump.  In order to run the stove, one rotates the fuel tank around the axis formed by the valve to the "ON" position (as seen in the below photograph).  The black grooved piece of plastic that you see immediately to the left of the pump rotates freely.
To turn the stove off, one again rotates the fuel tank around the axis formed by the valve into the "OFF" position.  In the "OFF" position, the dip tube, which would normally be in the lowest portion of the tank, submerged in fuel, now points upward and just draws air.  This air now flows out through the valve, clearing the fuel line and depressurizing the fuel tank.

It's worth noting that the threads on the Omnifuel's pump will fit Primus, Snow Peak, Sigg, MSR, Optimus, and Brunton fuel bottles.  Here, the Omnifuel is shown with an MSR fuel bottle.

The Omnifuel, as the name implies, will run on both of the standard petroleum liquid stove fuels, "white" gasoline (Coleman type fuel) and kerosene.  The Omnifuel is not designed to work on alcohol.  In a pinch, the Omnifuel can be run on unleaded automotive gasoline or diesel.  Of course it will not run as cleanly on unleaded or diesel and will require more frequent cleaning.  Use non-standard fuels like unleaded or diesel only when absolutely necessary.  The Omnifuel's manual states that leaded automotive gasoline should not be used "for health reasons."  As much as I like stoves and as much as I'd like to do a thorough review, I'm not about to personally test that health warning!  I imagine that you could run the Omnifuel on aviation gasoline or jet fuel as well, but again do so only when absolutely necessary.

Now, all the preceding regarding fuel is pretty standard fare for a multi-fuel expedition type stove like the Omnifuel, but there's another standard fuel out there that I haven't yet mentioned:  canister gas.   
The Omnifuel can run on the same gas canisters that power such popular stoves as the MSR Pocket Rocket and the Jetboil PCS.  It's really quite ingenious how Primus managed to allow not only liquid but gas fuel to be used.  The connection between the pump and the fuel line is a 7/16ths UNEF threaded male connector -- the exact same connector as on a gas stove.  If one wishes to use gas, one screws the connector into a canister of gas.  If one wishes to use liquid fuel, one screws the connector -- the very same connector -- into the pump.  Quite clever.  Indeed, other stove manufacturers, such as Brunton with the Vapor AF and Coleman with the Fyrestorm, are copying this idea.  I don't know for a fact that Primus originated the idea, but if Primus was not the first, they were among the first, and certainly the Omnifuel is a fine implementation of the idea..
For cold weather, the Omnifuel can operate with the canister inverted, that is it can operate in liquid feed gas mode.  Normally, one would invert the canister only if a stove has a pre-heat loop (aka generator) which the Omnifuel does not  However, since the Omnifuel can burn liquid fuel, which must be vaporized at the burner, it can therefore vaporize liquefied gas.  In liquid feed mode, the Omnifuel should easily operate in temperatures down to 0F/-18C, provided that you use canisters that contain some blend of either isobutane or regular butane with propane.  Canisters of 100% regular butane will not work in cold weather.  If one employs various means to keep the gas canister relatively warm and uses a winter grade fuel (a propane blend with no regular butane), one can operate the stove in far lower temperatures. The ability to run on canister gas, which requires no priming, is a big plus if the weather is really horrible and you want to cook inside your tent.  I personally do not find the idea of priming a stove inside a tent to be appealing.

The Omnifuel comes with jets with three different sized apertures, one jet for each of the three general classes of fuel:  gas (0.45mm), gasoline (0.37mm), and kerosene (0.28mm).  Each jet aperture size is optimized to burn efficiently the fuel for which it is intended.  The lighter the fuel, the larger the aperture size.  The heavier the fuel, the smaller the aperture.  While it is best to run the stove with the correct jet for a given fuel, my experience is that the stove will work reasonably well with mid-sized aperture jet on both gas and gasoline.  I have not, as of this writing, tried all possible combinations of jets and fuels.


Let's take another look at the burner.
Note the wire handle attached to the rigid portion of the fuel line.  This handle controls an "at the burner" valve.  A valve that close to the burner allows one to very precisely adjust the fuel and therefore the flame.  The Omnifuel has excellent simmering capabilities, no matter the fuel.

Now, a mild word of caution.  Stoves with a valve at the burner generally require a bit more maintenance than those that do not.  I am not saying that the Omnifuel is in any way unreliable.  It is a well designed, wonderful stove.  However, generally speaking, stoves with a simpler design, i.e. without the valve at the burner, require less maintenance.  With good quality fuels, there should be little problem.  However, were I going to some remote third-world location where the kerosene is likely to be quite unreliable as to its purity, I might be tempted to take a simpler stove, perhaps something like the MSR XGK.

At this juncture, let me make mention of a worthwhile aftermarket modification to the Omnifuel:  the Omnidawg silent cap.  The Omnidawg silent cap replaces the roarer plate in the Omnifuel's burner.  The Omnidawg greatly reduces the roaring noise of the burner.  I did a video review of the Omnidawg cap which I will link to below.  You will see me running the Omnidawg cap on an MSR Dragonfly stove because I didn't have an Omnifuel at the time I made the videos.  In actual field use, the Omnidawg cap works every bit as well on an Omnifuel as it does on the Dragonfly in the videos.  I haven't got the means to run the number of controlled trials necessary to establish this, but my gut feel is that the Omnidawg cap puts out more power than the roarer plate.  This perceived increase in power may be due to improved air gas mixing inside the cap, leading to increased efficiency in the flame.  Again, this is my gut feel only; I have no hard data on this.  Whether it increases efficiency or not, the cap runs extremely well and is very quiet.  People have asked in connection with the videos, so in hopes of heading off a lot of questions, let me publish the following information:  Omnidawg caps are available on eBay through seller "hugecanine."  The caps are hand made and are not always available.


Note:  I was approached by the producer of the Omnidawg cap and asked to do a review.  As a part of the review process I received an Omnidawg cap.  Other than the cap itself, I received no remuneration for my review.  The receipt of the Omnidawg cap was not contingent on the nature of my review (in other words I didn't have to promise to do a positive review in return for the cap).  Further, I receive no part of the proceeds from the sales of Omnidawg caps.  All comments regarding the Omnidawg cap on this page and in the linked videos are strictly my own and do not necessarily reflect the views of the producer of the Omnidawg cap.

Well, there you have it, a brief look at the Primus Omnifuel, a truly wonderful stove and a personal favorite.

HJ

The Primus Omnifuel
What's good about it?
Truly multifuel, burns all standard petroleum based fuels, including canister gas.
Precise, easy simmering
Precision engineering.
Relatively quiet for a roarer type burner
Extremely quiet with an Omnidawg cap
Powerful
Reliable
Stable
Efficient

What's bad about it?
Expensive
Relatively heavy compared to typical canister gas stoves
A bit bulky compared to typical canister gas stoves
May require more maintenance than simpler designs

Overall, highly recommended.

Other Primus Omnifuel Related Posts
Primus Omnifuel vs. MSR Whisperlite Universal -- A comparison

Tuesday, March 15, 2011

Stove of the Week: MSR Rapidfire

OK, so this week's stove is a bit of a "sleeper" in the sense that it's not a stove that you would expect a lot from -- unless you knew better.  But you'll have to read on to find out what's so interesting about this week's stove, the MSR Rapidfire.

First, let's go through our usual run down of the stove, and then we'll get into some of it's unusual qualities.  So, what's with this thing called a Rapidfire?  Isn't it just a Whisperlite?  I mean seriously, just look at it.  It's a freakin' Whisperlite for crying out loud.

Or is it?  Take a look at the bottom of the burner column.  Hmm.  No priming cup.  OK, so what the Dickens is this thing?  Well, it is a close relative of the Whisperlite all right, but made to run on canister gas.
The Rapidfire was MSR's first entry into the gas stove market.  Prior to the Rapidfire, MSR was a liquid fuel only stove manufacturer.  When MSR saw how gas stoves were really catching on, they needed an entrant into the market.  How better to get there than to simply modify their existing "workhorse" stove, the Whisperlite?  Enter the Rapidfire.  Apparently, MSR was pretty paranoid about the volatility of gas as compared to liquid fuel; they really lengthened the fuel line which is odd when you consider that now the majority of MSR gas stoves mount directly on to the canister.

The stove itself is identical to the Whisperltie except for the aforementioned lack of a priming cup.
Instead of a priming cup, there's a threaded, knurled ring that holds the fuel line and legs in place.
At the end of the fuel line, there's a gas connector and valve rather than the open ended tube with aluminum block and catch-arm of the Whisperlite.
Now take a careful look at that connector.
Note the central pin.  It is this pin that depresses the Lindal valve inside the canister of gas.  I've seen these pins go missing.  No pin, and essentially you've got no gas.  Second, note the black rubber "O" ring.  This "O" ring must be in place for you to operate the stove safely.  Without the "O" ring, gas may leak which could be quite dangerous.

Speaking of gas, it's worth mentioning here that the MSR Rapidfire stove can use any standard threaded backpacking gas canister.  Originally, the Rapidfire used a cylindrical gas canister, but that canister had the same 7/16" UNEF standard thread as used on today's dome shaped canisters, so there's no problem with respect to finding fuel even though the Rapidfire is an older stove.  MSR discontinued production, to the best of my ability to discern, in 2001.

OK, so MSR needed a gas stove, so they pressed a modified Whisperlite into service, so what?  I mean does this Rapidfire have any redeeming features or is it just some kludgey attempt to not let all the other stove manufacturers run away with the gas stove part of the stove market?  Actually, the Rapidfire has several features that distinguish it from typical gas stoves, one of which actually makes the Rapidfire potentially pretty worth owning.  I'll get to that in a moment.
First, the Rapidfire, like its progenitor the Whisperlite, is a remote fueled stove.  In other words, the fuel is not directly attached to the burner but rather fuel is brought in via a fuel line from a remote source.  This does several things for us:  1) since there's no fuel tank under the burner, the burner is lower which brings us out of the wind.  2)  Also since the burner is lower, the stove is more stable.  3) Lastly and most importantly, since the fuel isn't local to the burner, we do not have to worry about heat radiating from the burner and overheating the fuel -- which means we can use a windscreen with complete impunity.  Use a windscreen the wrong way on a typical canister stove, and you could turn your stove from a domestic servant into a domestic terrorist.  Overheated canisters can and do explode.

Speaking of windscreens, here's a Rapidfire all set up with a heat reflector and windscreen, a very efficient cooking set up.

Now, I keep blathering about something special about the Rapidfire.  Let's take a closer look at the burner itself shall we?
Do you see that loop in the burner?  That's the fuel line.  That loop is referred to as a pre-heat loop (or generator).  The loop is exposed directly to the flame when the stove is in operation.  Fuel flows into that loop before it enters the burner, which greatly heats the fuel.  In a liquid fueled stove, that heat is what turns the liquid into a vapor so that it can be burned.

Well, that's just great, Jim, but we're working with gas here, so who really cares?

Are you?  Really?  Pick up a full canister of gas and shake it.  Hear that sloshing sound?  That's a liquid in there.

OK, great, it's a liquid in the can but it's a gas when it comes out of the burner, so I still don't care about that pre-heat loop; can we just move on?

Well, not so fast there.  Yes, you're right, it is a gas when it comes out of the burner.  Usually.  But what about cold weather?  Gotcha.  That's the problem with gas stoves.  They lose power when the weather gets below freezing because the liquefied gas in the canister won't vaporize properly.  Remember that pre-heat loop?  There's our answer.  In cold weather, we let the liquefied gas stay liquid, and we let the pre-heat loop vaporize it for us.  In that way, we don't care if it's cold or not.  We don't use the air temperature to vaporize our gas, we use the heat of the flame.

Uh, great Jim, but the connector attaches to the top of the canister, and all it's going to draw is gas off the top.  If there's no gas, we've got no fuel.

This is not a problem.  Just turn the canister over.  Note:  Do not invert the canister on a gas stove that does not have a pre-heat loop.  A serious flare up might result. 
The top of the canister is now the bottom.  That portion of the fuel that is in vapor form now acts to pressurize the canister, pushing liquid down, out of the canister, and down the fuel line.  The fuel stays in liquid form until it hits the pre-heat loop where the high heat causes it to change from liquid to gas.  The resultant gas comes rushing out of the burner, and baby you've got flame.  Note that the stove is in operation in the above photo.  When gas is fed in liquid form to the burner, the stove is said to be in liquid feed mode.  Note that I said liquid feed not liquid fuel.  The fuel will still be a gas at room temperature and pressure.  We haven't changed fuel; we've merely changed the form that the fuel is fed in.
Using a gas stove in liquid feed mode is an important capability for a couple of reasons:
1.  Normal gas stoves operate in vapor feed mode, that is the fuel is fed in as a vapor, and you have to rely on the ambient temperature to vaporize your fuel.  In liquid feed mode, you rely not on the outside temperature but on the heat of the flame.  Stoves in liquid feed mode will operate in colder weather than normal gas stoves.
2.  In normal gas stoves, the fuel is typically a propane-butane or propane-isobutane blend.  Propane, the gas that works best in cold, has a higher vapor pressure and burns off faster leaving you, toward the end of the life of the tank, with a tank full of your worst performing cold weather fuel. In fact, you may wind up with a canister that is still 30% full that you can't coax any gas out of because all the good propane has burned off and nothing is left but the lesser performing fuels.  In liquid feed mode, all the fuels are burned at a constant rate.  The fuel towards the end of the life of the canister is the same mix as at the start of the canister.  In liquid feed mode, you don't get such horrible "canister fade" like you do in vapor feed mode.

I normally recommend a cut off of about 20F/-7C for normal gas stoves -- and that's with using "tricks," having to put up with less-than-stellar performance, and potentially having fuel that you can't get to vaporize.  With a gas stove in liquid feed mode, you can easily go down to 0F/-18C without having to use a lot of tricks, with full performance, and without having a portion of your fuel being unusable.

In other words, with a gas stove in liquid mode, you get all of the convenience of gas without all the low performance and hassles associated with gas in cold weather.  Uh, couldn't I just use a regular liquid fueled stove?  Sure.  If you're comfortable with liquid fuel, go for it.  But consider this:  If it's really snowing hard and you need to cook inside your tent do you really want to use liquid fuel?  What happens if your priming gets a little out of hand?  With a gas stove in liquid feed mode, you get liquid fuel performance but without the danger of priming.  And of course you get all of the usual convenience of a gas stove.  One of those conveniences is simmering.  It's pretty tough to get the typical Whisperlite to simmer like this:
And that's without monkeying around with only filling the fuel bottle half full and only pumping a few strokes.  Easy, just about automatic simmering in other words.

Now, in all fairness, other remote canister gas stoves have pre-heat loops. Other remote canister stoves can operate in liquid feed mode.  What makes the Rapidfire a "sleeper" -- a stove you wouldn't expect much from but turns out to be a pretty good stove?  Well, take a look at the price tags on some of those stoves out there that are remote canister stoves and have pre-heat loops.  They're expensive.  The Rapidfire is an older, discontinued stove, most people haven't heard of it, and you can pick one up for a much more reasonable price than you can some of the current production stoves.  All the performance at a fraction of the price.  You heard it here on Adventures in Stoving.  :)  Also, the Rapidfire's fuel line rotates easily at the connector which makes it easy to invert the canister to put the stove into liquid feed mode.  The Rapidfire's more modern cousin, the Windpro, does not rotate easily at the connector.

Yep, the Rapidfire is a "sleeper," but don't underestimate this stove.  It's a lot of stove for the money.

Well, looks like the kettle's boiling.  I'd best get to that cup of hot chocolate before it gets cold.

Thanks for joining me on another Adventure in Stoving.

HJ

The MSR Rapidfire
What's good about it?
Able to operate in liquid feed mode
Economical
Can use a full windscreen with impunity even though it's a gas stove
Simmers well
Connector rotates easily for liquid feed mode
Quiet
Fairly compact
Reasonably powerful
Reliable
Stable
Efficient

What's bad about it?
The wire pot supports are difficult to get back into "true" if they get bent.  (so don't bend them!)
The fuel line is a little stiff particularly when compared to newer stoves like the WindPro.
A tad heavy when compared to newer stoves like the WindPro.

Overall, recommended.

Thursday, March 3, 2011

Stove of the Week: MSR Whisperlite (Pre-Shaker Jet)

In 1980 Mountain Safety Research (MSR) was bought out by Recreational Equipment Incorporated (REI).  Prior to the buy out, MSR was mainly a fairly specialized equipment manufacturer catering mostly to mountaineers. REI wanted to change that and turn MSR into a company that would cater to a wider audience.  One of the first big projects undertaken during the REI years was the MSR Whisperlite.

Prior to the Whisperlite, MSR stoves all had roarer type burners.  As the name "roarer" implies, such burners tend to be rather noisy.  MSR therefore decided to go with a different type of burner, a baffled burner, which is a far quieter type of burner.  To herald this change, MSR named the stove the Whisperlite. Indeed, I've had friends remark on just how quiet the Whisperlite is compared to other stoves. The "lite" portion of the stove's name, as one might expect, reflects the fact that the Whisperlite was at that time MSR's lightest stove.  MSR had another goal:  to produce an economical stove that would have broader appeal than the higher end stoves that they had theretofore been producing.  In this regard, MSR hit a home run, launching one of the most successful of modern white gasoline type stoves.  Introduced in 1984, the Whisperlite is still sold today.  Backpackers quickly adopted the Whisperlite despite its occasional clogs.  In a survey of through hikers on the Appalachian Trail in 1989, the number one most commonly carried stove was the Whisperlite, and this only five years after its introduction.  In about 1996, the Whisperlite's jet was redesigned.  MSR made the jet larger and inserted a weighted cleaning needle.  When the stove was shaken up and down, the weighted needle would move in and out of the jet's orifice, clearing the jet.  MSR named this redesigned jet after its method of use:  the shaker jet.  Unfortunately, MSR stoves with the shaker jet generally do not simmer as well as pre-shaker jet models. Now why the average person couldn't simply use the wire pricker to clean the jet I am not sure, but MSR apparently felt that they needed to do something to allay customer's fears about clogs.

Well, let's have a look shall we?  This week's stove is the pre-shaker jet version of the MSR Whisperlite.    The early Whisperlites came with this red stuff sack, marked with the MSR "Matterhorn" logo:

These older stuff sacks are in my opinion nicer than the newer black stuff sacks.  The old red stuff sacks included small pockets which were handy for holding spares, matches, a lighter, etc.

The Whisperlite is a fairly compact stove, certainly more compact than its predecessors, the XGK line of stoves or the Firefly. 
I should mention that this particular stove is special to me:  This is my very first pack stove.  I bought it from Sport Chalet in La Canada in about 1987.  It has served me faithfully for now almost a quarter of a century with very few problems.
The early Whisperlites came with a fabric covered rubber fuel hose that was crimped at both ends.

Later versions came with a woven metal sheath with brass fittings on either end.  The later fuel lines are generally superior to the earlier ones.

Well let's assemble her and get ready to fire her up.  Here are the basic components (clockwise from top, left):  The burner, the fuel bottle with windscreen wrapped around it and fuel pump in place, and the heat reflector.  Tip: Note that I have wrapped the windscreen around the fuel bottle.  This helps prevent the windscreen from getting all bent up when packed and avoids having to fold the windscreen for storage.  The points at which windscreens are folded often become points of failure.  Believe it or not the windscreen shown in the photo is the original windscreen that came with this stove that I purchased in about 1987.  I keep the windscreen wrapped as shown, and then I put the whole ensemble in a plastic bag before I put the fuel bottle in my pack.  This technique protects not only the windscreen but also the contents of the pack from damage.  I also put my burner in a small plastic bag before placing it in the stuff sack.  This keeps the inside of the stuff sack clean.  Tip:  Note also that I keep the pump in the bottle when in the field.  I leave the bottle's cap at home.  Do be sure to release the pressure when the stove is not in use.  Do not release the pressure near the stove when the stove is hot.  Release the pressure away from flame or heat sources.

Here's a photo of the heat reflector unfolded.  Note the hole in the center.
The legs of the stove, while still folded, are inserted through the hole...
...then the heat reflector is moved up around the mid section of the burner...
...and then the legs are rotated into position.  The "hourglass" shape of the legs holds the heat reflector in position above the fuel line and below the burner.
This is a good design and when combined with the windscreen makes for efficient cooking.  In later models of the heat reflector, MSR removed the center hole.  This is most likely a cost cutting measure.  The heat reflector, instead of sitting just below the burner now sits underneath the whole stove.  This is a bad idea for two reasons:  1.  Now the reflector is farther away from the burner which is less efficient and 2. the aluminum reflector is slick.  Putting a stove on a slick surface on uneven ground invites the disaster of the spilled supper.  The original design was better.  One can improve the newer heat reflectors by cutting the hole oneself or one can simply omit the heat reflector.  The heat reflector does make the stove more efficient, but the reflector is not essential on newer stoves.  On older stoves that have the fabric covered fuel line, I recommend that you always use the heat reflector lest heat damage the fuel line in some way.

After the reflector is in place, emplace the windscreen.  Early MSR windscreens had a diagonal cut on the lower corners of the windscreen.  When the ends were joined, a small "V" shaped opening remained.  One is supposed to thread the fuel line through the "V" as shown.

The only problem with this is that if one has a smaller pot, then a substantial gap will exist between the edge of the pot and the windscreen.  Wind can enter via this excessively large gap, reducing the effectiveness of your stove.
What I prefer to do is to wrap the windscreen more tightly and hold it in place with a paper clip.
Note that in the second photo, the gap is reduced but not eliminated.  Because of the reflector, it's difficult to reduce the gap further than shown, but the reduced gap that we do have should buy us some increased efficiency.  If one were having trouble in higher winds, one could curl the edges of the heat reflector upwards so that the windscreen could be drawn more tightly around the pot.

Now, in drawing the windscreen more tightly around the pot, we've closed the little "V" shaped opening, but this is no big deal.  Simply place the windscreen on top of the fuel line.

Yes, there is now a bit of a gap between the ground and the lower edge of the windscreen, but in practice I have not found this gap to cause any trouble.  In really windy conditions if wind were sweeping in through this small gap, one could pile up dirt to close the gap.

Now, let's get some water from the creek.  By the way, boiling water is the most effective treatment for killing water borne pathogens and is more effective than filtering, ultraviolet treatment, or chemical treatment.

Now, we'll need to prime the stove.  You can prime the stove with the stove's own fuel, white gasoline, but I prefer to bring a small squeeze bottle of denatured alcohol.
Why alcohol?  First, it's hard to control the amount of fuel dispensed when using the stove's own fuel.  Too much fuel, and you can get a very large "soccer ball sized" fireball (MSR's words).  It's easy to control how much alcohol is dispensed from a squeeze bottle.  Second, alcohol burns more cleanly and leaves less soot on your stove.  Third, alcohol is less volatile which further reduces the chance of a fireball.  To prime, squirt in some alcohol, fire it up, let it burn down a bit, and then just as the priming flame is about to go out, open the stove's valve a bit to add fuel.  I typically open the valve just a crack and then immediately close it, allowing the flame to burn down a bit before opening the valve again.  I go through a couple of iterations of opening the valve a crack, closing the valve, letting the flame burn down a bit, and then opening the valve again before I leave the valve open.  This sounds complicated, but after a few times of doing it, it becomes second nature.

When your stove is fully warmed up, your flame should be a nice steady blue and should look something like this.

As I mentioned, with pre-shaker jet Whisperlites, it is possible to get them to a relatively low flame.  Compare this flame.
With this flame.
Yes, a Whisperlite can simmer.  It's not automatic, but it can be done fairly easily on a consistent basis.

Well, it looks like my water is boiling,

so it's time I had a cup of cocoa...

...here in this little nook that I call "Stove Test Area 2.".


I thank you for joining me on another adventure in stoving.

HJ.

The MSR Whisperlite
What's good about it?
Economical
Quiet
Fairly compact
Reasonably powerful (not as powerful as an XGK)
Reasonably Reliable (not as reliable as an XGK)
Stable
Efficient

What's bad about it?
Difficult to simmer (although pre-shaker jet models simmer pretty well)
The wire pot supports are difficult to get back into "true" if they get bent.  (so don't bend them!)
The fuel line is a little stiff particularly when compared to newer stoves like the Simmerlite.
A tad heavy when compared to newer stoves like the Simmerlite.

Overall, recommended.  This is a good, economical basic stove for those who want a liquid fueled stove.

Saturday, February 19, 2011

Stove of the Week: MSR Reactor

Sometimes, technology can be brought to bear in ways that change the very game.  So it is with the technology of the MSR Reactor.
Hail the inferno; this is the hottest stove out there.  It boils water faster than anything else I've ever seen.  It's not light, it's not cheap, but dang is it effective.

Let's take a look.  Here's a Reactor all packed for travel. The handle locks across the clear lid holding everything securely.
Inside you can fit an 8oz/230g canister of gas, the burner, and a little bit more.  I've got it wrapped here in a wash cloth just to prevent rattling.  It could easily accommodate a spoon and a lighter.  One pushes the "ball" on the left side of the handle.  The handle springs up.  One then unfolds the handle, like so:
I like the fact that the handle locks down, holding everything in place, but herein lies a vulnerability.  The small piece of metal shown below is all that holds that handle in place.

Every time that handle is folded or unfolded, that small piece of metal has to bend.  Repetitive bending of a metal = metal fatigue = failure.  I've not heard of failures of this point, but they inevitably will come.  How soon?  I can't say, but I think this is a weakness in the design.  Note:  I don't mean to sound alarmist here.  I don't think the handle will fail immediately. I think we're talking about years here not days or months. 

Another nice feature, the burner nestles up inside a 8oz/230g sized gas canister.

OK, so it packs up nicely.  Fine.  But what the Dickens is all the buzz about?  I'll tell you.  HEAT, baby, heat.
The MSR Reactor is all about putting heat into whatever is in your pot.  How does it do it?  First, with a radiant heat burner.  It burns fuel, but not in an open flame like a normal burner.  Instead, the burner head is heated by the burning of gas and then heat is radiated into the pot.  The radiant heat burner:
Heat is transferred first by a fairly tight nesting of the burner underneath the pot.
And then by an integral heat exchanger

Wind?  Not a problem.  When the pot is mounted on the burner, you can't even see the burner.
Heat flows from the burner to the heat exchanger into the pot.  Any exhaust heat is forced up along the sides of the pot until it reaches the vents seen in the above photo, a process transferring yet even more heat to the contents of your pot while still being almost totally protected from the wind.  In a 100 mph gale on top of an exposed plateau at 15,000' (4500m), this is the stove to have.  Note also that I'm holding the burner at a steep angle.  The pot doesn't budge. If you jostle your pot in tight quarters, no problem.  Your pot -- and your supper -- are staying right where you put them.  No tippy, slidey action here.  Still, not a bad idea to put a set of "legs" under your canister if you've got 'em.  The Brunton CanStand, Primus Foot Rest, and JetBoil tripod stabilizer all should fit an 8oz/230g sized canister.  The JetBoil version is shown here.


Another nice feature?  How about liquid measurement lines on the inside of the pot?

And don't forget the little pack towel they give you.  I use it to protect the bottom of the burner -- and the bottom of the pot.

One caution:  This is a seriously hot stove.  A friend of mine walked away for a minute and got distracted.  When he got back, the pot had not only boiled dry, it had melted.  It's a dang good thing that his canister didn't overheat and explode.  As it was, he lost his pot.  He could have lost a whole lot more.  This is a stove that you want to keep an eye on.

Well how about at the other end of the temperature range?  What about simmering? Well, the Reactor quite frankly has a bad reputation in the simmering department.  But lack of simmering is not a given with the Reactor.  There are a lot of individual variations Reactor to Reactor, and some of them do simmer if you're patient and willing to fiddle with them.  Here's a Reactor on low flame.
For a bit more on how to simmer, I'll refer you to this YouTube video that I put together.

Now, the question that is probably on every serious mountaineer's mind is, "how is it at melting snow?"  It's great.  It's super hot; it's wind proof; what more could you want?

Ah, but high tech though it is, it is still constrained by the laws of physics and therein the problem lies.  This is an upright canister stove.  On an upright canister stove, vaporized gas is fed to the burner where it is combusted, producing heat. In cold weather, gas doesn't vaporize very well.  There are a lot of factors that control whether or not a given upright canister type stove will work well in cold weather (you can see some of my other blog posts for more about this) and a Reactor will do better than some, but high tech or no, there's a point at which your fuel simply will no longer vaporize.  There are tricks you can employ like sleeping with the canister at night or carrying the canister inside your jacket by day and then using the first gas in the warm canister to heat up some water which is then placed in a spare pan into which you place the canister, but tricks like that can only take you so far.  My working number is 20F/-7C.  Below that, you begin to push your luck with an upright canister stove.  For all its technology, the Reactor cannot escape the constraints of physics.  Is it a good snow melter?  Sure.  Down to about 20F, maybe even a little lower.  But somewhere around that temperature 20F, you run into a hard stop, a hard stop that the Reactor's technology simply cannot overcome.

Note:  if you're a serious mountaineer and you're ascending to very high altitudes, you can operate a Reactor at lower temperatures than 20F.  Gas will vaporize at a lower temperature at higher altitudes.  But you'd better do your homework and understand just what the Reactor's temperature limitations will be for the altitude you'll be at.  Guess wrong and you've got no stove.  No stove = no water = dehydration which can lead to hypothermia which can lead to death.

Bottom line?  This is a great stove, but in cold weather you'd better darn well know it's limitations.

Thanks for joining me on another adventure in stoving,

HJ

The MSR Reactor

What's good about it
Hot
Wind proof
Stable
Hot
Well thought out
Extremely functional
Hot
Packable
Reasonably Efficient (if you don't run it on high)
Hot
Can nest an 8oz/230g gas canister inside the pot.
Liquid measures delineated on inside of pot
Did I mention hot?

What's bad about it
Expensive 
Heavy 
Bulky
Can eat a lot of fuel if you run it on high
Limited by it's upright canister type to temperatures of about 20F.
Can be tough to simmer.